Raspberry Pi 500 — a review
I’ve had several Raspberry Pi Single-Board Computers in the past and used them in interesting ways. Many years ago I even used one as a firewall for my home lab. But now the Raspberry Pi 500 is here, and it’s already assembled for those who just want to plug it in and go.
First look
I just recently received my own Raspberry Pi 500 and have been giving it a good workout. It’s a pretty amazing little computer, with an impressive set of specifications.
- 8GB LPDDR4X-4267 SDRAM
- 2.4GHz quad-core 64-bit Arm Cortex-A76 CPU, with cryptography extensions, 512KB per-core L2 caches and a 2MB shared L3 cache
- 32GB Class A2 microSD included
- Dual-band WiFi
- Gigabit wired Etherenet
- 2 × USB 3.0 port
- 1 × USB 2.0 port
- Bluetooth 5.0
- Horizontal 40-pin GPIO header
- 2 × micro HDMI® port (supports up to 4Kp60)
- H.265 (4Kp60 decode)
- OpenGL ES 3.0 graphics
- SD card support: microSD card slot for operating system and data storage
- Keyboard: 78-, 79- or 83-key compact keyboard (depending on regional variant)
- Power: 5V DC via USB connector
This robust device is tucked into a regional keyboard and mounted on a single-piece heat-sink for efficient cooling. It’s all very compact inside it’s 78-key keyboard.
The Raspberry Pi 500 ships with the micro-SD card containing Raspberry Pi OS installed so there’s no need to download an image or install an image on a card. I like this a lot because it makes it easy to get started. It’s also easy to try other operating systems without the need to deal with dual boot. Just remove one micro-SD card and replace it with one containing a different distro. I plan to try Fedora for the Raspberry Pi 500 but haven’t yet.
Raspberry Pi Monitor
Every computer needs a good monitor, and the compact 15.6-inch Full-HD IPS Raspberry Pi Monitor is an excellent one. It can be powered directly from one of the Raspberry Pi 500’s USB ports but you can get higher brightness levels using a separate power supply for the monitor. It can be mounted to a VESA stand or used with its built-in stand. The monitor can’t be laid flat when in use as the cables exit from the rear.
Despite being relatively small and very lightweight, the Raspberry Pi Monitor produces an excellent image that’s crisp and clean. The monitor also has built-in speakers that produce a reasonable audio reproduction within their limited frequency range. Not that any other speakers that I’ve seen built into a display or laptop are any better.
There are two drawbacks to this excellent monitor. The first is that the minimal controls are on the back. Power, brightness, and volume controls are easy to use but require access to the rear of the display.
The second is that it won’t sync up with the high resolution display adapter on my primary workstation. I just tested this configuration out of curiosity so it’s not a problem, just an interesting anomaly.
This Raspberry Pi Monitor is so good I bought a second one for use with my System76 laptop and it works great with that. The price is excellent at $100US.
First boot
The first boot of Raspberry Pi OS is the when you do the initial configuration.
After turning on the monitor and the Raspberry Pi 500, the Raspberry Pi OS boots to a series of dialogs with configuration questions, such as pairing Bluetooth keyboards and mice, setting the locale, and user creation. Unless you take some extra steps later, you can only create one user acount. For most users, this will be enough.
It then displays a list of available WiFi networks. The list is in alphanumeric order, not by signal strength so that was a bit confusing at first. Select the desired WiFi network and login to it.
After connecting to WiFi, it asks you to select the default browser. The choices are Chromium and Firefox. I always choose Firefox. There’s also a nice box to check that will uninstall the unused browser. That’s a nice touch that illustrates how well thought-out the Raspberry Pi OS is. I chose to leave Chromium installed so I can experiment with it.
The next choice to make is that of Raspberry Pi Connect. This is a service that allows you to login and use your Raspberry Pi 500 from anywhere. That’s not something I need so I did not activate it.
The Raspberry Pi OS then displays one last dialog to inform you that the next step is to download and install all available updates. I clicked on Next to start that process. You can instead choose to not install updates, but there’s no reason to skip this step. But if you do skip it, you can still do updates at any time from the desktop. It took about 6 minutes to download and install the updates, and the last dialog is to restart the Raspberry Pi 500. Which I did.
Then — one more thing. A dialog is displayed that asks whether you want to switch to a new version of Wayland. The old compositing window manager (compositor), wayfire, would not be compatible with Raspberry Pi hardware for much longer so wasn’t seen as a viable long-term solution for the graphical compositor. Labwc, the new compositor, is much better suited for Raspberry Pi hardware. I decided to respond by clicking the “Switch to labwc” button.
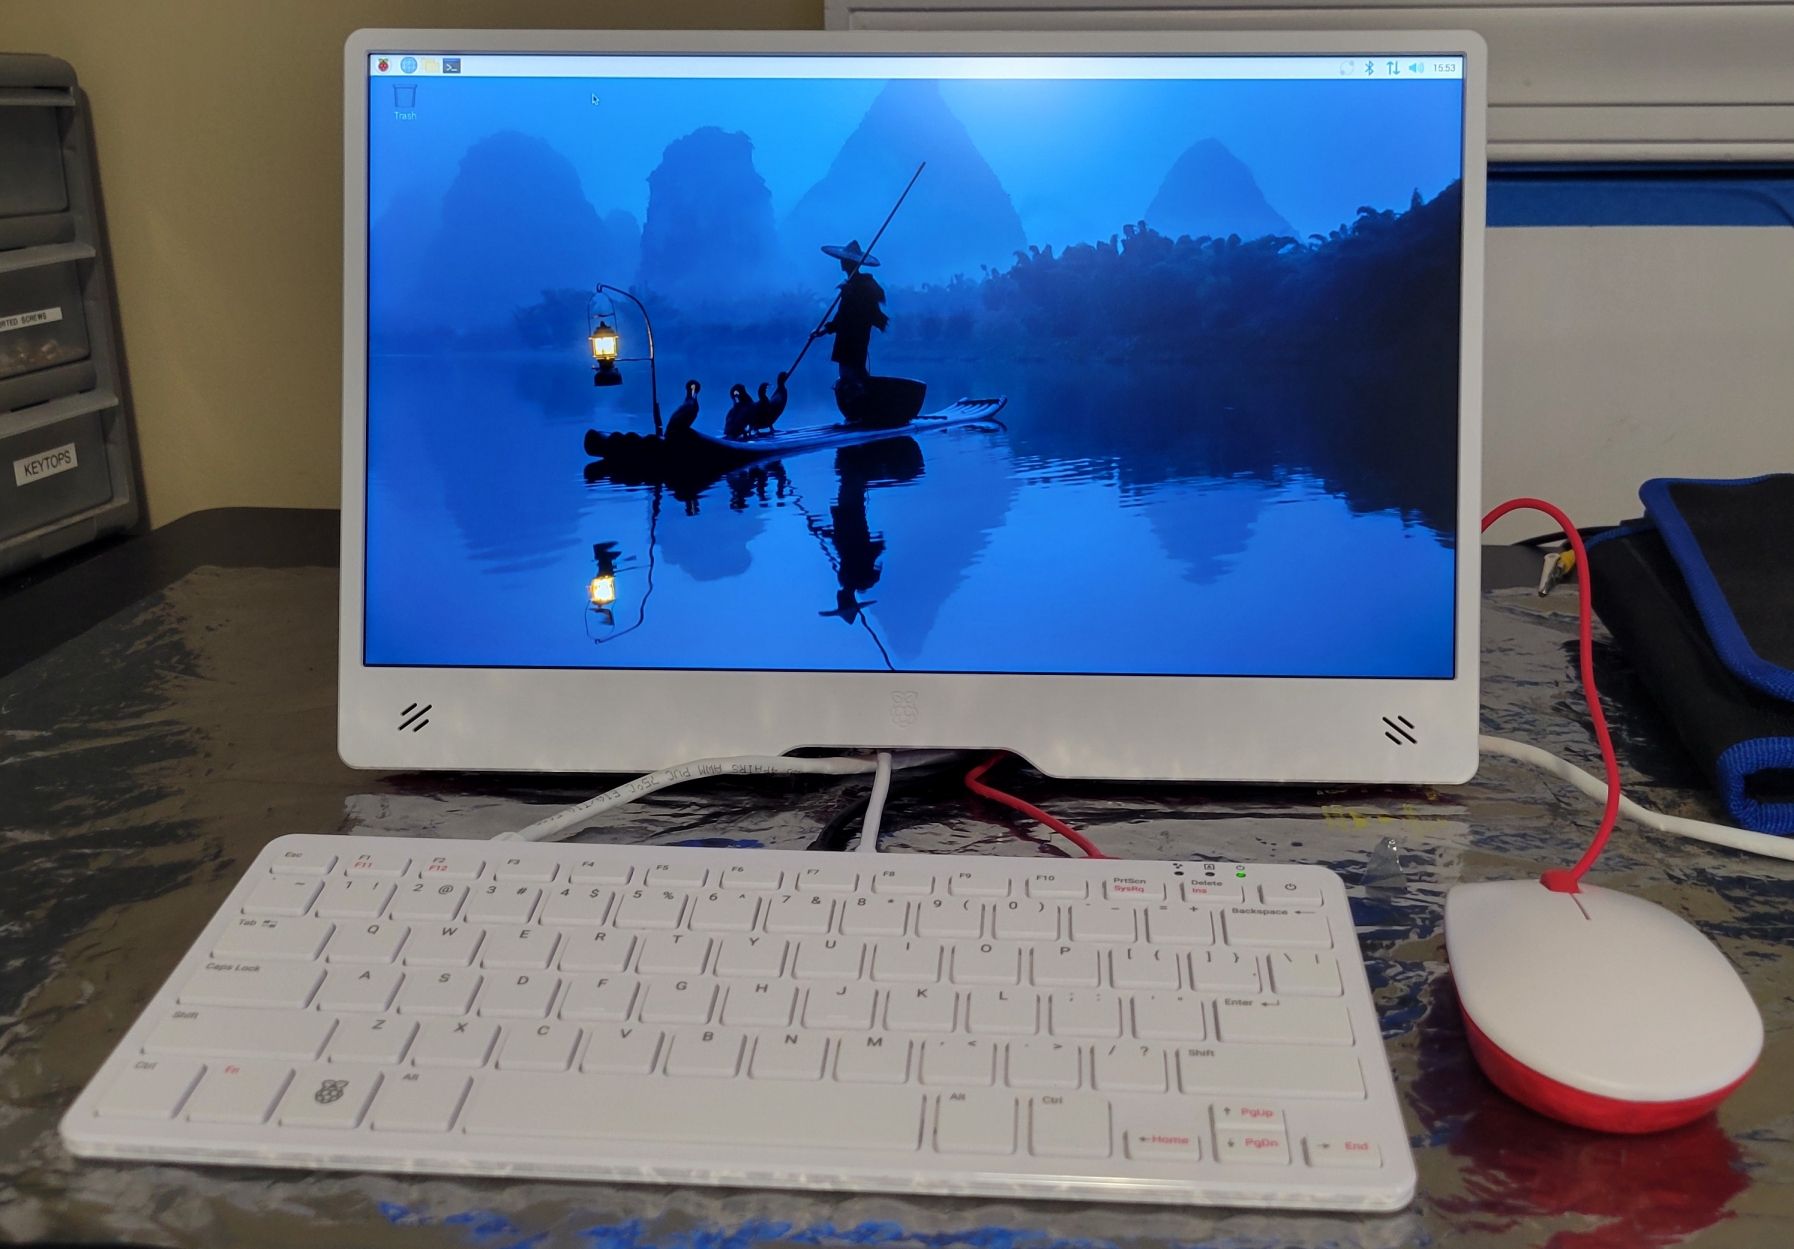
This resulted in another reboot but reboots are fast. Figure 1 shows the Raspberry Pi 500 and the Raspberry Pi Monitor with the default desktop.
I also have my Raspberry Pi 500 connected to a wired network and it connected to that immediately as I use a DHCP server of my own and reserve a few IP addresses for “guest” or temporary hosts.
The Raspberry Pi OS boots directly into the desktop as the default user. No password is required. While that’s fine for most of the target audience, it’s not on any network used for more than casual computing. However the root account is locked.
Getting root
In order to perform any administrative tasks such as creating additional users, setting up the root account, and pretty much anything else, we need some sort of root access. Fortunately all user accounts are configured for access to all administrative tasks in the /etc/sudoers file, thus providing root access.
No password is required to use sudo. The command sudo su – takes the user right to a root session, which is what we need. At that point I can set a root password and other tasks that to improve our security stance.
The primary use case for the Raspberry Pi 500 is for fun and learning so I don’t really expect much call for obtaining direct root access. However, when using it for tasks such as a network firewall and other interesting tasks we see our Raspberry Pi devices used for, it will be a necessity.
Setting Preferences
In general, there are very few configuration items available in the Raspberry Pi OS.
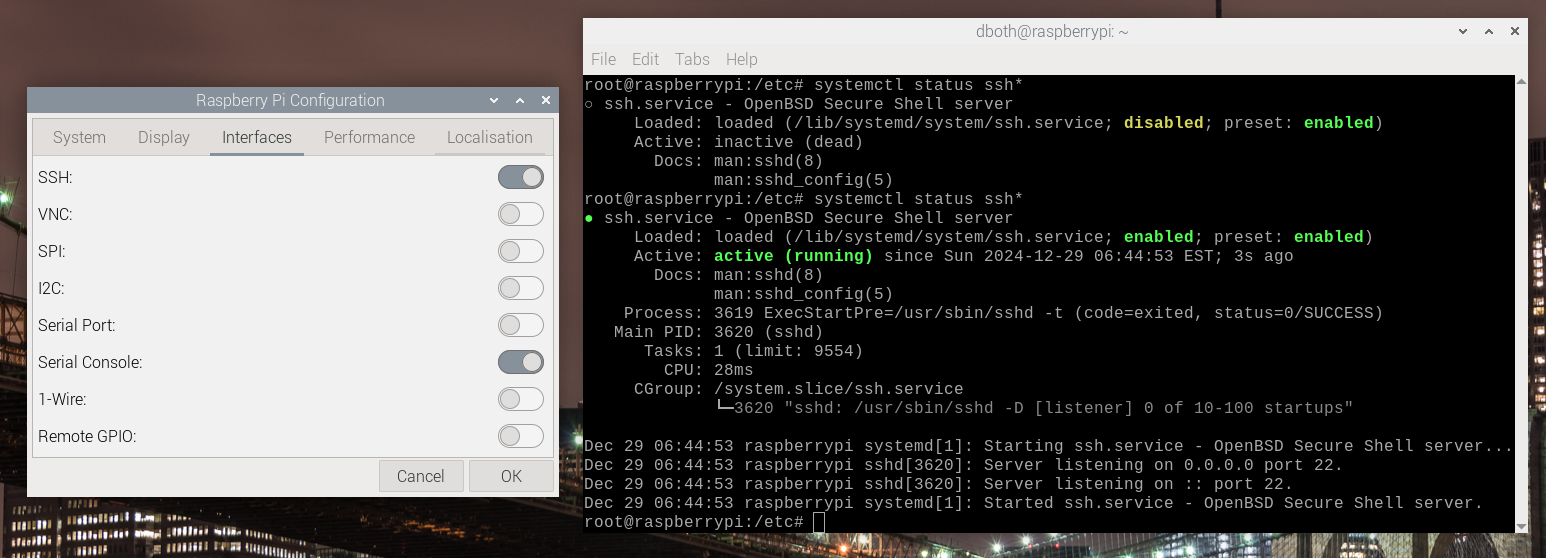
I have my Raspberry Pi 500 on my wired network for a number of reasons, most of which require the SSH service to be running. All configuration items are available through the Application menu, which is the Raspberry Pi icon on the left of the panel. Clicking on Pi > Preferences > Raspberry Pi Configuration > Interfaces, opens the dialog needed to enable the ssh.service. Figure 2 shows the Interfaces tab of the Configuration dialog box as well as the status of ssh.service both before and after activating ssh.service.

The Raspberry Pi Configuration dialog and Preferences also allow you to configure other aspects of the system. Compared to the options available to Fedora with Xfce or KDE Plasma, the number of items that can be configured is quite small. But this simplicity is elegant in that it allows the user to have more control over their environment than Windows, while keeping the number of choices to a manageable level.
Recommendations
The power switch on the Raspberry Pi 500 is the upper right corner. It’s not necessary to use the in-line power switch that plugs in between the USB-C power supply and the Raspberry Pi 500, so don’t purchase that unless you have a specific need. I also recommend purchasing two 45W power supplies, one for the Raspberry Pi 500 itself and one for the Paspberry Pi Monitor; this ensures enough power to support high brightness and volume levels on the display.
Mostly quirks
There are a few things to know about the Raspberry Pi 500 and its display. These are the little quirky things I’ve found so far:
- The power switch for the Raspberry Pi Monitor is on the rear. Press it once and the light will blink. It doesn’t stay on.
- The Micro HDMI cable for the display must be plugged into the socket next to the USB-C power socket. The other socket doesn’t work for the first display. There may be a configuration item for this, but I haven’t found it.
- The wireless LAN can be enabled or disabled, but not a wired connection. If it’s plugged into a network with DHCP, the connection is created without user intervention. To disconnect from a wired network, unplug the network cable. Advanced users can do this from the command line using the nmcli command.
- There’s no GUI way to add new users.
- The SSH server is not running by default. Use the Interfaces dialog shown in Figure 2 to enable it.
Summary
The Raspberry Pi 500 and the Raspberry Pi Monitor make an excellent combination for learning and playing — or “experimenting” — with Linux. It’s a great starter set for anyone who wants to do all the fun things with any Raspberry Pi. It can also be applied to more mundane tasks.
I also like it because it is small and fits nicely in cramped quarters such as my breakfast table. Actually, that’s not for me but for my partner. She likes to eat breakfast and browse the news sites to prepare for her day. It fits quite nicely in a much smaller space than the laptop she used to use.
I might have to get one for myself for the table. You know, just because.
