Set up an embedded system with FreeDOS
An embedded system is a computer system that is dedicated to running a single task. You might think of embedded systems as part of the “Internet of Things” (IoT) such as sensors or doorbell cameras. These kinds of embedded systems usually run on a version of Linux.
But in days past, embedded systems ran on a custom proprietary platform, or they ran on DOS. Some of these DOS embedded systems systems still run today, including cash registers or advertising displays.
Setting up an embedded system with FreeDOS requires defining a minimal DOS environment that runs just a single application. This is fairly straightforward if you are willing to do all the setup from the command line. All you need is a FreeDOS kernel, the application to run, and a FDCONFIG.SYS file that tells the kernel to run that application as a “shell” program.
Install a minimal system
Let’s simulate a dedicated FreeDOS system with the QEMU virtual machine, using a very small virtual disk. To reflect the limitations of an embedded system, let’s use a disk that’s only 10MB, which is tiny by today’s standards, but quite large for what DOS needs.
To create a small disk, use this qemu-img command to define a 10MB disk image:
$ qemu-img create -f qcow2 disk.qcow2 10M
Formatting 'disk.qcow2', fmt=qcow2 cluster_size=65536 extended_l2=off compression_type=zlib size=10485760 lazy_refcounts=off refcount_bits=16
To prepare the disk for FreeDOS, we need to create a single partition on it. We can do that by booting the FreeDOS 1.3 distribution, which is available as a “live CD.” The “live CD” includes a bootable version of FreeDOS with a basic FreeDOS environment plus a few games. That’s all we need to set up the disk for FreeDOS.
Boot QEMU with the FreeDOS LiveCD and the 10MB virtual disk, using this command:
$ qemu-system-i386 -enable-kvm -m 8 -hda disk.qcow2 -cdrom FD13LIVE.iso -boot order=dQEMU requires that you define the virtual machine entirely from the command line, so that line includes several parameters:
- -enable-kvm tells QEMU to use the kernel virtual machine support that’s built into the Linux kernel
- -m 8 sets up the virtual machine with 8MB of memory
- -hda sets up the disk image as the first hard drive
- -cdrom uses the FD13LIVE.iso image as the CD-ROM
- -boot order=d tells QEMU to boot from the CD-ROM (use c to boot from the hard disk, or a to boot from a floppy, or n to boot from a PXE server on the network)
After you’ve booted the FreeDOS 1.3 LiveCD, you should find yourself at a DOS prompt. Use the FreeDOS FDISK (“fixed disk”) program to partition the drive. Or, since this is a basic setup, we can let FDISK create the partition itself with this command:
D:\> fdisk /mbr /autoThis will automatically create a partition that spans the entire 10MB disk, and mark it active at the same time.
Format the disk and make it bootable
FreeDOS reads the disk partition information exactly once, at boot-time. So after making any changes to the disk, you need to reboot the system so FreeDOS will recognize the new partitions. Type reboot to restart the FreeDOS 1.3 LiveCD; you should find yourself back at a DOS prompt.
The next step is to create a DOS filesystem on the new partition, and make it bootable by transferring the system files. The system files are a copy of the FreeDOS kernel and command shell (called FreeCOM), which is the minimum that FreeDOS needs to start up. The FreeDOS FORMAT program can do all of this in one step with this command line:
D:\> format /s C:The /s command line option tells FORMAT to transfer a copy of the system files.
As part of formatting step, you’ll need to enter a volume name for the disk. Volume names are purely informative to the user, and they help to identify the purpose of the disk. You can pick whatever label is meaningful to you; I named mine “EMBED” because this tiny disk will run an embedded system.
Install the embedded application
An embedded system runs a single application, so now you need to install the program you want to run on this dedicated FreeDOS system. As a demonstration, I’ll make a copy of the Simple Senet game, which we include on the FreeDOS 1.3 LiveCD in the D:\GAMES\SENET directory as the SENET.EXE program. Copy it to the hard disk using the COPY command:
D:\> copy games\senet\senet.exe C:\This makes a copy of the Simple Senet game on the new disk, in the root directory (C:\).
Run the embedded application at boot-time
When FreeDOS boots up, the kernel immediately looks for the FDCONFIG.SYS file to find its system configuration information. (If this file does not exist, FreeDOS also looks for CONFIG.SYS, which is the file used by classic DOS systems.) The FreeDOS kernel uses several default values for some things, such as a default shell, but the FDCONFIG file lets you set your own values.
Let’s modify the FDCONFIG file to run the Simple Senet program at boot-time. To do that, create a SHELL= line that indicates the full path to the Simple Senet game. Since the freshly-formatted disk doesn’t have an FDCONFIG file, and we only need to put one line into this file, we can use the ECHO command to make a new SHELL= line, with this command:
D:\> echo SHELL=C:\senet.exe > C:\fdconfig.sysWhen you’re done, don’t forget to exit FreeDOS and halt the virtual machine by typing shutdown at the prompt.
FreeDOS as an embedded system
With the embedded system fully defined, we can now reboot the machine to run the embedded application. Running an embedded system usually requires only limited resources, so for this demonstration, we’ll tweak the QEMU command line to only boot from the hard drive and not use the LiveCD at all:
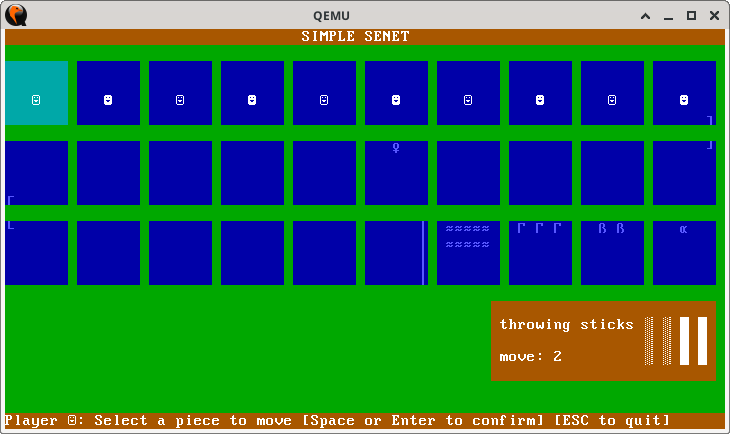
$ qemu-system-i386 -enable-kvm -m 8 -hda disk.qcow2 -boot order=cWhen the FreeDOS kernel starts up, it reads the FDCONFIG file file for its startup parameters. Then it runs the shell specified by the SHELL= line. That runs the Simple Senet game automatically:

Congratulations! You’ve created a new FreeDOS embedded system that runs the Simple Senet game at boot-time.
However, there’s one limitation here. Embedded systems do not usually need to exit back to a command prompt, so these dedicated applications don’t usually allow the user to quit to DOS. If you manage to exit the embedded application, you’ll likely see a “Bad or missing Command Interpreter” prompt, where you’ll need to enter the full path to a new shell. For a user-focused desktop system, this would be a problem. But on an embedded system that’s dedicated to doing only one job, you should never need to exit anyway.