
The dd command — the Disk Destroyer
Yes — dd — the disk destroyer. The command that strikes fear into the hearts of SysAdmins everywhere. It did for me, too, until I discovered how much power is contained in those twin letters.
Officially known as “disk dump,” many sysadmins call it “disk destroyer” for good reason. Many of us have inadvertently destroyed the contents of an entire hard drive or partition using the dd command. That is why we will hang out in the /tmp/test directory to perform some of the experiments in this article.
Despite its reputation, dd can be quite useful in exploring various types of storage media, hard drives, and partitions. We can also use it as a tool to explore other aspects of Linux.
About dd
The dd command is part of the GNU Core Utilities, so is part of every Linux distribution. The dd man page has a disastrously understated description of its function. “Copy a file, converting and formatting according to the operands.”
A better description of this tool is quite elusive but I’ll try. “The dd command is a tool that can copy data streams from any device to any other device.” That data stream can be what we normally think of as a file, a data stream stored on a disk, with a beginning and an end, and an entry in a directory that points to the inode that contains the metadata for the file including the locations of its data on the disk.
But in Linux, everything is a file. So that opens up some interesting and powerful, yet potentially dangerous possibilities.
The bootable USB thumb drive
On of the most common things I do when a new version of Fedora is released is to download the ISO image to my hard drive and then copy it to a couple USB flash drives. This creates what’s typically called a “Live USB.” Let’s look at how that works.
Most Linux distributions provide a bootable ISO image of each release. An ISO image is a file that conforms to the ISO 9660 standard for an optical disk image. Intended for use with CDs and DVDs, they contain all the information necessary to create a bootable disk. Such an image can also be copied to a USB device.
I use Fedora and the images I use are typically 1.5GB to a little over 2GB. It’s easy to copy these ISO images to a USB device but the standard cp (copy) command can’t do that. The cp command can only copy a file to a directory on a formatted partition on the device. The ISO image needs to be copied starting at the very first sector of this storage device in order to be bootable. The image is a linear copy of the boot record, GRUB2 and the entire boot loader as well as the kernel and the rest of the operating system. Only the dd command can perform this task.
For this example, the ISO image is contained in the file, ~/Fedora-Xfce-Live-x86_64-40-1.14.iso, and the device on which I want to install it is located at /dev/sdb. The command to install the ISO image on that device looks like this.
# dd if=~/Fedora-Xfce-Live-x86_64-40-1.14.iso of=/dev/sdbSimple and easy. It typically takes about 8 minutes to copy the image on my primary workstation but that will vary depending on the speed of the USB device, and your computer.
The thing I like about using dd for this, is that I don’t need any other special software.
Linux also provides a tool to create an ISO image file from the files located in a directory. You’ll probably need to install the genisoimage package like I did with Fedora.
# dnf -y install genisoimageCreating an ISO image is outside the scope of this article, but I think it is important that you know that it’s there and where to start.
Exploring the hard drive
It is now time to do a little exploring. Let’s start with something simple. Assuming that the bootable device on your Linux host is /dev/sda, let’s see what we can find.
As root in the terminal session, I use the dd command to view the boot record of the hard drive, assuming it is assigned to the /dev/sda device. The bs= argument is not what you might think; it simply specifies the block size, and the count= argument specifies the number of blocks to dump to STDIO. The if= argument specifies the source of the data stream, in this case, the /dev/sda device. Notice that we are not looking at the first blocks of the partition, we are looking at the very first blocks of the storage device.
# dd if=/dev/sda bs=2048 count=25 | lessThe first page of the data stream isn’t very interesting. I scrolled down a page or two, how far depends on the size of the terminal session, and I saw the more interesting stuff. Figure 1, shows the beginning of the logical volume metastructure that defines the layout of the logical volumes configured on this device. Be sure to click on the image to enlarge it.
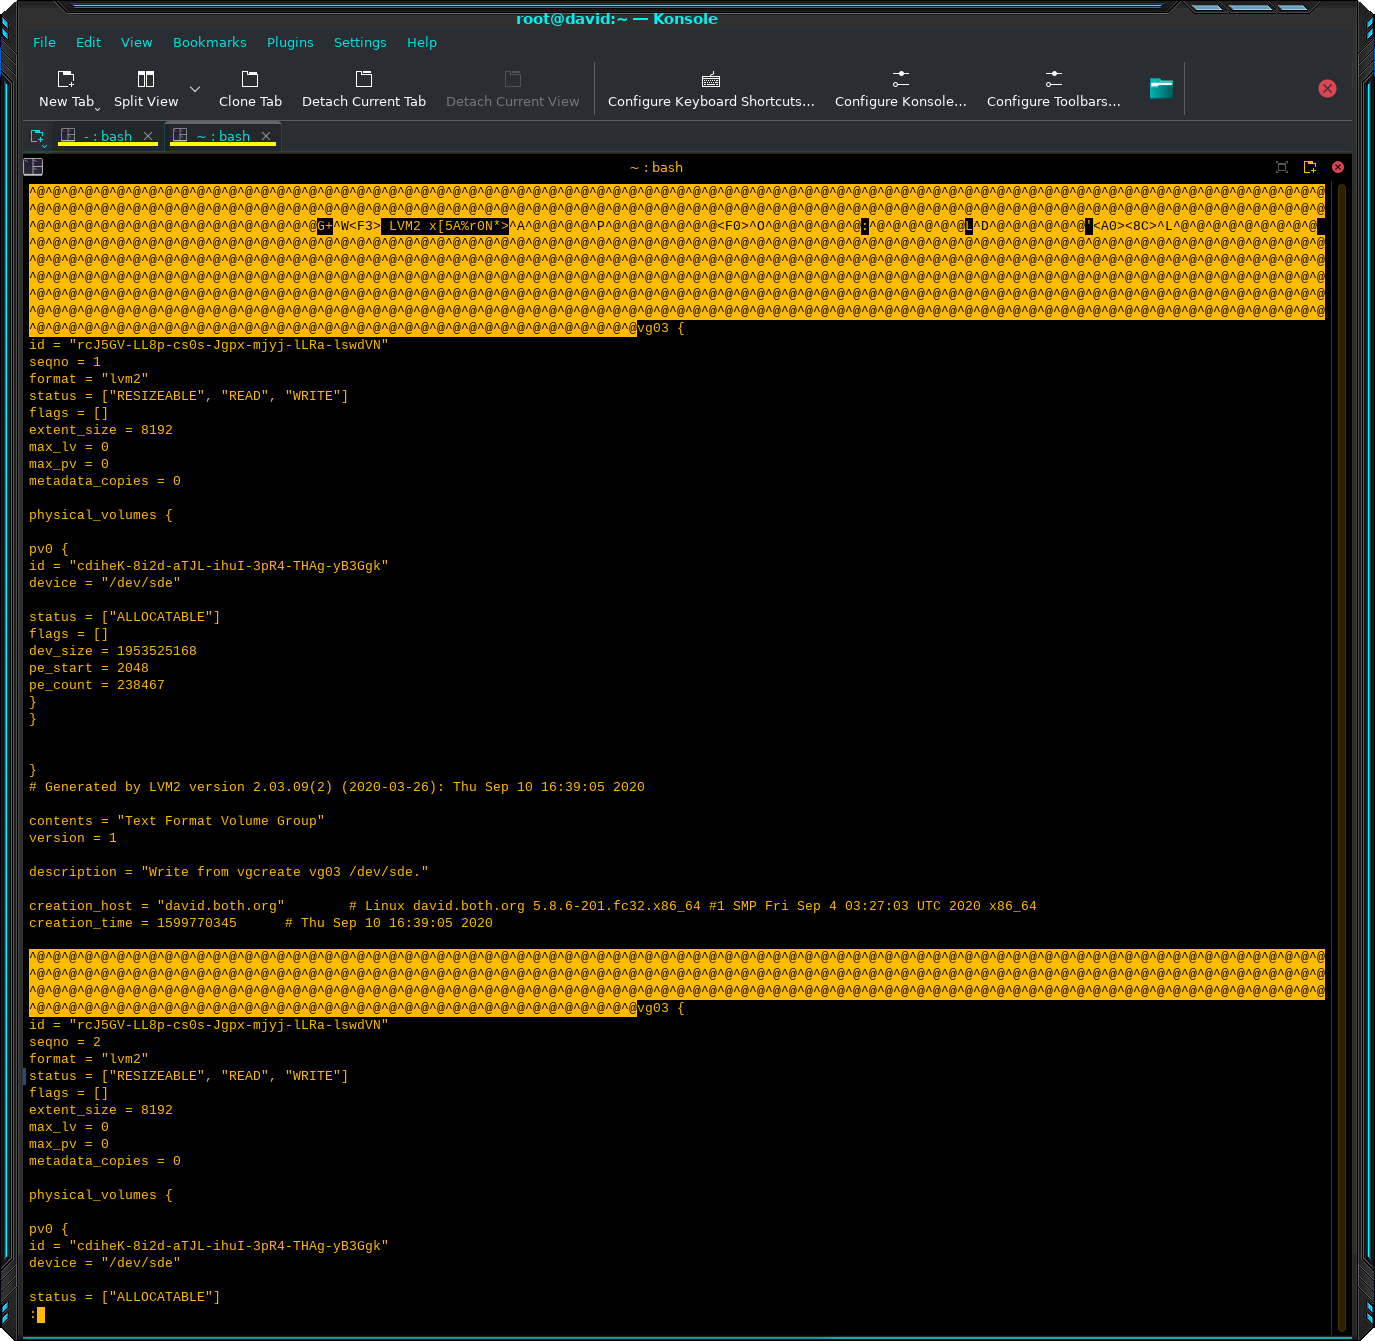
Because this LVM (Logical Volume Management) data was only a short distance into the data stream, and the LVM 2 label starting at about Hex 0010000, this is a non-bootable LVM device. I didn’t create a partition on it before creating a physical volume (PV) of the entire device.
The bootable device on my workstation is /dev/nvme0n1 so let’s take a look at that one.
# dd if=/dev/nvme0n1 bs=2048 count=10 | lessThe results of this command on my bootable device are significantly different. Figure 2 shows the first page of the data stream and you can see the string, “EFI PART,” indicating that this device boots from an EFI partition.
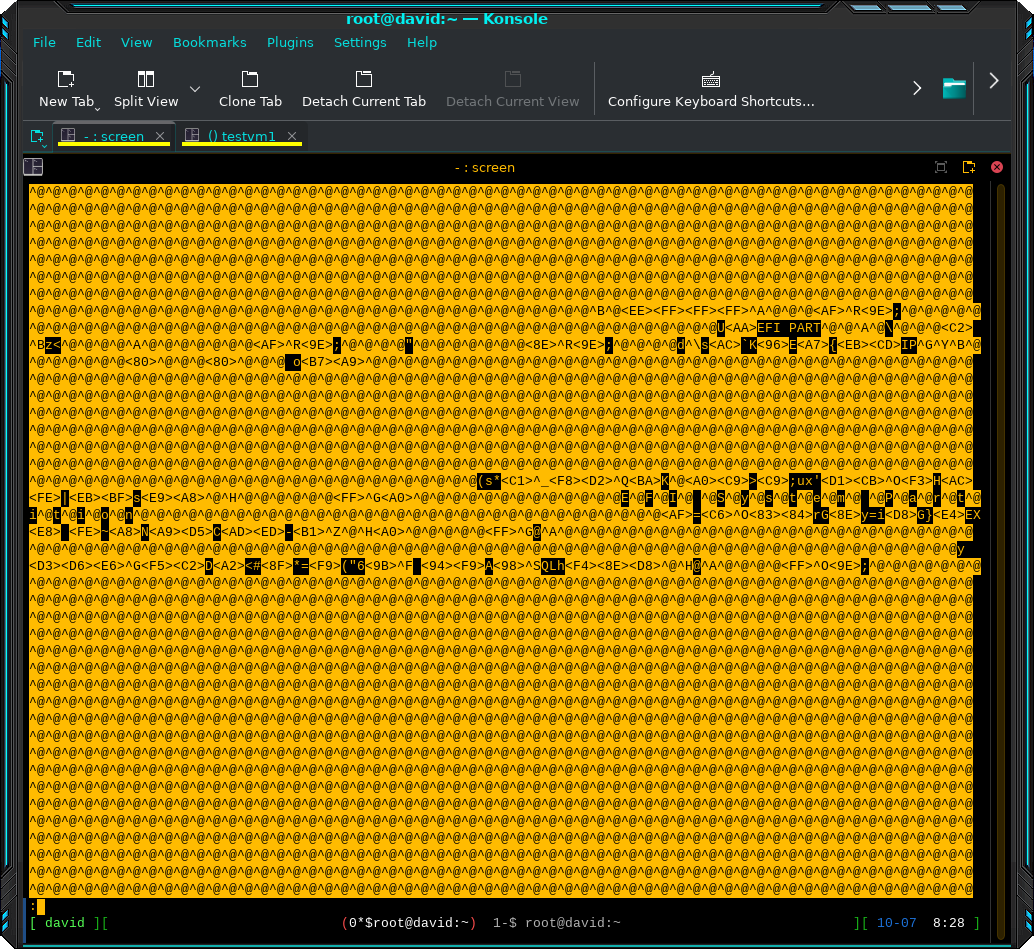
This device is a standard Linux GPT partitioning scheme, with /boot and /boot/efi partitions with EXT4 filesystems. The rest of the device is a partition with LVM, one logical volume formatted with an EXT4 filesystem. Your system could look like one of these examples, or it may be something entirely different, like a BTRFS partition.
I’ve been looking at the device itself and not the partitions contained on the device. That’s easy to do with another simple command. Of course, you’d use the device ID for your own host.
# dd if=/dev/sda1 bs=2048 count=100 | lessSaving data
I’ve had instances where a storage device has failed. Sometimes one of mine, and sometimes one belonging to a friend. One of the best uses I’ve found for dd is that of salvaging as much data as possible from a defective drive. Of course the error must be on the storage medium rather than in a complete electronic or head-seek or read failure.
I’ve managed to save most of the data on a bad storage device by using dd to copy the entire partition or device to another device. Sometimes I’ve simply copied the image of the defective data stream to an image file and use the Linux loopback devices to mount that file as if it were a physical device. Either way I can copy most of the data off the image off the image to another device. This works because dd ignores bad data.
Turning it around
Reading data from the disk can provide us with some important information and help us to understand the structure of the metadata on the storage device. With some patience we could also locate and view — or copy — files and the data they contain, although this would normally seem to be a hard way to do that.
But we can also write data to storage devices which opens some interesting but potentially dangerous possibilities.
One useful application of dd is to clone a storage device. That’s pretty much what we did to create the Live USB device that can be used to try out Linux and to install it.
This use case is to copy the entire content of a storage device directly from one to another. I have a dual-slot SATA docking station that I can plug two SATA devices into. Yet another simple command can be used to clone one device to the other. Just ensure that the target drive is equal to or larger than the size of the source device.
In this example, I assume that the source device is /dev/sdc and the target is /dev/sdd. That gives us this command.
# dd if=/dev/sdc of=/dev/sddThis command will run until it’s read all the data from the source device or until the target device is full, whichever comes first. You can do the same with a partition.
Copy a file
Yes, the dd command can copy a single file but we need to be careful with the syntax. Unlike the cp command, dd won’t automatically copy the file into a directory if we specify only the directory name as the outfile argument. Fortunately, it tells us we’re making a mistake and that it can’t open the directory as its not a file.
$ dd if=testfile.txt of=Test/
dd: failed to open 'Test/': Is a directory
The of= argument must contain the full name of the file as well as the directory.
$ dd if=testfile.txt of=Test/Testfile.txt
31+1 records in
31+1 records out
16200 bytes (16 kB, 16 KiB) copied, 0.000250787 s, 64.6 MB/s
We can also copy a file to the same directory with a different filename.
$ dd if=testfile.txt of=Testfile2.txt
31+1 records in
31+1 records out
16200 bytes (16 kB, 16 KiB) copied, 0.000153622 s, 105 MB/s
I don’t think there are any advantages to using dd to copy a file rather than using the cp command unless you have a need for one of the conversions. Read the manual page for more information on those conversions.
Conversions
The dd manual page says that it can make some conversions. Most of the ones it discusses are esoteric and most SysAdmins will never need them. But I did find a couple interesting ones that can convert IBM Mainframe EBCDIC to ASCII and back. Others can convert uppercase to lowercase and vice-versa. Another can swap every pair of input Bytes, thus little-endian for big-endian and back.
Destructive uses
You can also do some destructive things. Sometimes I do this on purpose. I just want to delete all the data from a device or a partition. The dd command makes that easy, especially when combined with device special files like /dev/zero, /dev/random and /dev/urandom.
Parting thoughts
You can see that the dd command can be very useful for exploring the structures of various types of filesystems, locating data on a defective storage device, and much more. It also produces a stream of data on which we can pipe through standard Linux utilities in order to modify or view.
The real point here is that dd, like so many Linux commands, produces a stream of data as its output. That data stream can be searched and manipulated in many ways using other tools. It can even be used for ghost-like backups or disk duplication.
More Stories
Open Source on macOS: Exploring Free Software on My M3 MacBook
Lead Image by Tom's Hardware Guide Open-source software is not restricted to Linux. While I spend most of my time...
Call for articles — Switching to Linux
October 25 is the last day of support for Win10 and over 400 million PCs can't upgrade to Win11. I...
Moving from Windows 10 to Linux
Instead of purchasing a new computer just to run a new version of Windows, consider installing Linux.
The Linux Philosophy for SysAdmins, Tenet 18—Document everything
“Real programmers don’t comment their code, if it was hard to write, it should be hard to understand and harder to modify.”
— unknown
Signal Messenger: Privacy, Simplified with Open Source
Messaging apps have revolutionized communication, reshaping our daily lives and relationships. It’s hard to imagine a time without SMS paving...
Connect to a Windows drive from Linux
Here’s how I connected my Linux system to a Windows AD fileshare.