Unlocking the secrets of the /proc filesystem
In a previous article, 4 open source tools for Linux system monitoring, I looked at tools like top, htop, and others, that allow SysAdmins to look inside the running Linux kernel. But there is also this thing called the observer effect which is a theory in the scientific discipline of physics that states, “simply observing a situation or phenomenon necessarily changes that phenomenon.” This is also true when measuring computer system performance. The act of using those monitoring tools alters the system’s use of resources including memory and CPU time.
The performance of Linux hosts is not impacted by data collection and monitoring tools. The Linux kernel is designed to always collect and store the performance data that is then merely accessed and displayed by any and all performance monitoring tools. It is the tools’ access of that data to read it and then to manipulate it and display it in a meaningful format that further affects the system performance.
Linux has some special filesystems that it creates in RAM at each boot, one of which is especially interesting to SysAdmins. The /proc filesystem is where the kernel stores the performance data of the running kernel and much more. The data is always there and it is easy to access. This is a virtual filesystems that exists only in RAM while the Linux host is running; it dosn’t exist on any physical disk. The /proc filesystem is not persistent like filesystems that are located on storage devices such as hard drives and solid state drives. It disappears, along with other virtual filesystems such as /sys, when the computer is turned off and is recreated anew each time Linux starts up.
The /proc filesystem is one with which you will become well acquainted as a SysAdmin so we are going to explore it in some detail.
The /proc filesystem
The /proc filesystem is defined by the FHS as the location for Linux to store information about the system, the kernel, and all processes running on the host. It is intended to be a place for the kernel to expose information about itself in order to facilitate access to data about the system. It is also designed to provide access to view kernel configuration parameters and to modify many of them when necessary in order to allow the SysAdmin to tune the running system without needing to perform reboots after making changes.
When used as a window into the state of the operating system and its view of the system and hardware, it provides easy access to virtually every bit of information you might want as a SysAdmin.
Exploring /proc
Let’s explore the /proc filesystem. For best results you should do this as root.
Let’s first look at the top-level contents of the /proc filesystem of a running Linux host. You may see color coding to differentiate files from directories.
First, look at the numeric entries. The names of these directories is a PID, or process ID number. Each of those PID directories contains information about the running process that it represents.
# cd /proc ; ls
1     11    1353  20    46    61   929            kmsg
10    110   1355  21    47    611  930            kpagecgroup
1003  1101  136   22    4734  618  932            kpagecount
1004  1104  1360  23    4786  63   946            kpageflags
1024  1109  1361  24    48    641  96             latency_stats
1026  111   1362  2470  49    642  991            loadavg
103   114   1367  25    4931  65   992            locks
104   1147  1368  257   4941  66   997            mdstat
1047  115   137   258   4969  67   998            meminfo
1048  1150  1374  27    5     69   acpi           misc
105   1154  1375  28    5027  697  asound         modules
1051  1158  1376  29    5044  698  bootconfig     mounts
1053  116   138   299   5079  7    buddyinfo      mtrr
1059  1167  1382  3     5080  70   bus            net
106   1169  139   30    5095  71   cgroups        pagetypeinfo
1060  117   14    302   51    72   cmdline        partitions
1062  12    140   31    5111  73   consoles       pressure
1063  1206  141   312   5117  737  cpuinfo        schedstat
1065  121   142   3193  5118  74   crypto         scsi
1067  122   1422  33    5132  76   devices        self
1068  1226  1423  34    5138  77   diskstats      slabinfo
107   123   1477  35    5143  78   dma            softirqs
1070  124   1478  36    5148  788  driver         stat
1072  1241  1479  3671  5149  79   dynamic_debug  swaps
1079  1244  15    37    5165  80   execdomains    sys
108   1248  1509  39    5166  81   filesystems    sysrq-trigger
1081  1276  1558  4     5175  818  fs             sysvipc
1082  13    16    40    5176  82   interrupts     thread-self
1083  130   1631  41    5177  822  iomem          timer_list
1084  1324  1641  42    5178  829  ioports        tty
1086  1333  1652  4242  519   832  irq            uptime
1087  1335  17    43    520   86   kallsyms       version
109   1337  18    4446  58    87   kcore          vmallocinfo
1090  1342  19    45    59    926  keys           vmstat
1091  1348  2     4570  6     927  key-users      zoneinfo
Each of the files in the /proc directory contains information about some part of the kernel. Let’s take a look at a couple of these files, cpuinfo and meminfo.
The cpuinfo file is mostly static. It contains the specifications for all CPUs in the processor package. I pipe the output of the cat command through the less pager to make it easier to see the entire data stream.
# cat cpuinfo | less
processor       : 0
vendor_id       : GenuineIntel
cpu family      : 6
model           : 85
model name      : Intel(R) Core(TM) i9-7960X CPU @ 2.80GHz
stepping        : 4
cpu MHz         : 2819.454
cache size      : 22528 KB
physical id     : 0
siblings        : 6
core id         : 0
cpu cores       : 6
apicid          : 0
initial apicid  : 0
fpu             : yes
fpu_exception   : yes
cpuid level     : 22
wp              : yes
flags           : fpu vme de pse tsc msr pae mce cx8 apic sep mtrr pge mca cmov pat pse36 clflush mmx fxsr sse sse2 ht syscall nx rdtscp lm constant_tsc rep_good nopl xtopology nonstop_tsc cpuid tsc_known_freq pni pclmulqdq ssse3 cx16 pcid sse4_1 sse4_2 x2apic movbe popcnt aes xsave avx rdrand hypervisor lahf_lm abm 3dnowprefetch pti fsgsbase bmi1 avx2 bmi2 invpcid rdseed clflushopt arat md_clear flush_l1d arch_capabilities
bugs            : cpu_meltdown spectre_v1 spectre_v2 spec_store_bypass l1tf mds swapgs itlb_multihit mmio_stale_data retbleed gds bhi
bogomips        : 5638.90
clflush size    : 64
cache_alignment : 64
address sizes   : 46 bits physical, 48 bits virtual
power management:

processor       : 1
vendor_id       : GenuineIntel
cpu family      : 6
model           : 85
model name      : Intel(R) Core(TM) i9-7960X CPU @ 2.80GHz
stepping        : 4
cpu MHz         : 2819.454
cache size      : 22528 KB
physical id     : 0
siblings        : 6
<SNIP>
The data from the cpuinfo file includes the processor ID and model, its current speed in MHz, and the flags that can be used to determine the CPU features. Now lets look at memory. First use cat to view the meminfo file and then use the free command to do a comparison.
# cat meminfo
MemTotal:        8126608 kB
MemFree:         6964236 kB
MemAvailable:    7543448 kB
Buffers:          111796 kB
Cached:           669104 kB
SwapCached:            0 kB
Active:           418000 kB
Inactive:         516204 kB
Active(anon):     161952 kB
Inactive(anon):        0 kB
Active(file):     256048 kB
Inactive(file):   516204 kB
Unevictable:           0 kB
Mlocked:               0 kB
SwapTotal:       8126460 kB
SwapFree:        8126460 kB
Zswap:                 0 kB
Zswapped:              0 kB
Dirty:                 0 kB
Writeback:             0 kB
AnonPages:        153304 kB
Mapped:           142788 kB
Shmem:              8648 kB
KReclaimable:      51888 kB
Slab:             113028 kB
SReclaimable:      51888 kB
SUnreclaim:        61140 kB
KernelStack:        4672 kB
PageTables:         7160 kB
SecPageTables:         0 kB
NFS_Unstable:          0 kB
Bounce:                0 kB
WritebackTmp:          0 kB
CommitLimit:    12189764 kB
Committed_AS:     912480 kB
VmallocTotal:   34359738367 kB
VmallocUsed:       53040 kB
VmallocChunk:          0 kB
Percpu:             5024 kB
HardwareCorrupted:     0 kB
AnonHugePages:         0 kB
ShmemHugePages:        0 kB
ShmemPmdMapped:        0 kB
FileHugePages:         0 kB
FilePmdMapped:         0 kB
CmaTotal:              0 kB
CmaFree:               0 kB
Unaccepted:            0 kB
HugePages_Total:       0
HugePages_Free:        0
HugePages_Rsvd:        0
HugePages_Surp:        0
Hugepagesize:       2048 kB
Hugetlb:               0 kB
DirectMap4k:      137152 kB
DirectMap2M:     8251392 kB

# free
               total        used        free      shared  buff/cache   available
Mem:         8126608      584160     6963228        8648      832796     7542448
Swap:        8126460           0     8126460
There is a lot of information in the /proc/meminfo file. Some of that data are used by programs like the free command. If you want the complete picture of memory usage, look in /proc/meminfo. The free command, like top, htop, and many other core utilities, gets its data from the /proc filesystem.
Run the cat meminfo command several times in quick succession to see that the /proc/meminfo file is continuously changing. That indicates the file is being updated. You can do this easily with the watch command.
# watch cat meminfoBecause the data in /proc is a realtime picture of the state of the Linux kernel and the computer hardware, the data may change rapidly. Look at the interrupts file several times in a row.
Spend a little time to compare the data in the /proc/meminfo file against the information you get when using commands like free, and top. Where do you think these utility tools and many others get their information? Right here in the /proc filesystem, that’s where.
Exploring systemd
Lets look a little bit deeper into PID 1. Like all of the process directories it contains information about the process with that ID. So let’s look at some of that information. As root, enter and look at the contents of the /proc/1 directory. Then view the contents of the cmdline file.
# cd /proc/1 ; cat cmdline
/usr/lib/systemd/systemd--switched-root--system--deserialize=42rhgb
We can see from the contents of the cmdline that this is systemd, the mother of all programs. On all older and some current versions of Linux, PID 1 will be the init program.
Create an executable file named cpuHog in /usr/local/bin with permissions of 755. Add the content shown here and save the file.
#!/bin/bash
# This little program is a cpu hog
X=0;while [ 1 ];do echo $X;X=$((X+1));done
Start one instance in a terminal session as a non-root user.
$ cpuHog
0
1
2
3
4
5
6
7
8
9
10
11
12
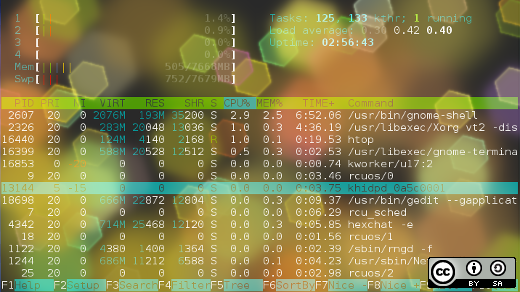
<SNIP>As root, use one of the monitoring tools like top to determine the PID of this cpuHog process. I use htop which shows the cpuHog as in Figure 1. On my VM, the PID is 5445 but it will be different for you. Be sure to use the correct PID for the cpuHog on your host.
Make the directory corresponding to the PID of your cpuHog instance the PWD. Then list the contents.
# cd /proc/5539 ; ll | less
total 0
total 0
-r--r--r--.  1 dboth dboth 0 Sep 27 10:01 arch_status
dr-xr-xr-x.  2 dboth dboth 0 Sep 27 10:01 attr
-rw-r--r--.  1 dboth dboth 0 Sep 27 10:01 autogroup
-r--------.  1 dboth dboth 0 Sep 27 10:01 auxv
-r--r--r--.  1 dboth dboth 0 Sep 27 10:01 cgroup
--w-------.  1 dboth dboth 0 Sep 27 10:01 clear_refs
-r--r--r--.  1 dboth dboth 0 Sep 27 09:48 cmdline
-rw-r--r--.  1 dboth dboth 0 Sep 27 09:48 comm
-rw-r--r--.  1 dboth dboth 0 Sep 27 10:01 coredump_filter
-r--r--r--.  1 dboth dboth 0 Sep 27 10:01 cpu_resctrl_groups
-r--r--r--.  1 dboth dboth 0 Sep 27 10:01 cpuset
lrwxrwxrwx.  1 dboth dboth 0 Sep 27 10:01 cwd -> /home/dboth
-r--------.  1 dboth dboth 0 Sep 27 10:01 environ
lrwxrwxrwx.  1 dboth dboth 0 Sep 27 09:48 exe -> /usr/bin/bash
dr-x------.  2 dboth dboth 4 Sep 27 10:01 fd
dr-xr-xr-x.  2 dboth dboth 0 Sep 27 10:01 fdinfo
-rw-r--r--.  1 dboth dboth 0 Sep 27 10:01 gid_map
-r--------.  1 dboth dboth 0 Sep 27 10:01 io
-r--------.  1 dboth dboth 0 Sep 27 10:01 ksm_merging_pages
-r--------.  1 dboth dboth 0 Sep 27 10:01 ksm_stat
-r--r--r--.  1 dboth dboth 0 Sep 27 10:01 latency
-r--r--r--.  1 dboth dboth 0 Sep 27 10:01 limits
-rw-r--r--.  1 dboth dboth 0 Sep 27 10:01 loginuid
dr-x------.  2 dboth dboth 0 Sep 27 10:01 map_files
-r--r--r--.  1 dboth dboth 0 Sep 27 09:48 maps
-rw-------.  1 dboth dboth 0 Sep 27 10:01 mem
-r--r--r--.  1 dboth dboth 0 Sep 27 10:01 mountinfo
-r--r--r--.  1 dboth dboth 0 Sep 27 10:01 mounts
-r--------.  1 dboth dboth 0 Sep 27 10:01 mountstats
dr-xr-xr-x. 54 dboth dboth 0 Sep 27 10:01 net
dr-x--x--x.  2 dboth dboth 0 Sep 27 10:01 ns
-r--r--r--.  1 dboth dboth 0 Sep 27 10:01 numa_maps
-rw-r--r--.  1 dboth dboth 0 Sep 27 10:01 oom_adj
-r--r--r--.  1 dboth dboth 0 Sep 27 10:01 oom_score
-rw-r--r--.  1 dboth dboth 0 Sep 27 10:01 oom_score_adj
-r--------.  1 dboth dboth 0 Sep 27 10:01 pagemap
-r--------.  1 dboth dboth 0 Sep 27 10:01 patch_state
-r--------.  1 dboth dboth 0 Sep 27 10:01 personality
-rw-r--r--.  1 dboth dboth 0 Sep 27 10:01 projid_map
lrwxrwxrwx.  1 dboth dboth 0 Sep 27 10:01 root -> /
-rw-r--r--.  1 dboth dboth 0 Sep 27 10:01 sched
-r--r--r--.  1 dboth dboth 0 Sep 27 10:01 schedstat
-r--r--r--.  1 dboth dboth 0 Sep 27 10:01 sessionid
-rw-r--r--.  1 dboth dboth 0 Sep 27 10:01 setgroups
-r--r--r--.  1 dboth dboth 0 Sep 27 10:01 smaps
-r--r--r--.  1 dboth dboth 0 Sep 27 10:01 smaps_rollup
-r--------.  1 dboth dboth 0 Sep 27 10:01 stack
-r--r--r--.  1 dboth dboth 0 Sep 27 10:01 stat
-r--r--r--.  1 dboth dboth 0 Sep 27 09:48 statm
-r--r--r--.  1 dboth dboth 0 Sep 27 09:48 status
-r--------.  1 dboth dboth 0 Sep 27 10:01 syscall
dr-xr-xr-x.  3 dboth dboth 0 Sep 27 09:48 task
-rw-r--r--.  1 dboth dboth 0 Sep 27 10:01 timens_offsets
-r--r--r--.  1 dboth dboth 0 Sep 27 10:01 timers
-rw-rw-rw-.  1 dboth dboth 0 Sep 27 10:01 timerslack_ns
-rw-r--r--.  1 dboth dboth 0 Sep 27 10:01 uid_map
-r--r--r--.  1 dboth dboth 0 Sep 27 10:01 wchan
Note the entries for cwd and exe. The cwd entry points to the current working directory, aka the PWD, for the process. The exe entry points to the executable file for the process, which is the Bash shell. But look at the content of the cmdline file.
# cat cmdline
/bin/bash/usr/local/bin/cpuHog
This tells us the program that is running is the cpuHog. It also gives us some insight into the manner in which programs — at least shell scripts — are run in Linux. When starting a shell program, systemd first launches a shell, the default being Bash unless otherwise specified, and the shell program, cpuHog, is provided as an argument to the command.
Open two more terminal sessions and start an instance of cpuHog in each.
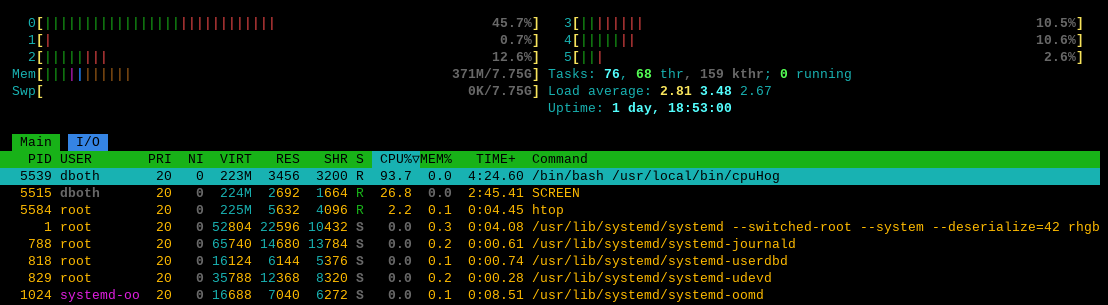
If you are not already using top or htop to monitor the ongoing activities on your VM, start an instance of one now. Look for the COMMAND column which, as you can see in Figure 2 shows the three running instances of the cpuHog.
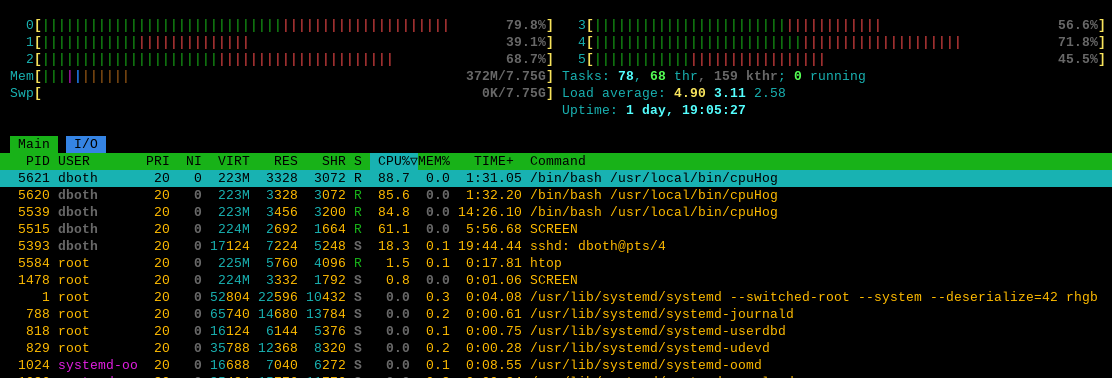
We can see in Figure 2 that the cpuHogs have PIDs of 5539, 5620, and 5621.
Now press F5 to show the process tree which allows us to see the process hierarchy as in Figure 3.
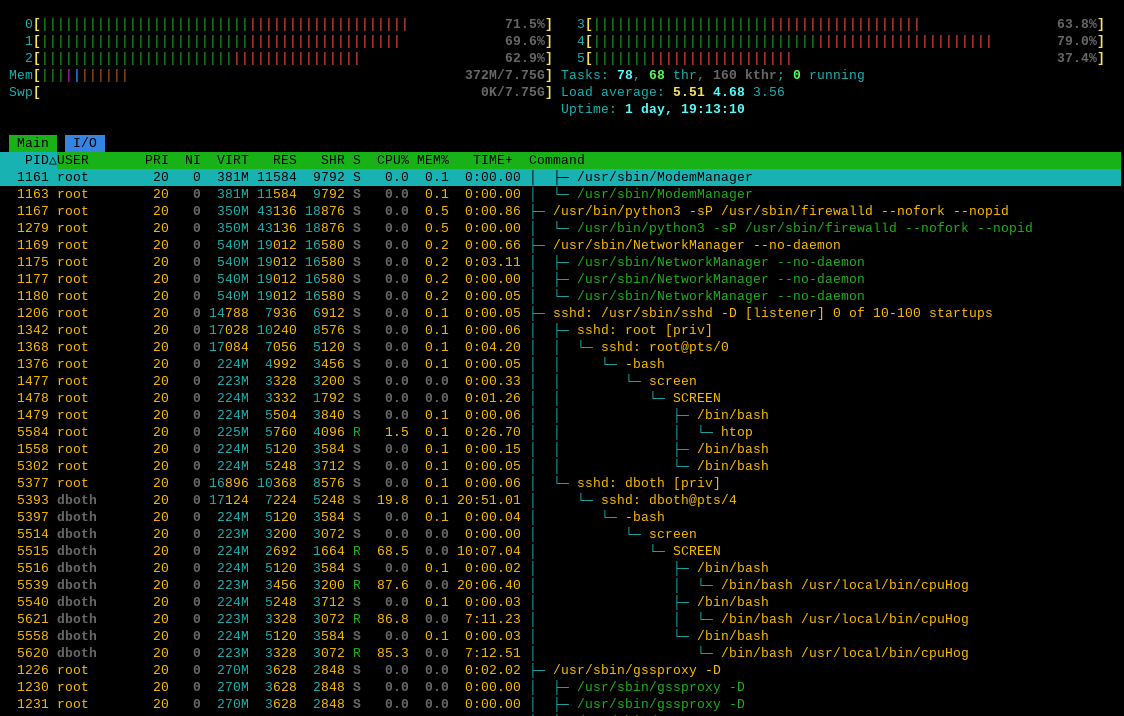
Once again, this helps us to understand a bit more about how Linux launches command line programs. We can see that in all three cases that systemd starts a sub-shell and then launches the program within that sub-shell.
Another tool that allows us to view the process tree is the pstree utility. Use the pstree utility to view the process tree. I’ve removed some portions of the data stream from the pstree command. Scroll through the output and find the cpuHogs. You should check the man page for pstree to discover the meanings of the options we used for this command.
# pstree -Acp | less
systemd(1)-+-ModemManager(1158)-+-{ModemManager}(1160)
           |                    |-{ModemManager}(1161)
           |                    `-{ModemManager}(1163)
           |-NetworkManager(1169)-+-{NetworkManager}(1175)
           |                      |-{NetworkManager}(1177)
           |                      `-{NetworkManager}(1180)
           |-VBoxDRMClient(1087)-+-{VBoxDRMClient}(1098)
           |                     |-{VBoxDRMClient}(1099)
           |                     `-{VBoxDRMClient}(1100)
           |-VBoxService(1091)-+-{VBoxService}(1112)
           |                   |-{VBoxService}(1113)
           |                   |-{VBoxService}(1114)
<SNIP>
           |-accounts-daemon(1081)-+-{accounts-daemon}(1123)
           |                       |-{accounts-daemon}(1124)
           |                       `-{accounts-daemon}(1128)
<SNIP>
           |-rtkit-daemon(1072)-+-{rtkit-daemon}(1075)
           |                    `-{rtkit-daemon}(1076)
           |-sshd(1206)-+-sshd(1342)---sshd(1368)---bash(1376)---screen(1477)---screen(1478)-+-bash(1479)---htop(5584)
           |            |                                                                    |-bash(1558)-+-less(5939)
           |            |                                                                    |            `-pstree(5938)
           |            |                                                                    `-bash(5302)
           |            `-sshd(5377)---sshd(5393)---bash(5397)---screen(5514)---screen(5515)-+-bash(5516)---cpuHog(5539)
           |                                                                                 |-bash(5540)---cpuHog(5621)
           |                                                                                 `-bash(5558)---cpuHog(5620)
           |-systemd(1353)---(sd-pam)(1355)
           |-systemd(1335)-+-(sd-pam)(1337)
<SNIP>
Our real purpose here was to discover the PID of the cpuHogs in order to explore them in the /proc filesystem. Now we know multiple ways to do that. Pick one of the cpuHogs and, as root, make /proc/<PID> the pwd. I chose PID 5539 but you should use the PID for an instance of cpuHog on your host, and then list the contents of the directory.
# cd /proc/5539 ; ls
arch_status         environ            maps           patch_state   statm
attr                exe                mem            personality   status
autogroup           fd                 mountinfo      projid_map    syscall
auxv                fdinfo             mounts         root          task
cgroup              gid_map            mountstats     sched         timens_offsets
clear_refs          io                 net            schedstat     timers
cmdline             ksm_merging_pages  ns             sessionid     timerslack_ns
comm                ksm_stat           numa_maps      setgroups     uid_map
coredump_filter     latency            oom_adj        smaps         wchan
cpu_resctrl_groups  limits             oom_score      smaps_rollup
cpuset              loginuid           oom_score_adj  stack
cwd                 map_files          pagemap        stat
Take some time to explore the content of some of these files and subdirectories. Be sure to view the content of the status, limits, loginuid, and maps files. The maps file is a memory map that lists executable and library locations in virtual memory. The status file contains a great deal of information including some interesting data about virtual memory usage. Also take some time to explore a few of the other files and subdirectories in this and the PID directories for the other cpuHogs and some other processes as well.
There is a huge amount of information available in the /proc filesystem and it can be used to good advantage to solve problems. But that’s not all.
Kernel performance parameters
The capability to make changes to the running kernel on the fly and without a reboot is a powerful tool. It allows you to make instant changes to the Linux kernel to resolve a problem, enable a function, or tune performance. Let’s look at one example.
Linux is very flexible and can do many interesting things. One of those cool things is that any Linux host with multiple network interface cards (NICs) can act as a router. All it takes is a little knowledge, a simple command, and some changes to the firewall.
Routing is a task managed by the kernel. So turning it on (or off) requires that we change a kernel configuration parameter. Fortunately we do not need to recompile the kernel, and that is one of the benefits of exposing the kernel configuration in the /proc filesystem. We are going to turn on IP forwarding which provides the kernel’s basic routing functionality.
This little command line program makes the /proc/sys/net/ipv4 directory the pwd, prints the current state of the ip_forward file which should be zero (0), sets it to “1” and then prints its new state which should be 1. Routing is now turned on. Be sure to enter the command on a single line.
# cd /proc/sys/net/ipv4 ; cat ip_forward ; echo 1 > ip_forward ; cat ip_forward
0
1
Warning: I intentionally chose to modify a kernel parameter that I am familiar with and that won’t cause any harm to your Linux VM. As you explore the /proc filesystem, you should not make any further changes.
Congratulations! You have just altered the configuration of the running kernel.
In order to complete the configuration of a Linux host to full function as a router, additional changes would need to be made to the iptables firewall, or to whatever firewall software you may be using, and to the routing table. Those changes will define the specifics of the routing such as which packets get routed where.
While you are here in the /proc filesystem look around some more – follow your own curiosity to explore different areas of this important filesystem.
More Stories
It should be fun
Most of the good programmers do programming not because they expect to get paid or get adulation by the public,...
The Linux Philosophy for SysAdmins, Tenet 19—Backup everything frequently
Author’s note: This article is excerpted in part from chapter 21 of my book, The Linux Philosophy for SysAdmins, with...
Microsoft announces significant changes to Windows
In a sudden and short press conference early this morning, Microsoft has announced that Windows will be completely restructured at...
Open Source on macOS: Exploring Free Software on My M3 MacBook
Lead Image by Tom's Hardware Guide Open-source software is not restricted to Linux. While I spend most of my time...
Call for articles — Switching to Linux
October 14, 2025 is the last day of support for Win10 and over 400 million PCs can't upgrade to Win11....
Moving from Windows 10 to Linux
Instead of purchasing a new computer just to run a new version of Windows, consider installing Linux.