Easy File Management with Thunar
Image by: WIlliam Warby. Modified by Jason Baker. Creative Commons BY-SA 2.0.
Introduction
Computers are all about files. Linux itself is a collection of many files; application programs like LibreOffice are made up of many files; and the documents, spreadsheets, financial data, photos, videos, audio, and more that you use are all files. Working with files is a very important part of your work as a user. This article introduces the use of the Thunar graphical file manager for managing files. We’ll explore a number of common file management tasks.
- Configure the Thunar file manager.
- Use the Thunar file manager to move, copy, and delete files.
- Mount and unmount external USB storage devices when they are connected and disconnected.
- Access the files on external storage devices.
Author’s note: This article is based on Chapter 11, of my book, Linux for Small Business Owners, but updated to reflect changes in Thunar, and to fit the article format.
Preparation
First you need some files to experiment with. You can easily create some files for testing from the command line. Although you could do this in your home directory, you should probably create a test subdirectory in which to perform the experiments in this article. I just named mine Test. Then make that new directory the present working directory (PWD)1.
Enter the following command line program2 on one line in your terminal session. If it wraps naturally around to the next line when you are typing and it reaches the maximum width of the terminal window, that is fine; just don’t press the Enter key until you have entered all of the program.
$ for X in `seq -w 200` ; do echo "Hello world file$X" > testfile$X.txt ; done
$ ls
testfile001.txt  testfile041.txt  testfile081.txt  testfile121.txt  testfile161.txt
testfile002.txt  testfile042.txt  testfile082.txt  testfile122.txt  testfile162.txt
testfile003.txt  testfile043.txt  testfile083.txt  testfile123.txt  testfile163.txt
testfile004.txt  testfile044.txt  testfile084.txt  testfile124.txt  testfile164.txt
testfile005.txt  testfile045.txt  testfile085.txt  testfile125.txt  testfile165.txt
<SNIP>
testfile037.txt  testfile077.txt  testfile117.txt  testfile157.txt  testfile197.txt
testfile038.txt  testfile078.txt  testfile118.txt  testfile158.txt  testfile198.txt
testfile039.txt  testfile079.txt  testfile119.txt  testfile159.txt  testfile199.txt
testfile040.txt  testfile080.txt  testfile120.txt  testfile160.txt  testfile200.txt
tuser@testvm1:~/Test$
The back-tics (`) around `seq -w 200` are not regular single quotes. The back-tic is located on the Tilde (~) key which is usually just below the Escape key on most keyboards. Use the Shift-Tilde key combination to get the back-tic. If you don’t want to enter that command from the keyboard, you can copy and paste directly.
Introducing the Thunar file manager
Thunar is the default GUI file manager for the Xfce desktop. There are many other file managers for Linux but Thunar is one of the best. A complete set of documentation for Thunar3 is maintained at the Xfce web site. You can also access the help for Thunar using the Menu bar==>Help item.
Launching Thunar
There are three ways to launch the Thunar file manager using the Xfce desktop. You can click on the file cabinet icon on the bottom panel (panel 2), the Home icon on the upper left side of the desktop, or the Applications==>File Manager menu sequence on the upper panel (panel 1). Figure 1 shows all of these options along with an open instance of Thunar. Note that the Home icon has been moved to the lower left side so that it will be visible instead of covered by the Applications menu.
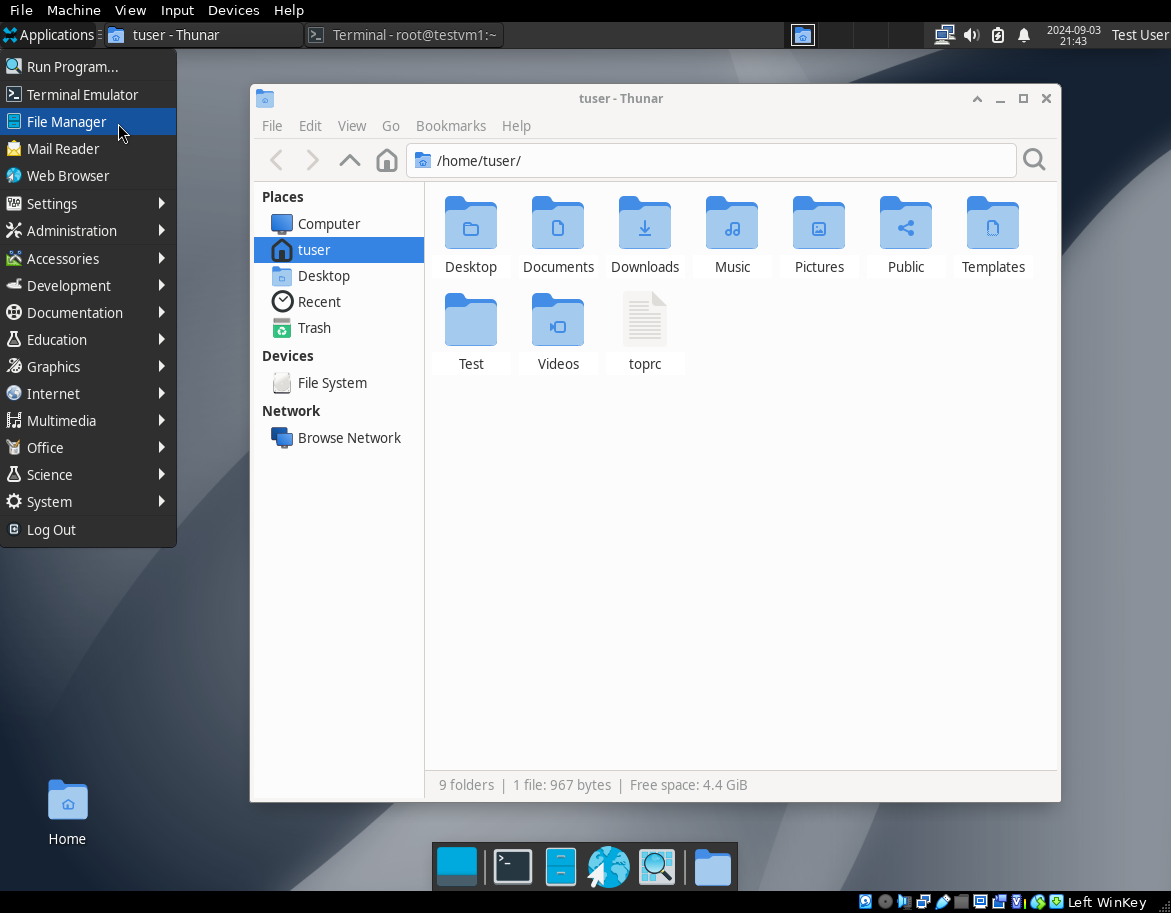
The desktop icons in Xfce must be double-clicked while the panel icons only need a single click. Other desktops have similar options for launching applications but the details may vary. The view of your home directory in Figure 1 shows the default directories as well as the toprc4 file and the new Test directory. None of the so-called hidden files are displayed although that can be changed in the Thunar configuration.
The Thunar interface
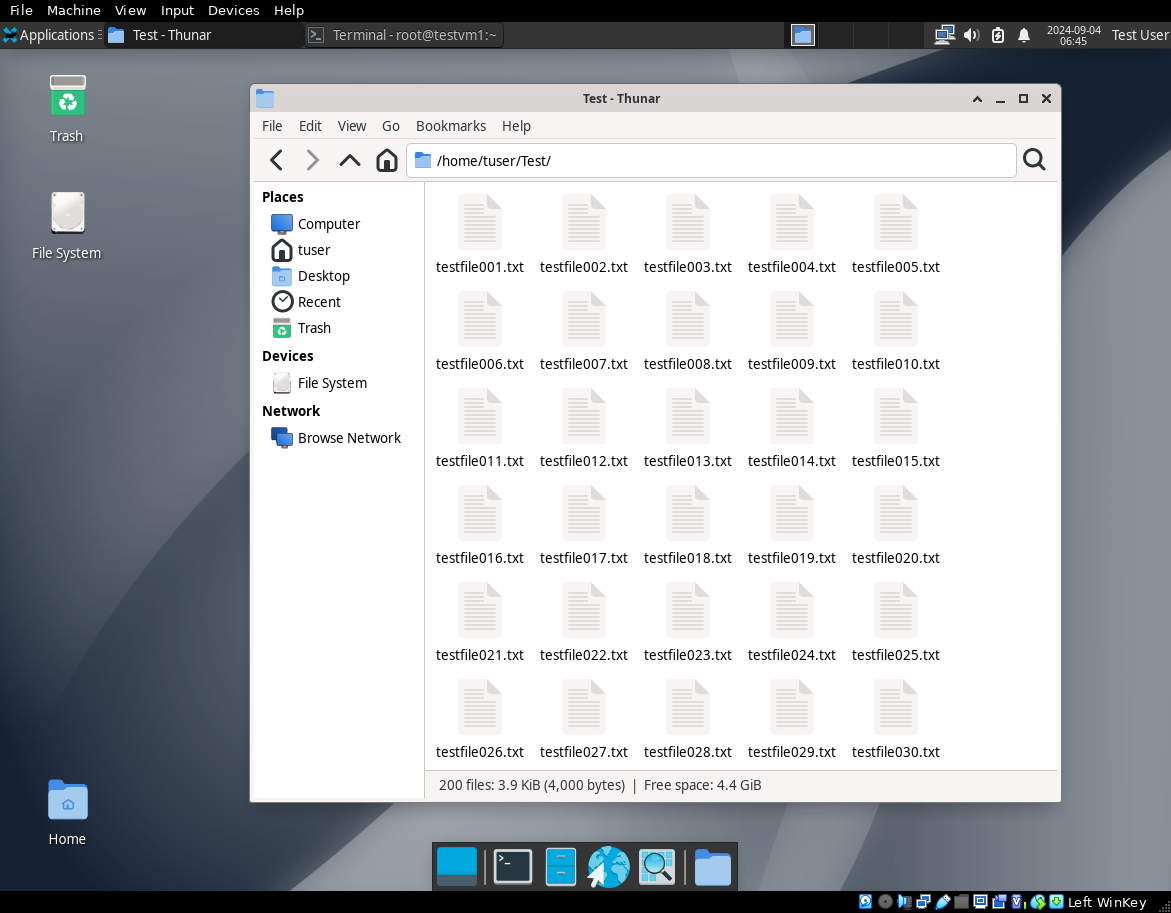
Double-click on the Test folder icon to enter that directory. Figure 2 shows Thunar with some of the files you created. We’ll use this directory to explore the Thunar user interface. Click on the image to enlarge it.
The Thunar Side Panel, on the left, contains a Places section with icons that allow quick access to an overall view of the computer which includes the File System and all storage devices including any external thumb drives or other USB storage devices. The tuser icon gives immediate access to your home directory — it does look like a little house after all.
The Desktop icon does not really take you to the desktop. Its just a place-holder for some types of files that are related to the desktop. It may also be empty.
And, of course the Trash icon opens the trash bin. If you have deleted a file and not configured Thunar to delete files immediately, the deleted file or files will be located here. You can simply drag them from the Trash bin to the directory from which they were deleted. The Trash icon on the desktop also allows access to the Trash bin.
The Devices section only contains the File System. If you were to plug in an external storage device that would also appear in this section.
The Network section will not display any locations other than Browse Network unless the host is connected to an internal network with some shared filesystems from other hosts or a Network Attached Storage (NAS)5 device.
Note that there are multiple ways to access each of these locations using Thunar. Spend a few minutes to explore these just to familiarize yourself with them. When you have finished that, click on the Home icon in the Thunar side panel.
The right side of the Thunar is the file management window; it’s also known as the Main area. This window currently displays the files and directories in the PWD. Figure 2 shows the files we created in the Test directory in the Icon view which is the default.
Thunar configuration
Let’s take a few minutes to configure Thunar. Once again there is more than one way to access the configuration options for Thunar. You can get to all of them using Applications==>Settings==>File Manager Settings or you can use the menu bar at the top of the Thunar window to access the View menu quickly. Let’s start by doing that.
Location Selector
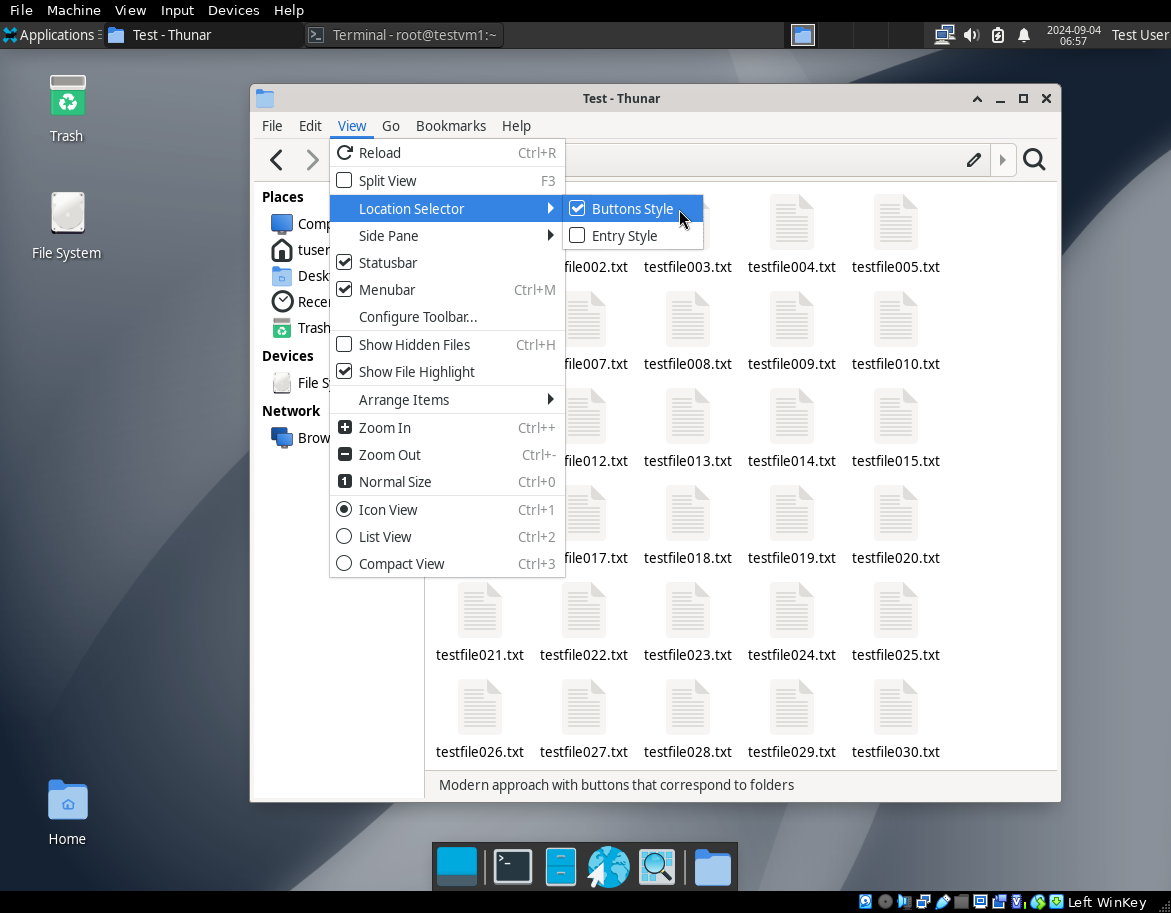
Figure 3 shows the View menu. I like to set the location selector to Toolbar style because it changes the text mode path to a series of buttons that you can click on to go immediately to that directory. Click on View==>Location Selector==>Toolbar Style to make that change. The menus will disappear and the path will now show in the Button style. Single-click on the Home icon and watch what happens to the Location toolbar. Now double-click on the Documents directory. Notice the arrow on the left side of the Location toolbar and click on it.
On the right side of the Selector is a pencil icon. Click on that and you can type in any path to which you have access. Try it now with /tmp – without the quotes.
Return to your Test directory.
File View
I also like to change one other thing on the View menu. I like to switch to the List view because it shows more files in a format similar to a long listing on the command line. Try that to see how it looks. Then change to the Compact view which only shows file icons and names and which lists the largest number of files in the available space.
You could also select Show Hidden Files but that is not necessary. As you use more applications they will store their configuration information in hidden files. This can add unnecessary clutter to the list of files and you won’t need to deal with these files directly anyway so there is no point in showing them – most of the time.
File Manager Preferences dialog
Now let’s use the File Manager Preferences dialog window which provides more configuration options for Thunar. This dialog can be accesses in multiple ways also. From the Thunar Menu bar choose Edit==>Preferences. Or you could open it from the Applications menu in the upper panel, Applications==>Settings==>File Manager Settings. Finally you could also use the Applications menu to open the Settings Manager Applications==>Settings==>Settings Manager and then click on the File Manager Settings icon.
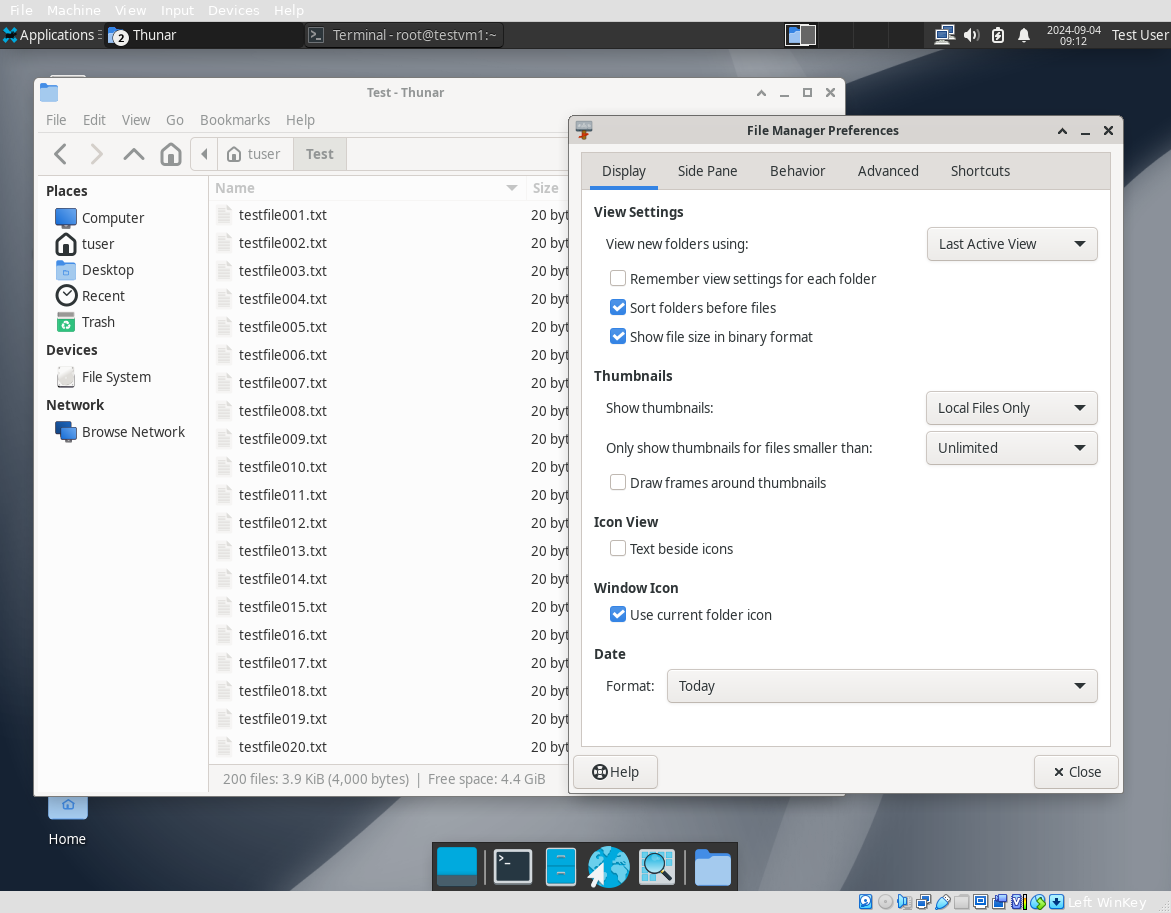
Whichever method you use to launch it the result will be the same. Figure 4 shows the File Manager Preferences dialog with its four tabs. Open the File Manager Preferences dialog now.
Display tab
The Display allows setting the view options like we have already done but with a bit more choices. One example of this is the View Settings in which you can also choose Last Active View. What this means that if you choose a view such as List view instead of the default Icon view that now becomes the default view. I sometimes like to use a different view but I always prefer the List view as the default.
You may also choose to have different views for each folder. The checkbox “Remember view settings for each folder” enables you to activate that. For example, with this box checked, you can set the Icon view for your home directory and the List view for your Documents directory and these settings will be persistent for future access to those directories.
Another default is to “Sort folders before files” which always puts folders, i.e., directories at the top of the listing. I like this default because it makes it easier to find directories.
Side Pane tab
By default the Side Pane is in shortcut mode. The Side Pane tab allows you to set the size of the icons in the Shortcuts and Tree panes. It does not let you select between those two views. The only way to select the tree view for the Side Pane is from the Thunar Menu bar. Select View==>Side Pane==>Tree to see this. Then click on the “twisty,” the triangular shape next to the Student icon, to open the tree view of your home directory. The Side Bar now shows a tree view of your home directory. It also has sections for Computer, Trash, and File System and shows those directory structures in a tree view that allows you to select a needed directly quickly and gives a good overview of each of those directory structures.
For now leave the Side Pane in the Tree view because we will use that view.
Behavior tab
This tab allows configuration of four aspects of Thunar behavior. The first is whether a single or double-click is required to open a data file or to execute a program file. I suggest leaving this at a double-click. An accidental single-click on a file or directory can produce undesired results. You can try single-click but it is easy to return to double-click.
The second item here is whether a folder is opened in a new window or as a new tab in the existing Thunar window when selected. I prefer new tabs to help keep the rest of the desktop from getting cluttered with Thunar windows.
Third, transferring files in parallel can make a huge difference in overall speed when moving files from one directory to another or from the home directory to an external USB device. Depending upon the speed of your network connection it can increase overall transfer speeds there, too. The default setting of “Local Files Only” is the best setting for most users so don’t change this.
I like having the option to permanently delete files and folders without sending them to the Trash bin. So this fourth item, when selected, causes a “Delete” option to be added to the normal context menu when you right click on a file. For now you should leave this as it is for your own account until you have more experience with Linux and file management with Thunar. Once a file is deleted it cannot be recovered unless there is a backup. If it goes to Trash it can be easily copied from Trash to the original directory.
Advanced tab
This tab should not be changed because it already sets the best options for most users. In this case it is a really good idea for Thunar to ensure that you really do want to change permissions on a directory.
Volume Management is a term used for managing storage devices when they are connected to the host. It will ask what you want to do when a new device is connected to the computer. You can use the Configure link to enable certain things to take place automatically such as to mount an external storage device, burn a CD or DVD when a blank one is inserted into a CD/DVD drive – even though many computers no longer come with those drives installed. It can be configured to automatically play CDs when they are inserted into a CD drive, automatically play files on a “music player,” import photos from a camera, and more.
I suggest leaving these options inactive. Having those things start automatically can be the cause of some unexpected results. I prefer to do these things manually without programmatic intervention. Your needs may be different so you should experiment when you make changes to the Advanced tab to ensure that unexpected results do not occur.
File management with Thunar
With Thunar configured more to your liking, we can explore file management. For the most part, Thunar can do the same things in its GUI interface that can be done on the command line such as move, copy, and delete files. It does work a bit differently. If the Preferences dialog is still open, close it now. The Thunar window should be open and your home directory should be the PWD. There should be some files in your home directory along with the new Project directory.
Basic navigation
Navigation around the directory tree is easy and there are almost always multiple ways to get to the directory you want. Figure 11-3 shows most of these in one way or another.
The Side Pane should show the expanded view of your home directory. You can click on any of the directory icons to navigate to that directory.
Before we do that, use the Side Pane to right-click on the Public directory now to raise the context menu. The Public directory is an ancient remnant from Unix that is kept around for compatibility purposes in case the Linux host is used in an environment that might take advantage of that Public directory.
In the context menu, click on Create Folder… then type the name of the folder, MyFolder, and press the Create button. Notice what has happened to the Public icons in the Side Pane and the main window which contains the contents of the PWD. The Side Panel now shows a twisty next to the Public icon and the main window now shows the ~/student/Public/MyFolder directory as the PWD.
There are four icons to the immediate left of the Location Selector. These icons, <,>,^, and a house, are used to perform simple navigation tasks. You can navigate to the previous (<) directory displayed no matter where in the directory tree it exists relative to the PWD. You can go to the Next (>) directory. Use the Up (^) icon to navigate to the parent directory of the PWD. And of course the house icon always takes you to your home directory.
Any time there is a directory icon in the file pane you can double-click on that icon to navigate to that directory. And, of course, you can always use the Location Selector to either click on a directory button or type in a new directory path.
Selecting files
Many times it is desirable to perform an operation on multiple files simultaneously, such as moving or deleting them. Selecting a single file is easy, just click on it. Selecting multiple files is almost as easy.
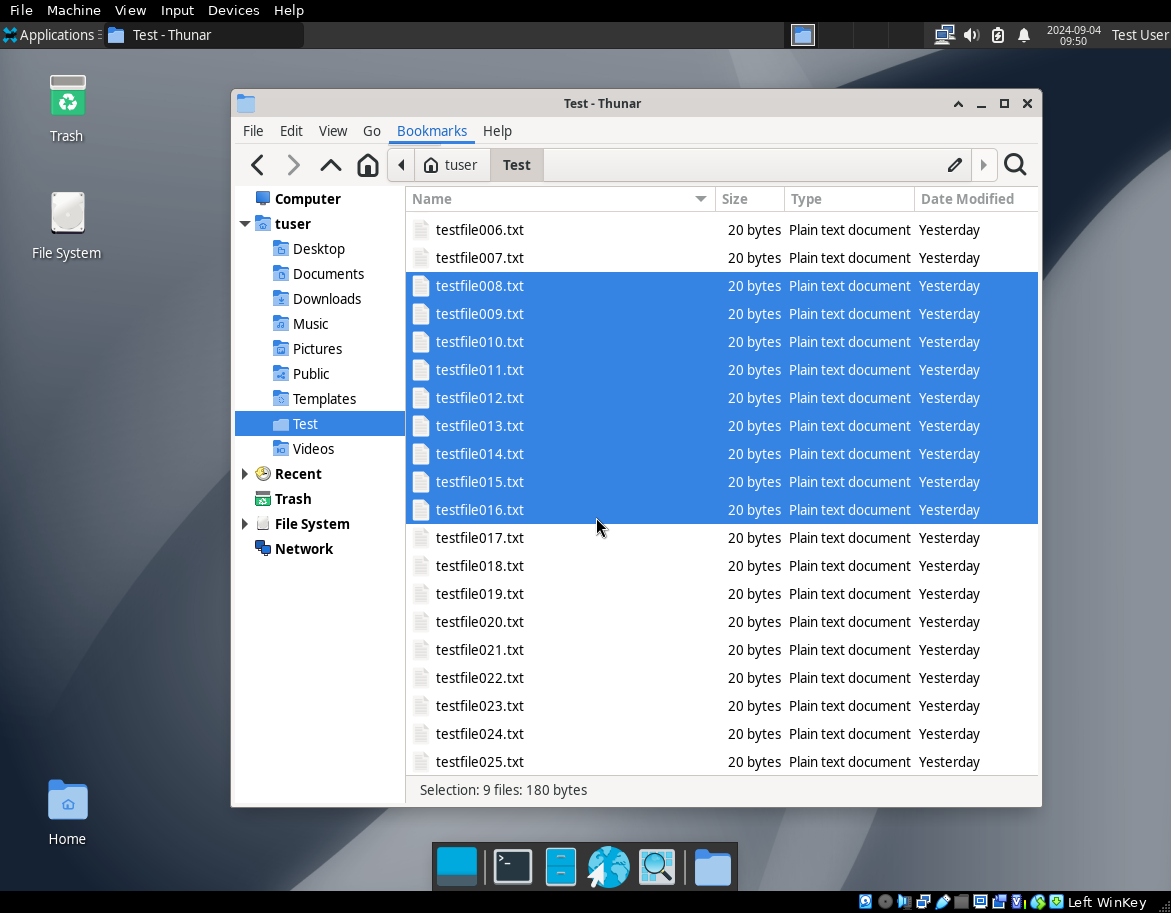
To select several files that are listed sequentially in the Thunar window, Select the first file in the sequence then hold down the shift key. Select the last file in the sequence, hhold down the shift key and click on the last file. All of the files between the two that you clicked on will be highlighted. In Figure 5 I have used this technique to select the highlighted files.
At this point we can drag these files to move them to a different directory. Go ahead and move the selected files to the Public directory icon in the side panel — this is why we left this in tree mode. Point to any space highlighted in blue, left click, drag until the Public directory is highlighted, then release the mouse button.
To copy them rather than move them, you would hold down the Control (Ctrl) key before you click to start the move. Double-click on the Public directory to make it the PWD and select all of the files you just moved there.
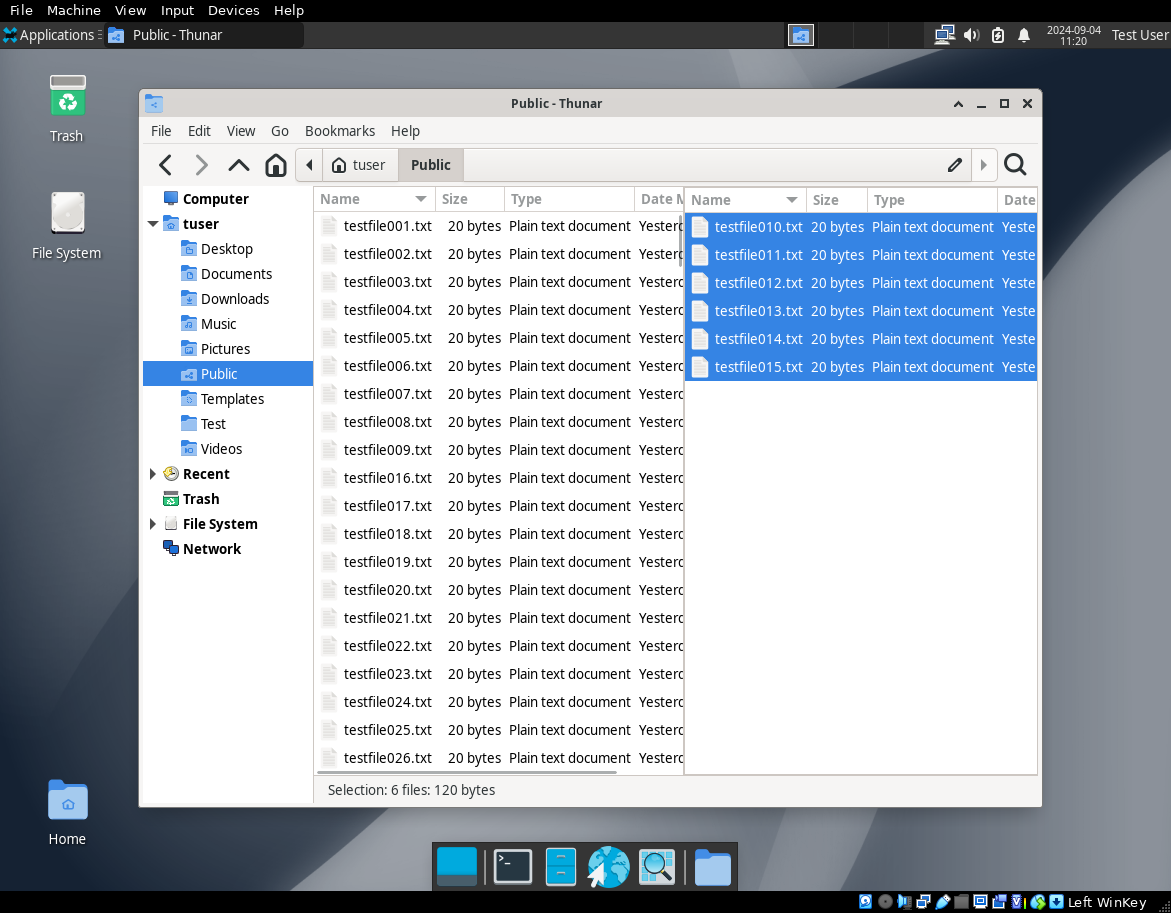
Thunar has a useful Split mode feature that can display two different directories simultaneously. Press F3 to enter and exit Split mode. You can also use the Menu bar and open the View drop-down menu. Then click on the Split checkbox.
Figure 6 shows the Test directory on the left and the Public directory on the right. I’ve already selected all of the files in the Public directory and can now move them back into the Test directory. Just drag and drop to do that then make the Test directory the PWD by clicking on any file in that window pane. Then press F3 to exit Split mode.
Another option would be to open a second instance of Thunar on the desktop and navigate to the target directory in that instance. It is then easy to drag files from the first instance to the PWD in the second instance.
Deselecting files
If you need to deselect all selected files click on any empty space in the file list window. To deselect individual files from a number of selected ones, hold the Control (Ctrl) key down and click on the file or files to be deselected.
Using the context menu
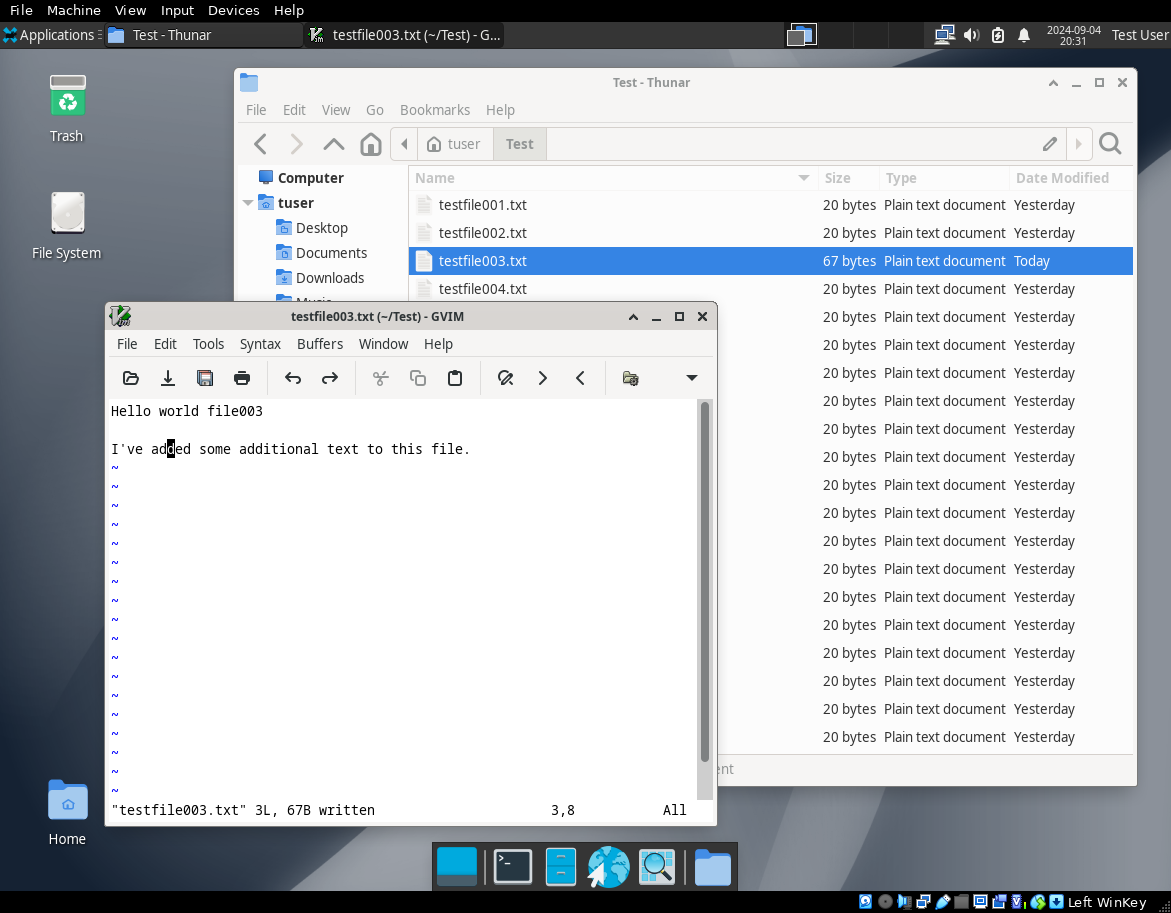
Locate testfile014.txt and right-click on it to display the context menu. Although you may have configured Thunar to look differently than mine, Figure 7 shows the List view and the context menu for testfile14.txt.
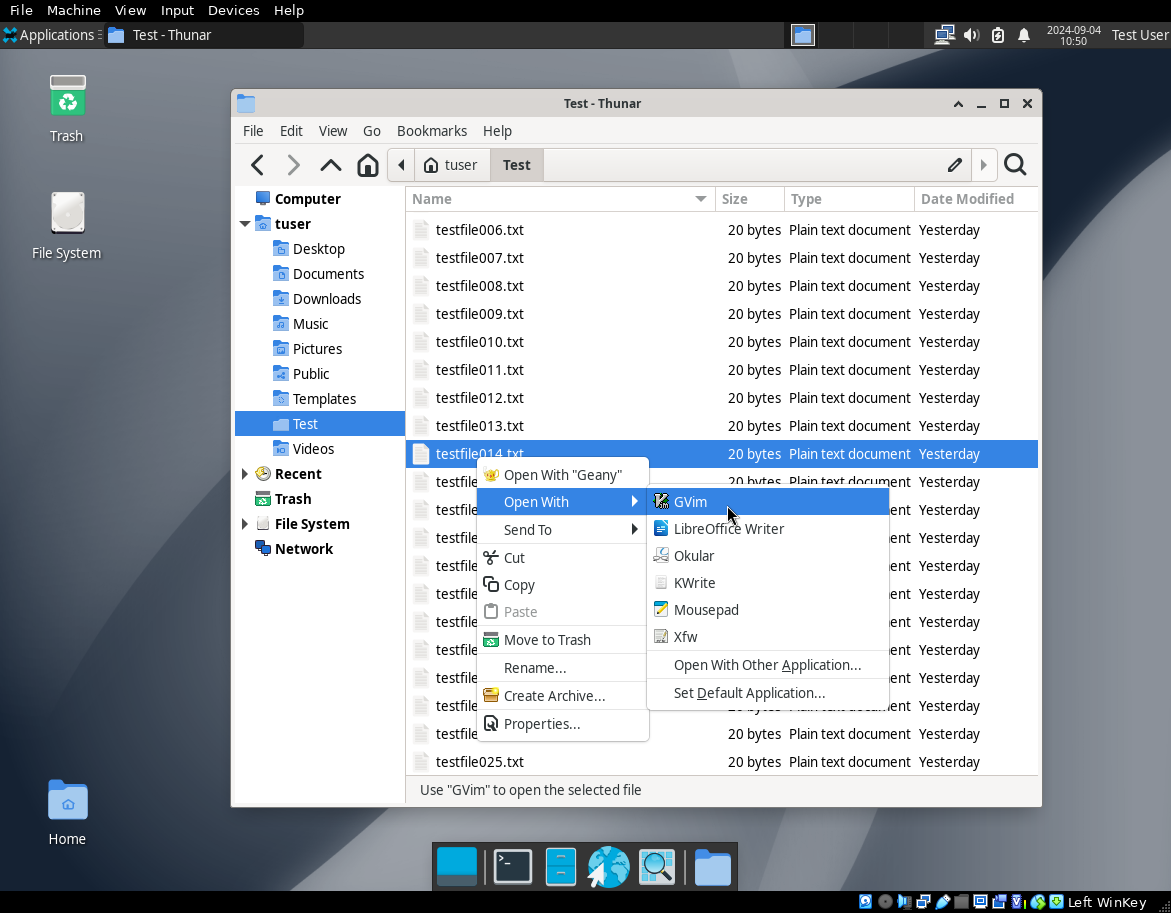
Choose the Open With item in the context menu and select the gvim text editor. Figure 8 shows the file open in the text editor. At this point you can edit this file to change it. Go ahead and add some text to it. It does not matter what it is just change the file. Save the file using the Menu bar==>File==>Save. Then exit from the editor. If you are using the List view you will see that the file size has changed and is different from the others.
Back in Figure 7, the default option at the top of the context menu will vary depending upon the three character file name extension. The context menu also shows an option, Open With which lists other programs that could be used to open this file. Hover the mouse over that item to see the other option at this time, Geany, an “Integrated Development Environment” (IDE) which can edit text files that are used as source code for program developers. You probably won’t use Geany. LibreOffice is installed so that also shows up as an option because it can edit text files.
The Send To options in the context menu allow sending a file to an email address, or to a device such as a phone or tablet using Bluetooth. The computer must have Bluetooth hardware installed and active for the latter.
The Move to Trash menu item performs as its name implies. You can also highlight one or more files and press the Delete key to move them to Trash.
Copy performs a copy of the entire file and Paste will paste the copy into the current directory (PWD) with a new name such as “testfile003 (copy 1).txt” which does use spaces and special characters. If you select a different directory into which to paste the file it will have the same name as the original. In both cases this is an identical and separate copy of the original file and not a link or short-cut.
The Rename menu item allows renaming of a file.
Archiving files
Most of us have received or downloaded zip files. The zip format is an old DOS/Windows type of archive file. A comparable archive file for Linux is the tar file. Tar stands for Tape ARchive which gives you an idea about how long it has been around. Although both types of archive files have been around for a long time, they are still commonly used to create an archive.
There are many types of archive files but tar and zip are the most common and well known. The point of any archive tool is to create a single file that is an “archive” of multiple files and which may be compressed to save space and network bandwidth when being transferred or downloaded.
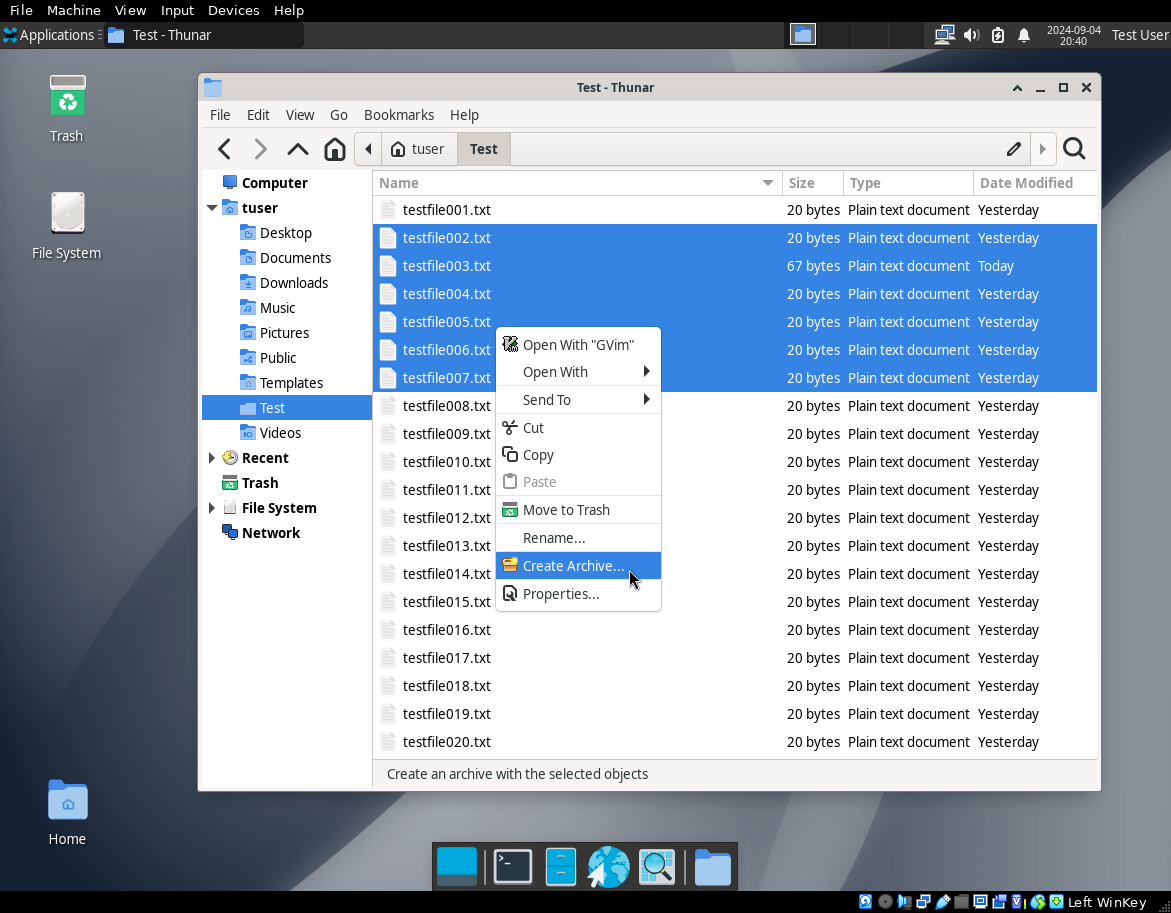
The Create Archive context menu option is an easy way to create archives such as zip files and tar files of one or more files that you select. However it is a little tricky because what you see is not exactly what you get during this process.
Start by selecting several of the files in your Test directory. Hover over any of the selected files and right-click to raise the context menu as shown in Figure 9.
Click on the Create Archive menu selection to start the process. If more than one archime manager is installed, you’re first asked to choose the one you wan to use. I use XArchiver, so choose that one for this experiment.
You’ll then see the Create a new archive dialog shown in Figure 10. This dialog guides the process of creating and storing the archive. In Figure 10 I have already clicked on the Archive type button. Do this yourself now and scroll down to find and select the zip option. This adds a zip extension to the file name in the Name text field near the top of the dialog. Note that the file list does not show the selected files nor can any additional files be selected in that field. This is what I found confusing the first time I used this method for creating archive files.
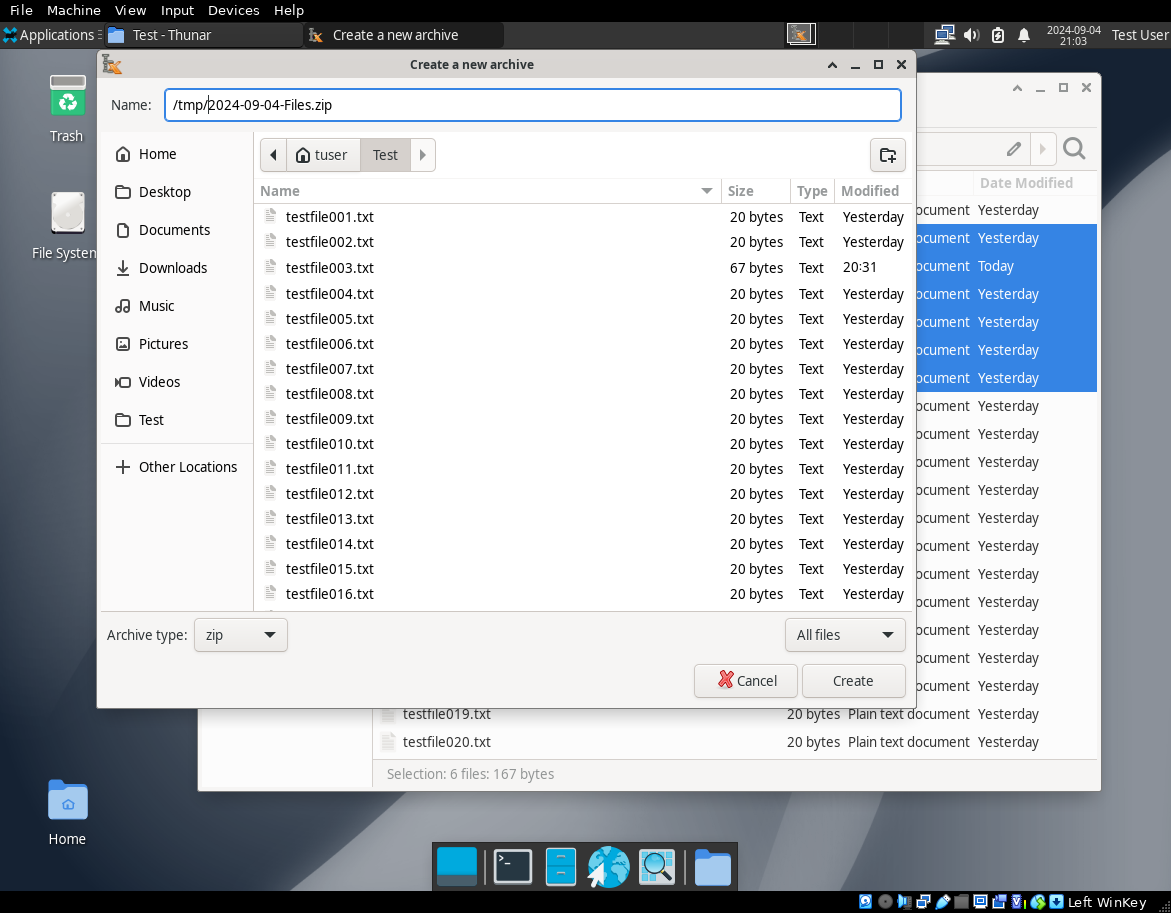
Note that I have changed the name of the archive file that will be created by this process to /tmp/2024-09-04-Files.zip. This date format, YYYY-MM-DD-<filename>, allows files to be automatically sorted sequentially by date when displayed in a file manager or CLI list. Using this file naming convention makes finding files like archives and date-related documents such as credit card or bank statements easy.
To create the archive file, click on the Create button and the Create a new archive dialog disappears. It looks like nothing has happened because there is no message to the effect that, “The archive has been created.” This is in line with the Linux Philosophy of “Silence is Golden.”
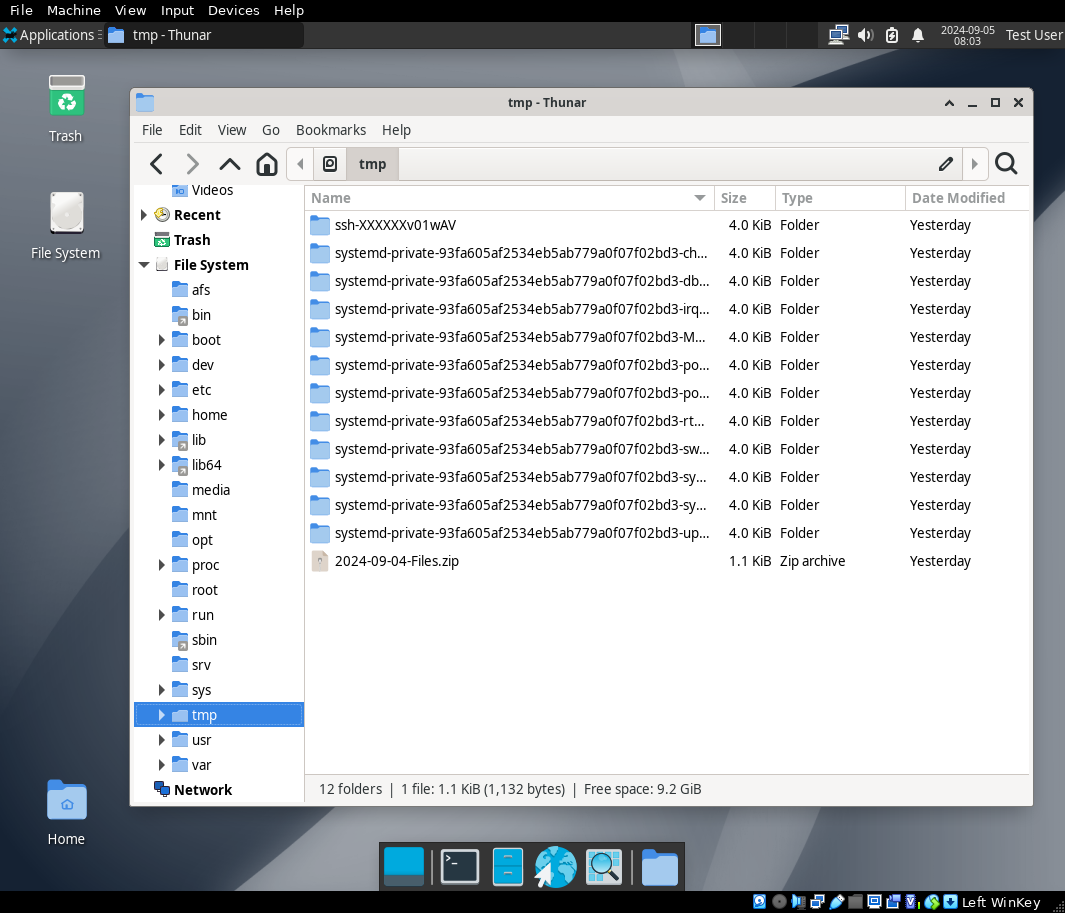
Verify that the archive was created by using Thunar to check the /tmp directory. Open the File System tree and click on the tmp directory. Figure 11 shows the open File System tree and the contents of the /tmp directory.
File Properties
The last menu item at the bottom of the file context menu is Properties which opens a dialog that allows changing many – but not all – of the file’s attributes.
With your Test directory as the PWD in Thunar, right-click on testfile001.txt to raise the Properties dialog as in Figure 12. I have changed the file name to testfile01-a.txt in the Name field but the name does not actually change until the Close button is pressed or another tab is selected. This dialog also shows that this is a plain text document based on the .txt file name extension. If the extension were .doc it would tell us that this is a Word document and an .odt extension would be for a LibreOffice document. You can open another instance of Thunar, navigate to the Documents directory, and open the Properties dialog to verify this. Just remember that these are text files and not actually Word or LibrOffice documents.
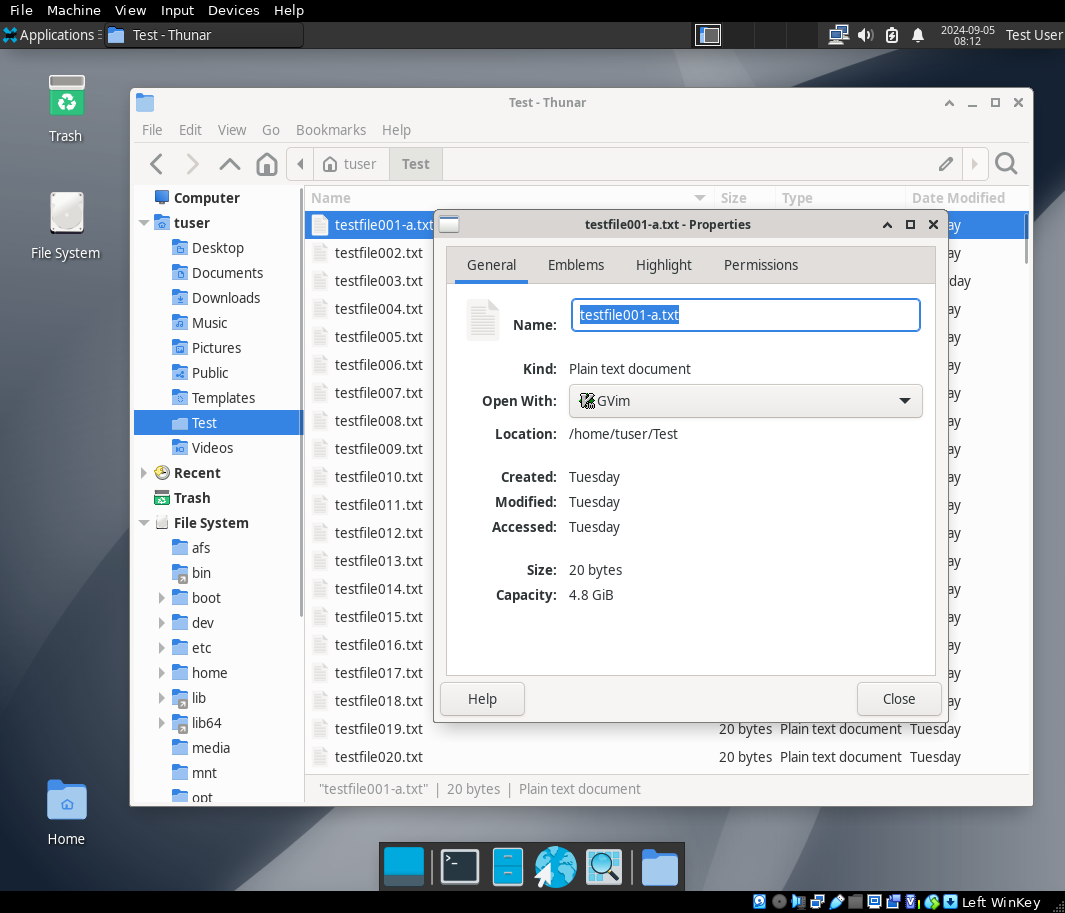
The General tab also shows the location of the file, its size in bytes, the last date it was modified, and the date it was last accessed. “Accessed” means that the file has been viewed using the cat command, a text editor, or other tool that can view the contents of the file. For a Word or LibreOffice document that would be LibreOffice, for example.
The Emblems tab shows a list of icons from which you can choose to replace the default icon. Choose one of those icons; it does not matter which.
The Permissions tab allow you to change the permissions and the group to which the file belongs. It is unlikely that you will need to change anything on this tab. The default file permissions are appropriate for almost any situation unless you start writing executable shell programs.
Close the Properties dialog and look at the file in the listing. Notice the file name and icon changes.
Do not close the Thunar dialog yet.
Using external storage devices
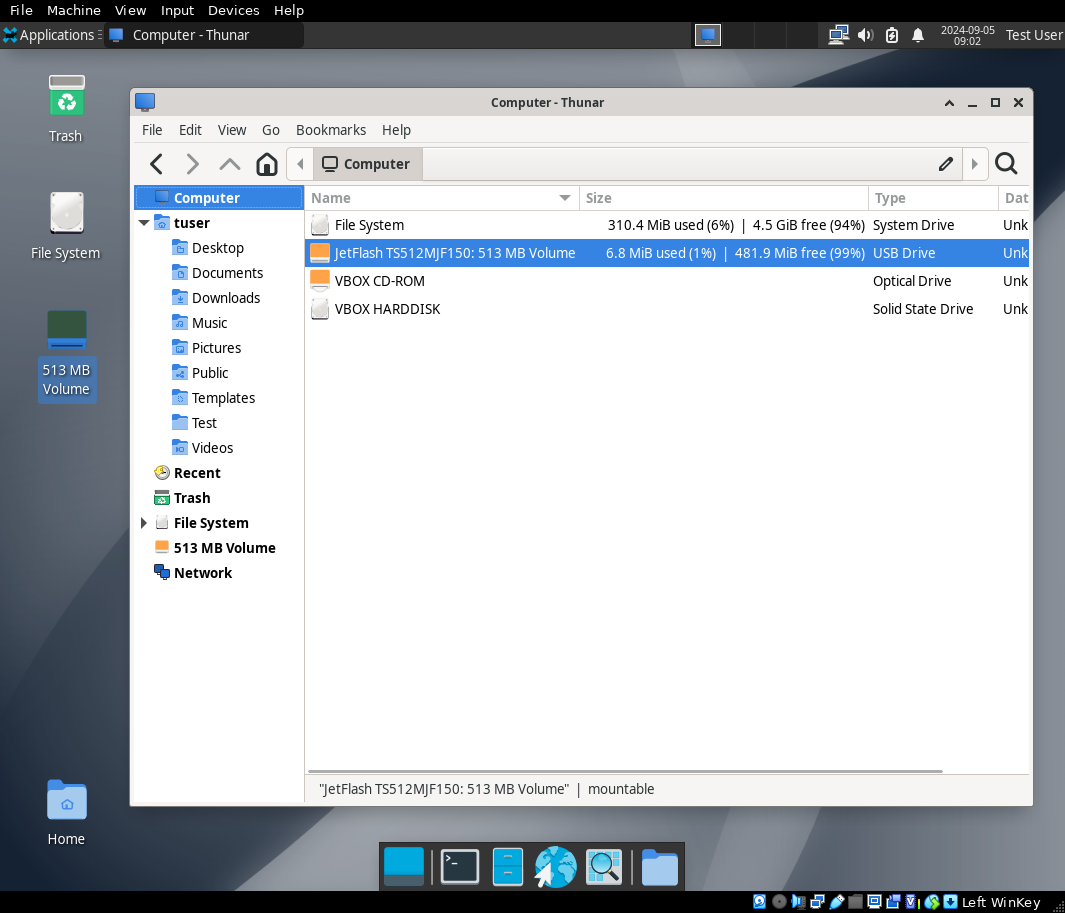
There will always be times when using an external storage device such as a USB thumb drive or other USB storage device will be useful or even necessary. Most of us have at least several USB thumb drives around; choose one that you know has some data stored on it. A small one is fine.
Insert that USB thumb drive into a USB slot on your computer. Figure 13 shows the new device which I’ve highlighted. The USB device is automatically mounted. Click on it to open and view the contents. Your USB device will show a different set of files, but mine has tow files on it. If your USB device doesn’t have any files, or you don’t want to use the ones that exist, create a couple new ones with a bit of text in them.
Assume that you want to copy those two files to your ~/Documents directory so you won’t need to access them on the USB drive in the future. You could open the tuser directory tree in the Side Pane, but let’s do this a little differently. Open a second instance of Thunar and navigate to the ~/Documents directory in that second instance. Move the two instances on the desktop so that they are both visible. The first instance of Thunar can partially cover the second instance if you do not have a lot of room (real estate) on your display screen. Just be sure that the file list pane is visible in the second instance of Thunar.
Select both files in the first instance and drag them to the Documents directory in the second instance to copy.
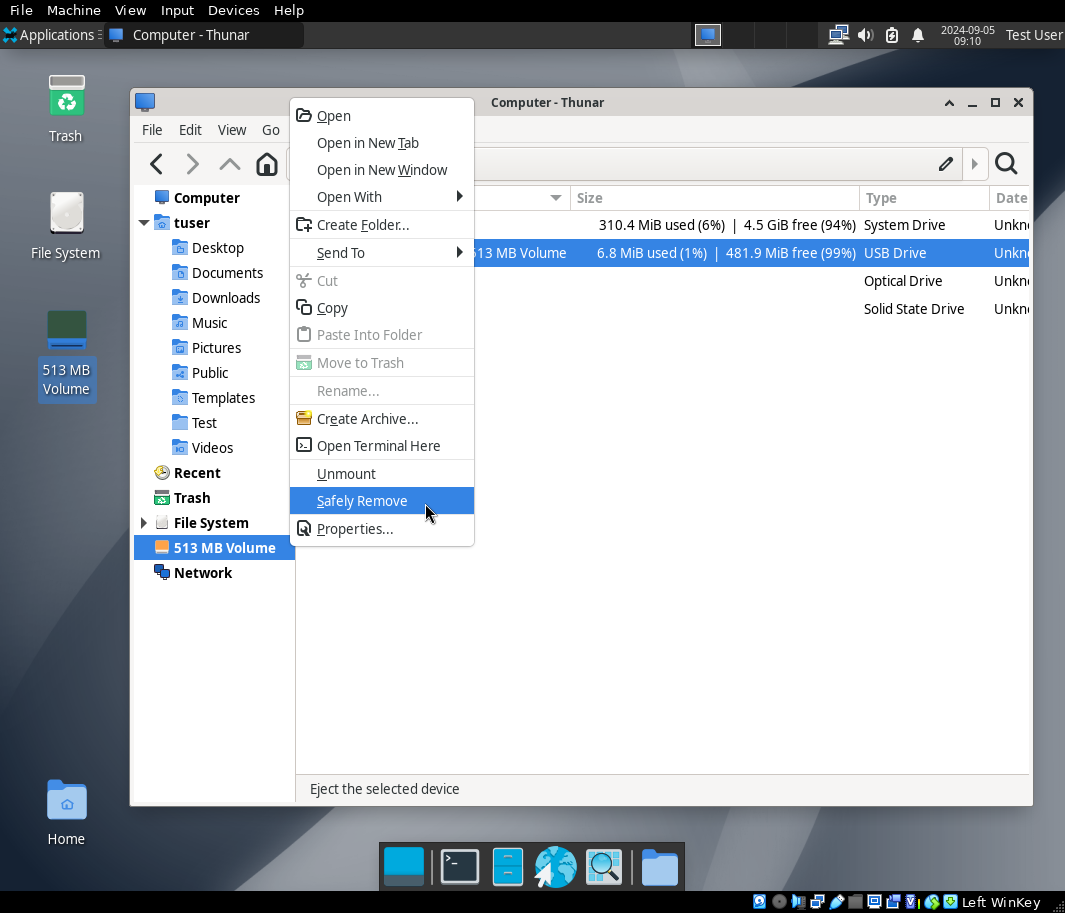
Be sure to unmount/eject the USB device before you unplug it from the computer. Left click on the device in the sidebar to open the context menu. Figure 14 shows the context menu for the Live USB device and the Unmount option is near the bottom of the menu. There is also an Safely Remove option.
You can also use the Safely Remove button next to the device name on the desktop icon.
Use either of these choices to unmount the device. Note that the icon on the desktop becomes grayed out and a status message is displayed in the upper right of the display. Once unmounted you can remove the USB device from the computer.
The Trash bin
So you have been using the Thunar file manager to move files to the Trash bin. You should use Thunar or the desktop Trash icon to check the Trash bin on a fairly regular basis, daily at best and at least weekly, to determine whether you might have accidentally deleted any files you really want to keep. The Trash bin is just like any other directory. You can move or copy files out of it and back to their appropriate locations.
After you have ensured that the files in the Trash bin are really OK to permanently delete, right click on the Trash icon, either on the desktop or in Thunar, and select Empty Trash. The files can no longer be recovered unless they have been backed up.
Cleanup
You no longer need the test files that you created at the beginning of this article. Use Thunar to delete the Test directory and all of the files it contains.
Summary
This chapter has been an introduction to file management using the Thunar file manager. There is a lot more, but what you have learned in this chapter is sufficient to get you started.
- The PWD (Present Working Directory) is, in the context of file managers like Thunar, the directory currently on display in the file window. ↩︎
- Some of you are asking yourselves, “Command line WHAT??!” Yes, you are going to write a simple program. ↩︎
- Xfce.org, Thunar documentation, https://docs.xfce.org/xfce/thunar/start ↩︎
- The toprc file is the configuration file for the top program. ↩︎
- Wikipedia, Network Attached Storage, https://en.wikipedia.org/wiki/Network-attached_storage ↩︎
More Stories
Open Source on macOS: Exploring Free Software on My M3 MacBook
Lead Image by Tom's Hardware Guide Open-source software is not restricted to Linux. While I spend most of my time...
Call for articles — Switching to Linux
October 25 is the last day of support for Win10 and over 400 million PCs can't upgrade to Win11. I...
Moving from Windows 10 to Linux
Instead of purchasing a new computer just to run a new version of Windows, consider installing Linux.
The Linux Philosophy for SysAdmins, Tenet 18—Document everything
“Real programmers don’t comment their code, if it was hard to write, it should be hard to understand and harder to modify.”
— unknown
Signal Messenger: Privacy, Simplified with Open Source
Messaging apps have revolutionized communication, reshaping our daily lives and relationships. It’s hard to imagine a time without SMS paving...
Connect to a Windows drive from Linux
Here’s how I connected my Linux system to a Windows AD fileshare.