
The Linux Philosophy for SysAdmins, Tenet 03 — Everything is a File
Last Updated on August 10, 2024 by David Both
Author’s note: This article is excerpted in part from chapter 5 of my book, The Linux Philosophy for SysAdmins, with some changes.
This is one of the most important concepts that makes Linux especially flexible and powerful: Everything is a file. That is, everything can be the source of a data stream, the target of a data stream, or in many cases both. In this article you will explore what “everything is a file” really means and learn to use that to advantage as a SysAdmin.
The whole point with “everything is a file” is … the fact that you can use common tools to operate on different things.
Linus Torvalds in an email.
What is a file?
Here is a trick question for you. Which of the following are files?
- Directories
- Shell scripts
- Running terminal emulators
- LibreOffice documents
- Serial ports
- Kernel data structures
- Kernel tuning parameters
- Hard drives – /dev/sda
- /dev/null
- Partitions – /dev/sda1
- Logical Volumes (LVM) – /dev/mapper/volume1-tmp
- Printers
- Sockets
To Unix and Linux they are all files and that is one of the most amazing concepts in the history of computing. It makes possible some very simple yet powerful methods for performing many administrative tasks that might otherwise be extremely difficult or impossible. Linux handles almost everything as a file and that has some interesting and amazing implications. This concept makes it possible to copy an entire hard drive, boot record included, because the entire hard drive is a file, just as are the individual partitions.
“Everything is a file” is possible because all devices are implemented by Linux as these things called device files. Device files are not device drivers, rather they are gateways to devices that are exposed to the user.
Device Files
Device files are technically known as device special files. Device files are employed to provide the operating system and, even more importantly in an open operating system, the users an interface to the devices that they represent. All Linux device files are located in the /dev directory which is an integral part of the root (/) filesystem because they must be available to the operating system during early stages of the boot process–before other filesystems are mounted.
Device data flow
Let’s look at the data flow of a typical command to visualize how device special files work. Figure 1 illustrates a simplified data flow for a simple command. Issuing the cat /etc/resolv.conf command from a GUI terminal emulator such as Konsole or xterm causes the resolv.conf file to be read from the disk with the disk device driver handling the device specific functions such as locating the file on the hard drive and reading it. The data is passed through the device file and then from the command to the device file and device driver for pseudo-terminal 6 where it is displayed in the terminal session.
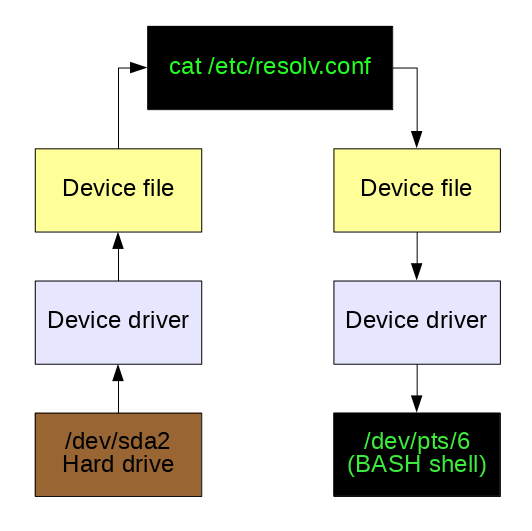
Of course the output of the cat command could have been redirected to a file in the following manner, cat /etc/resolv.conf > /etc/resolv.bak in order to create a backup of the file. In that case the data flow on the left side of Figure 1 would remain the same while the data flow on the right would be through the /dev/sda2 device file, the hard drive device driver, and then back onto the hard drive in the /etc directory as the new file, resolv.bak.
These device special files make it very easy to use Standard Streams (STDIO) and redirection to access any and every device on a Linux or Unix computer. They provide a consistent and easy to access interface to every device. Simply directing a data stream to a device file sends the data to that device.
One of the most important things to remember about these device special files is that they are not device drivers. They are most accurately described as portals or gateways to the device drivers. Data is passed from an application or the operating system to the device file which then passes it to the device driver which then sends it to the physical device.
By using these device files which are separate from the device drivers it is possible for users and programs to have a consistent interface to every device on the host computer. This is how common tools can be used to operate on different things as Linus says.
The device drivers are still responsible for dealing with the unique requirements of each physical device. That is, however, outside the scope of this article.
Device File Classification
Device files can be classified in at least two ways. The first and most commonly used classification is that of the type of data stream commonly associated with the device. For example tty and serial devices are considered to be character based because the data stream is transferred and handled one character or byte at a time. Block type devices such as hard drives transfer data in blocks, typically a multiple of 256 bytes.
Let’s take a look at the /dev directory and some of the devices in it. This experiment should be performed as a normal, that is a non-root, user. Open a terminal session and display a long listing of the /dev directory.
tuser1@testvm1:~$ ls -l /dev | less
total 0
crw-r--r--  1 root    root     10, 235 Jul 25 08:40 autofs
drwxr-xr-x  2 root    root         260 Jul 25 08:40 block
drwxr-xr-x  2 root    root          80 Jul 25 04:40 bsg
crw-rw----  1 root    disk     10, 234 Jul 25 08:40 btrfs-control
drwxr-xr-x  3 root    root          60 Jul 25 08:40 bus
lrwxrwxrwx  1 root    root           3 Jul 25 08:40 cdrom -> sr0
drwxr-xr-x  2 root    root        3800 Jul 27 07:50 char
crw--w----  1 root    tty       5,   1 Jul 27 07:49 console
lrwxrwxrwx  1 root    root          11 Jul 25 04:40 core -> /proc/kcore
drwxr-xr-x  8 root    root         160 Jul 25 08:40 cpu
crw-------  1 root    root     10, 124 Jul 25 08:40 cpu_dma_latency
crw-------  1 root    root     10, 203 Jul 25 08:40 cuse
drwxr-xr-x  8 root    root         160 Jul 25 04:40 disk
brw-rw----  1 root    disk    253,   0 Jul 25 08:40 dm-0
brw-rw----  1 root    disk    253,   1 Jul 25 08:40 dm-1
brw-rw----  1 root    disk    253,   2 Jul 25 08:40 dm-2
brw-rw----  1 root    disk    253,   3 Jul 25 08:40 dm-3
brw-rw----  1 root    disk    253,   4 Jul 25 08:40 dm-4
<SNIP>
crw-rw----  1 root    lp        6,   0 Jul 25 08:40 lp0
crw-rw----  1 root    lp        6,   1 Jul 25 08:40 lp1
crw-rw----  1 root    lp        6,   2 Jul 25 08:40 lp2
crw-rw----  1 root    lp        6,   3 Jul 25 08:40 lp3
drwxr-xr-x  2 root    root         160 Jul 25 08:40 mapper
crw-------  1 root    root     10, 227 Jul 25 08:40 mcelog
crw-r-----  1 root    kmem      1,   1 Jul 25 08:40 mem
drwxrwxrwt  2 root    root          40 Jul 25 08:40 mqueue
drwxr-xr-x  2 root    root          60 Jul 25 08:40 net
crw-rw-rw-  1 root    root      1,   3 Jul 25 08:40 null
crw-------  1 root    root     10, 144 Jul 25 08:40 nvram
<SNIP>
crw-rw-rw-  1 root    root      1,   8 Jul 25 08:40 random
crw-rw-r--+ 1 root    root     10, 242 Jul 25 08:40 rfkill
lrwxrwxrwx  1 root    root           4 Jul 25 08:40 rtc -> rtc0
crw-------  1 root    root    250,   0 Jul 25 08:40 rtc0
brw-rw----  1 root    disk      8,   0 Jul 25 08:40 sda
brw-rw----  1 root    disk      8,   1 Jul 25 08:40 sda1
brw-rw----  1 root    disk      8,   2 Jul 25 08:40 sda2
brw-rw----  1 root    disk      8,   3 Jul 25 08:40 sda3
<SNIP>
lrwxrwxrwx  1 root    root          15 Jul 25 04:40 stderr -> /proc/self/fd/2
lrwxrwxrwx  1 root    root          15 Jul 25 04:40 stdin -> /proc/self/fd/0
lrwxrwxrwx  1 root    root          15 Jul 25 04:40 stdout -> /proc/self/fd/1
crw-rw-rw-  1 root    tty       5,   0 Aug  3 09:03 tty
crw--w----  1 root    tty       4,   0 Jul 25 08:40 tty0
crw--w----  1 root    tty       4,   1 Jul 25 08:40 tty1
crw--w----  1 root    tty       4,  10 Jul 25 08:40 tty10
crw--w----  1 root    tty       4,  11 Jul 25 08:40 tty11
<SNIP>
crw-rw-rw-  1 root    root      1,   5 Jul 25 08:40 zero
brw-rw----  1 root    disk    252,   0 Jul 25 08:40 zram0
The results from this command are too long to show here in full but you will see a list of device files with their file permissions and their major and minor identification numbers. The voluminous output of the ls -l command is piped through the less pager utility to allow you to page through the results; use the Page Up, Page Down, and up and down arrow keys to move around. Type q to quit and get out of the less display.
The pruned listing of device files shown in this experiment are just a few of the ones in the /dev directory on my Fedora workstation. They represent disk, printer, memory, CPU, and tty type devices among many others. Notice the leftmost character of each line in the output. The ones that have a “b” are block type devices and the ones that begin with “c” are character devices.
The Linux Allocated Devices file at Kernel.org is the official registry of device types and major and minor number allocations. It can help you understand the major and minor numbers for all currently defined devices.
Fun with device files
Let’s take a few minutes now and have some fun with some of these device files to illustrate their power and flexibility.
Console communications
Most Linux distributions have multiple virtual consoles, 1 through 7, that can be used to login to a local console session with a shell interface. These can be accessed using the key combinations Ctrl-Alt-F1 for console 1, Ctrl-Alt-F2 for console 2, and so on.
In this experiment we will show that simple commands can be used to send data between devices, in this case, different console and terminal devices. Perform this experiment as a normal user.
Press Ctrl-Alt-F2 to switch to console 2. On some distributions, the login information includes the tty (Teletype) device associated with this console, but others do not. It should be tty2 because you are in console 2. You might need to use a different key combination if you are using a local instance of a VM.
Login to console 2 as the normal user. Then use the who am i command—yes, just like that, with spaces—to determine which tty device is connected to this console.
tuser1@testvm1:~$ who am i
tuser1   pts/1        2024-07-25 08:42 (192.168.0.1)
This command also shows the date and time that the user on the console logged in. Before we proceed any further with this experiment, let’s look at a listing of the tty3 and tty4 devices in /dev. We do that by using a set [34] so that only those two devices are listed. This shows us the full paths to these two device special files which I used for the rest of this experiment.
tuser1@testvm1:~$ ls -l /dev/tty[34]
crw--w---- 1 root   tty 4, 3 Jul 27 07:49 /dev/tty3
crw--w---- 1 root   tty 4, 4 Aug  3 21:16 /dev/tty4
There are a large number of tty devices defined at boot time but we don’t care about most of them, just these two devices. As device files there is nothing special about them, they are simply character type devices; note the “c” in the first column of the results. The tty3 device is attached to virtual console 3 and the tty4 device is attached to virtual console 4 (VC4).
Press Ctrl-Alt-F3 to switch to console 3 and login again as the normal user. Use the who am i command again to verify that you really are on VC3 and then enter the echo command.
tuser1@testvm1:~$ who am i
student tty3          2017-10-05 13:18
tuser1@testvm1:~$ echo "Hello world" > /dev/tty4
tuser1@testvm1:~$
Press Ctrl-Alt-F4 to return to console 4. The string “Hello world” (without quotes) should displayed on console 4.
Terminal communications
This experiment can also be performed with terminal emulators on the GUI desktop but it does essentially the same thing as the previous experiment. Terminal sessions on the desktop use pseudo terminal devices in the /dev tree, such as /dev/pts/1, where pts stands for “pseudo terminal session.”
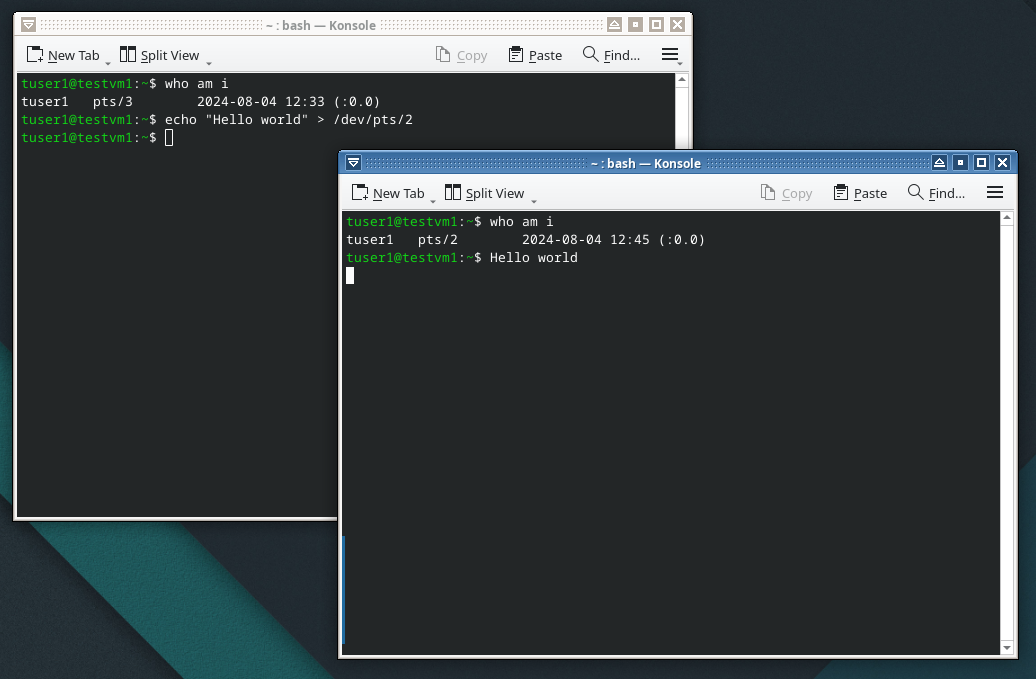
Open two terminal sessions on the GUI desktop using Konsole, or Xterm. Your other favorite graphical terminal emulator may work, but Tilix and Xfce4-terminal do not return the proper information for the who am i command. Determine which pseudo-terminal device files the sessions are connected to with the who am i command and then use one to send a message to the another with the echo command.
On my test host, I sent the text “Hello world” from /dev/pts/3 to /dev/pts/2. Your terminal devices will probably be different from the ones I have used on my test virtual machine. Be sure to use the correct devices for your environment for this experiment.
Direct printing
Another interesting experiment is to print a file directly to the printer using the cat command. This experiment should be performed as the student user.
You may need to determine which device is your printer. If your printer is a USB printer which almost all are these days, look in the /dev/usb directory for lp0 which is usually the default printer. You may find other printer device files in that directory as well. You must have configured this printer so that it prints using more traditional methods.
I used LibreOffice Writer to create a short document which I then exported as a PDF file, test.pdf. Any Linux word processor will do so long as it can export to the PDF format.
We will assume that your printer device is /dev/usb/lp0, and that your printer can print PDF files directly, as most can. Be sure to use a PDF file and change the name test.pdf in the command to the name of your own file.
tuser1@testvm1:~$cat test.pdf > /dev/usb/lp0This command should print the PDF file test.pdf on your printer.
Reading memory
The /dev directory contains some very interesting device files that are portals to hardware that one does not normally think of as a device like a hard drive or display. For one example, system memory (RAM) is not something that is normally considered as a “device,” yet /dev/mem is the device special file through which direct access to memory can be achieved.
This experiment must be run as the root user. Because you are only reading the contents of memory this experiment poses little danger.
If a root terminal session is not already available, open a terminal emulator session and login as root. The next command will dump the first 2MB of RAM to STDOUT via the less pager. To make it a bit more intelligible — to at least display the data in a decent format that might be interpreted using careful examination — pipe the output of the dd command through the od utility. In this instance, the line starting at memory location 2704240 looks like it contains the word SATA.
root@testvm1:~# dd if=/dev/mem bs=2048 count=1000 | od -c | less
<SNIP>
2703600   a 003   h 003   c 003   i 003     003   0 003   0 003   0 003
2703620   0 003   : 003   0 003   0 003   : 003   0 003   d 003   . 003
2703640   0 003   : 003     003   S 003   S 003   S 003     003   f 003
2703660   l 003   a 003   g 003     003   s 003   e 003   t 003   , 003
2703700     003   p 003   a 003   r 003   a 003   l 003   l 003   e 003
2703720   l 003     003   b 003   u 003   s 003     003   s 003   c 003
2703740   a 003   n 003     003   d 003   i 003   s 003   a 003   b 003
2703760   l 003   e 003   d 003      \a      \a      \a      \a      \a
2704000      \a      \a      \a      \a      \a      \a      \a      \a
*
2704040   a 003   h 003   c 003   i 003     003   0 003   0 003   0 003
2704060   0 003   : 003   0 003   0 003   : 003   0 003   d 003   . 003
2704100   0 003   : 003     003   A 003   H 003   C 003   I 003     003
2704120   v 003   e 003   r 003   s 003     003   0 003   0 003   0 003
2704140   1 003   . 003   0 003   1 003   0 003   0 003   , 003     003
2704160   3 003   2 003     003   c 003   o 003   m 003   m 003   a 003
2704200   n 003   d 003     003   s 003   l 003   o 003   t 003   s 003
2704220   , 003     003   3 003     003   G 003   b 003   p 003   s 003
2704240   , 003     003   S 003   A 003   T 003   A 003     003   m 003
2704260   o 003   d 003   e 003      \a      \a      \a      \a      \a
2704300   a 003   h 003   c 003   i 003     003   0 003   0 003   0 003
2704320   0 003   : 003   0 003   0 003   : 003   0 003   d 003   . 003
2704340   0 003   : 003     003   4 003   / 003   4 003     003   p 003
2704360   o 003   r 003   t 003   s 003     003   i 003   m 003   p 003
2704400   l 003   e 003   m 003   e 003   n 003   t 003   e 003   d 003
2704420     003   ( 003   p 003   o 003   r 003   t 003     003   m 003
2704440   a 003   s 003   k 003     003   0 003   x 003   f 003   ) 003
2704460      \a      \a      \a      \a      \a      \a      \a      \a
*
2704540   a 003   h 003   c 003   i 003     003   0 003   0 003   0 003
<SNIP>
This demonstrates how easy it is to access system memory directly if you have root privilege. This is why the crackers try so hard to install tools on target systems that can elevate their privileges to root level. Root has more access to read memory than a non-root user, but most memory is protected from being written by any user, including root. Many types of malware depend upon privilege escalation to allow them to read the contents of memory that they would not normally be able to access. This allows the malware to find and steal personal data such as account numbers, user ID, and stored passwords. Fortunately Linux protects against memory access by non-root users. It also protects against privilege escalation.
But even Linux security is not perfect. It is important to install security patches to protect against vulnerabilities that allow privilege escalation. You should also be aware of human factors such as the tendency people have to write down their passwords but that is all another article.
You can now see that memory is also considered to be a file and can be treated as such using the memory device file.
Implications of Everything is a File
The implications of “Everything is a file” are far-reaching and much greater than can be listed here. You have already seen some examples in the preceding experiments, but here is a short list that encompasses those and more.
- Clone hard drives.
- Back up partitions.
- Back up the master boot record (MBR) or the GUID Partition Table (GPT).
- Install ISO images onto USB thumb drives.
- Communicate with users on other terminals.
- Print PDF, ASCII text, and other files directly to a printer.
- Change the contents of certain files in the /proc pseudo filesystem to modify configuration parameters of the running kernel.
- Overwrite files, partitions or entire hard drives with random data or zeros.
- Redirect unwanted output from commands to a null device, /dev/null, where it disappears forever.
- etc., etc., etc.
There are so many possibilities here that any list can really only scratch the surface. I am sure that you have, or will, figure out many ways to use this tenet of the Philosophy far more creatively than I have discussed here.
Summary
It is all part of the filesystem. Everything on a Linux computer is accessible as a file in the filesystem space. The whole point of this is to be able to use common tools to operate on different things – common tools such as the standard GNU/Linux utilities and commands that work on files will also work on devices – because, in Linux, they are files.
More Stories
My first impressions of Fedora 42
You might be aware that I upgraded all of the Both.org systems over the last two days, moving from F41...
Fedora 42 upgrades at Both.org
Fedora 42 was released today, and I've been upgrading my systems. So far I've only done my internal systems and...
Fedora 42 has been released
It's now 21 years since Fedora Core 1 was originally released in November of 2003, and it's still maintaining its...
Five reasons for Windows users to move to Linux
Take back your power As the October deadline for dumping Windows 10 is fast approaching, many users are considering their...
Linux News
There are two items of interesting Linux news today. Fedora 42 The first is that Fedora 42 will be officially...
Breaking News – M$ Allows older computers to install Windows 11
Microsoft has finally bowed to the inevitable and changed their draconian stance on older computers. They'll now allow older computers...