
How to use SSH
You may have heard that Linux and Unix computers give you the ability to control a computer other than the one you’re sitting at. That’s true, and it’s how systems administrators manage hundreds of servers hidden away in a data centre, and it’s made possible by OpenSSH. It’s not just for sys admins, though, and is a daily convenience for many Linux users, although it can be confusing for someone who has yet to try it. This article explains how to configure two computers for secure shell (SSH) connections.
Install SSH
An SSH client is an application that provides you the option to contact another computer running an SSH server. One application (the “client”) requests a secure connection, while the other application (the “server”) listens for incoming SSH connections.
To use SSH, each computer involved must have SSH installed on it. In other words, the computer you’re physically using (your laptop or personal desktop workstation) must have an SSH client installed on it, and the computer you want to access (a server or personal computer in another room) must have an SSH server installed on it.
Most Linux and Unix computers have at least an SSH client installed by default. To verify, open a terminal application and try to get the version (-V) of the ssh command:
$ ssh -V
OpenSSH_8.8p1, OpenSSL 1.1.1m  14 Dec 2021
If you get any response, then you already have at least an SSH client installed.
To verify whether you have an SSH server installed, look for its configuration file:
$ file /etc/ssh/sshd_config
/etc/ssh/sshd_config: ASCII text
Should this return No such file or directory, then you don’t have an SSH server installed.
Install SSH on Linux using your package manager. For example, on an RPM distribution (such as Fedora, CentOS, Alma, Rocky, or Mageia):
$ sudo dnf install openssh-clients openssh-serverOn distributions derived from Debian (such as Mint, Ubuntu, Pop_OS, and Debian itself):
$ sudo apt install openssh-clients openssh-serverEnable SSH
In IT terminology, the computer you’re sitting at is considered your “local” computer. A computer that you’re not in front of is “remote”.
On the remote computer, enable the SSH service using the systemctl command:
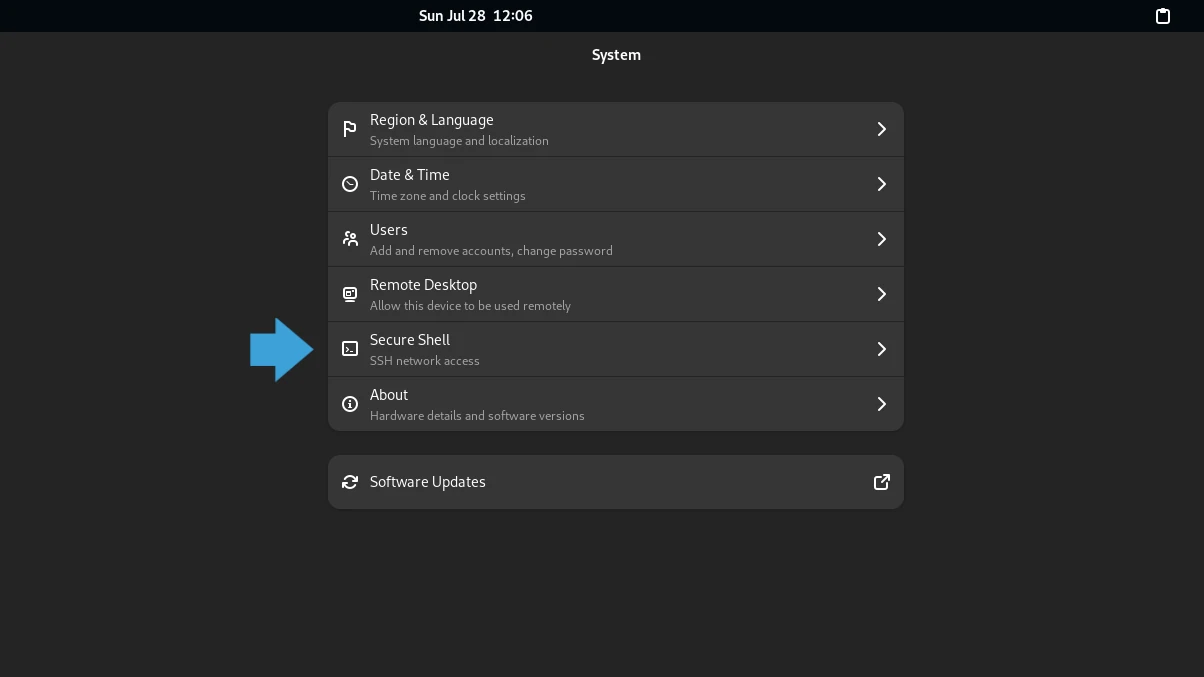
$ sudo systemctl enable --now sshdAlternately, you can enable the SSH service from within System Settings on the GNOME desktop, or in System Preferences on macOS. On the GNOME desktop, it’s located in the Sharing panel:
Adjust the firewall
There may be an active firewall between you and the remote computer. Assuming the remote computer is on the same network as you, there’s likely a firewall application running on the remote machine. There are many different firewalls out there, so you may have to research what firewall the remote computer uses and how to open a port for SSH traffic to pass through. If the remote computer runs Linux with firewalld, then you can use the firewall-cmd command (on the remote computer):
$ sudo firewall-cmd --add-service ssh --permanentLogin with SSH
Now that you’ve installed SSH, enabled SSH, and adjusted the firewall on the remote computer, you can try logging in. To access the remote computer, you must have a user account and a password on that machine. The username and password don’t need to be the same as it is on your local computer. For example, I could be seth on my local machine but sethkenl on a remote machine.
To SSH into a remote computer, you must know its IP address or its resolvable hostname. To find the remote machine’s IP address, use the ip command (on the remote computer):
$ ip addr show | grep "inet "
inet 127.0.0.1/8 scope host lo
inet 192.168.0.5/24 brd 192.168.0.255 scope [...]
On a remote computer that doesn’t have the ip command, try ifconfig instead (or even ipconfig on Windows).
In this example, the remote computer’s IP address is 192.168.0.5 (the 127.0.0.1 address is a self-assigned loopback address). From your local computer, send a ping to the remote machine’s IP address:
$ ping -c1 192.168.0.5
PING 192.168.0.5 (192.168.0.5) 56(84) bytes of data.
64 bytes from 192.168.0.5: icmp_seq=1 ttl=64 time=4.66 ms
If you can ping the remote machine by its IP address or its hostname, and have a login account on it, then you can try to SSH into it:
$ whoami
seth
$ ssh sethkenl@192.168.0.5
bash$ whoami
sethkenl
The test login works, so now you’re ready to activate passwordless login.
Create an SSH key
Passwords present a potential vulnerability to the security of a computer, because a password can be guessed either by luck or, more likely, automation. You can cleverly eliminate passwords as a vulnerability by not using passwords for SSH, and using SSH key pairs instead. When you use key pairs, your local computer presents half a key to the remote computer, and login is successful as long as the remote computer has the matching half of the same key.
An SSH key is sometimes generated for you by default, so you may already have an SSH key. Whether you do or not, it doesn’t hurt to create a new one, and in fact many users have multiple keys for different sets of computers or tasks.
An SSH key begins its life on your local computer. It consists of a private key, which you never share, and a public one, which you are meant to share with any remote machine you want to have passwordless access to.
Use the ssh-keygen command to generate a new SSH key:
$ ssh-keygen -t ed25519 -f ~/.ssh/my_keyThe -t option sets the encryption for the key to ed25519, which is stronger than the default. The -f option sets the key’s file name and location.
After running the command, you’re prompted to create a password for your SSH key. Make this password unique to your key, and obviously don’t forget it. When you use the key, you must enter this password, but the password remains local and isn’t transmitted across the network. It’s another layer of security, however, in the event that someone maliciously obtains a copy of your private key.
After running the ssh-keygen command, you’re left with an SSH private key called my_kkey and an SSH public key called my_key.pub.
To get the public key over to your remote machine, you can either use the ssh-copy-id command or just copy the public key to a thumbdrive and copy it to the remote machine manually. The ssh-copy-id command is the better option, because it manages permissions for you:
$ ssh-copy-id -i ~/.ssh/lan.pub sethkenlon@192.168.0.5Then again, if you can’t log into the remote host with a password, then you can’t set up passwordless login either, so you might have to do it manually. If you do have to manually copy the key over, place the key in your user’s ~/.ssh directory, and set its permissions to 600.
Once you’ve got the public key on the remote machine, try logging in again, this time using the -i option to point the SSH command to the appropriate key (my_key, in this example):
$ ssh -i ~/.ssh/lan sethkenl@192.168.0.5
bash$ whoami
sethkenl
Once you have passwordless authentication set up, you can edit the /etc/ssh/sshd_config file on the remote computer to forbid password authentication. This prevents anyone from using SSH to authenticate to a computer unless they have your private key. To do this, open /etc/ssh/sshd_config in a text editor with sudo permissions and search for the string PasswordAuthentication.
Change the line to this:
PasswordAuthentication noSave it and reboot, or just restart the SSH server:
$ sudo systemctl restart sshd && echo "OK"
OK
$
Remote login with SSH
OpenSSH can change your view of computing. With SSH, you have access to any computer on your network, or any computer you have an accounts on. With OpenSSH, you access the power of networked computing. OpenSSH is just the beginning, so start using it today, get used to it, and see what other gems you can discover within your Linux terminal.
More Stories
I need a list of URLs
I used the command line to do in seconds what would have needed more than ten minutes to do by hand.
Viewing PDF documents in console mode
I have a Raspberry Pi 3 that’s sat unused for the last few years. I used to run the Raspberry...
Extracting text with awk
The awk script interpreter is a very handy tool for systems administrators, and anyone else who uses Linux at the...