
How to do fast, repeatable Linux installations #1 — Bash scripts
Image by: Opensource.com
Some of my articles and an entire book have been about The Linux Philosophy For SysAdmins and its impact on the daily activities of system administrators (SysAdmins) like myself. One of the basic tenets of the Linux philosophy is to automate everything. In many organizations, the need to install Linux on new computers is constant; in more than one place I have worked that was a large part of my job.
In the most active organization for which I worked, we could typically install six to eight new servers in a day. This involved not only the installation of Linux, but also unboxing the computers; racking them; connecting power, network, and other cables; getting IP addresses and hostnames assigned; adding the MAC address for the NIC into the DHCP server; — and more. We couldn’t have done that many new hosts in a day without a significant level of automation.
There are many interesting and powerful tools available to automate installations. The tool you choose will depend upon the complexity of the installation and the pace of the installations being performed. However, many of those tools are too complex or expensive for smaller, sometimes simpler environments.
This article explores the use of a Bash shell script for the relatively simple post-install needs of individuals and small organizations. This article was originally written about ten years ago and first appeared on Opensource.com, which is no longer active. I have updated it significantly for Both.org. The script itself was created many years ago for use with Fedora and it worked with a few modifications for CentOS. It may require some changes such as using apt instead of dnf for your distro, but it can still be a good starting point if you need to automate your post-install setup and configuration tasks.
Warning!!! — Don’t use this program on a production system until you know exactly what it does and have modified it to meet your own needs. This article and the code that goes with it are intended as a tool to demonstrate what can be done with a Bash program to perform post-installation tasks.
Lots of installs
Although not as complex or fast-paced as some of the places I’ve worked, I have always had several computers in my home lab — as many as 14 or 15 at one time. With the use of VirtualBox, I usually have a similar number of virtual machines that I use for testing. I also install Linux on friends’ systems. As a result, I do frequent installations of Linux, sometimes several a day when researching an article or book. This leads to the need to do fast, repeatable installations.
For example, I have a large number of SysAdmin tools that I install on all my hosts, along with a number of user applications such as LibreOffice that I only install on user workstations. I also have a favorite set of configurations that I do for things like Midnight Commander and other system tools. I have a number of fonts that I like to install that are not part of most default installations. I could install each font manually using YUM and make the configuration changes to Midnight Commander manually each time I do an install, but that takes a lot of time and gets to be tedious and boring.
I would first do a pretty basic installation. When I first started using Red Hat Linux — long before RHEL — and with Fedora Core and then the first ten years of Fedora 1-20, I would install everything from a CD or DVD. The installation ISO images at that time included all possible software that could be installed and the installation program used a cumbersome menu system that allowed me to select packages to install. Although I usually installed a few items from that menu, I found it too time-consuming to use for more than a single installation at a time so I started installing the extras I wanted and making configuration changes from the command line.
When I was doing all of this manually, it took a long time and I would forget things. I started keeping lists of things to do, but that was still time consuming. So over the years I have developed a process that ensured installations were done quickly, reliably, and without my forgetting to install or configure anything — a Bash script.
Scripting repetitive tasks
I developed what was at first a fairly simple Bash script that I ran to do the configurations and installation of the other RPM packages that I wanted.
As time went on, that simple script evolved to allow me to tailor the standard installation based on whether they would be desktops, servers, or classroom systems. I added options that enabled me to select one or more of the several available desktop environments for installation. I created various configuration files that needed to be installed and determined that the best way to do that was to create an RPM package that included those files, some of which were more scripts that I created to perform various other repetitive tasks in addition to my post-installation script.
The RPM package is in itself a form of automation because it relieved me of the need to remember which files to install and where. The RPM package now installs about two dozen files, and the post installation script I have been improving for about 10 years is up to more that 1,300 lines of code and more than 800 comment lines.
Even using the RPM and the post-installation script, completing all of the work required to get each one of many computers I install up to my standards could take more than an hour. I certainly don’t miss the days of typing all of those instructions by hand and waiting for each to complete before typing in the next one.
For this article, we’ll just look at using a script without use of an RPM to install the script itself along with any other files. This was the simplest form of automation I used.
Preparation
I need to stipulate that the host you use for testing this script should a virtual machine (VM) used only for testing. The VM should be connected to the Internet either directly or through an internal network. This allows the postinstall.sh script to be downloaded directly to the target computer via the Internet. It also allows the script to perform updates on the target computer and to install new RPMs from the Fedora repositories.
I suggest you do your initial testing on a non-production virtual machine (VM) that can be used for testing so that you can roll it back to a snapshot that makes it easy to try different things. I’ll tell you when to take that snapshot.
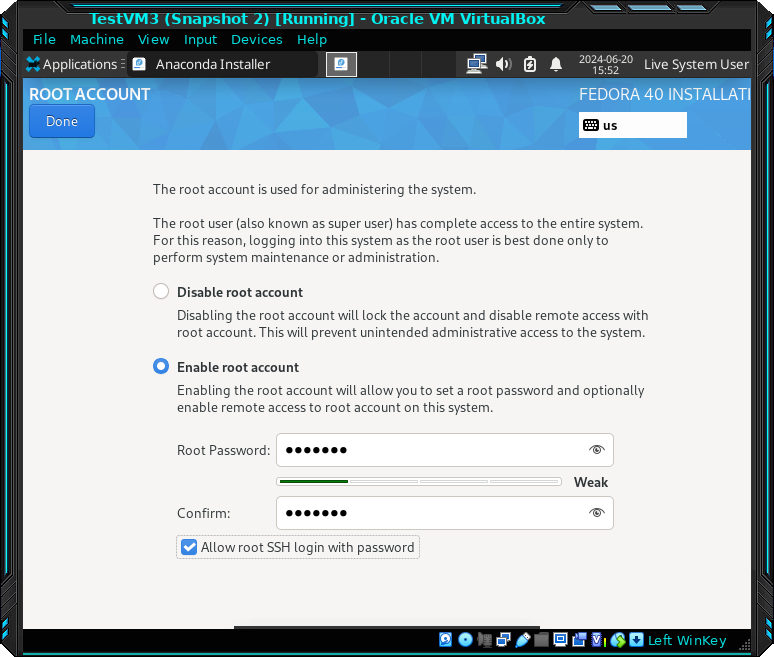
When you use this script to do post-install configuration for your computers, there are three things that must be done to prepare the host. First the root account must be enabled. The SSHD daemon must be configured to allow remote access by the root user; this can be done during installation on the same menu as enabling the root account. Third, SSHD must be enabled as it’s not be default in Fedora. Your distro may be different.
During a Fedora installation, you can choose to enable the root account by selecting the “ROOT ACCOUNT” icon on the Installation Summary page of the Anaconda installer1. Figure 1 shows the configuration settings you need to choose in order to enable the root account and allow remote root login with a password.
Placing a check-mark in the “Allow root SSH login with password” causes the Anaconda installer to create the /etc/ssh/sshd_config.d/01-permitrootlogin.conf file with the content shown in Figure 2. If you forget to place that checkmark, you can create this file using your favorite editor.
# This file has been generated by the Anaconda Installer.
# Allow root to log in using ssh. Remove this file to opt-out.
PermitRootLogin yes
Figure 2: The content of the 01-permitrootlogin.conf file enables the root user to login to this host using a password.
Be sure to create a non-root account, too.
After the initial Linux installation, login to the new host and enable SSHD so that the Bash program can be copied from the source computer to the new one. This is necessary because most distros don’t enable SSHD by default as a security precaution. Enter the command shown in Figure 3 as root.
root@testvm2:~# systemctl enable --now sshd.service
Created symlink /etc/systemd/system/multi-user.target.wants/sshd.service → /usr/lib/systemd/system/sshd.service.
root@testvm2:~#
Figure 3: Enable the SSHD server.
As root, download the postinstall.sh program to the /root/bin directory — root’s directory for executable files — on the newly installed host, testvm2. You’ll need to create the directory as it’s not created by default despite the fact that root’s $PATH variable contains /root/bin as a directory to search for executable files. The last command in this series sets the proper permissions on the file.
root@testvm1:~# mkdir bin
root@testvm1:~# cd bin
root@testvm1:~/bin# wget https://www.both.org/downloads/postinstall.sh
postinstall.sh  100% [=======================================================================>] 67.06K --.-KB/s
                     [Files: 1  Bytes: 67.06K [145.78KB/s] Redirects: 0  Todo: 0  Errors: 0   ]
root@testvm1:~/bin# ll
total 68
-rw-r--r--. 1 root root 68670 Jun 27 10:39 postinstall.sh
root@testvm1:~/bin# chmod 744 postinstall.sh
root@testvm1:~/bin# ll
total 68
-rwxr--r--. 1 root root 68670 Jun 27 13:28 postinstall.sh
root@testvm1:~/bin#
Figure 4: Create the /root/bin directory and download the postinstall.sh file into it. Note that the file permissions need changed.
Placing postinstall.sh in the /root/bin directory makes it unnecessary for the root user to make that directory the PWD or to prepend the path to the command. This results in the executable being located in the conventional location for programs to be used only by root. It also means less typing which is in line with the Linux Philosophy of being the Lazy SysAdmin. Be sure to set the permissions to 744 as shown in Figure 4. The wget command does not preserve the file permissions and sets the downloaded file’s permissions to 644, -rw-r–r–.
Now is the time to take the snapshot of your VM that you can restore after each test. This will ensure that you can always restore the VM to a known condition before each new test you want to run. This is one of the things I like about testing with a Virtual Machine.
The best way to take a snapshot with VirtualBox, which is my preferred virtualization tool, is to power it off before taking the snapshot. Reboot the test host after taking the snapshot.
Executing postinstall.sh
This program has lots of options so let’s start by using the Help function in Figure 5. The options are case-sensitive.
root@testvm1:~# postinstall.sh -h
#######################################################################################
# postinstall.sh: Installs useful administrative tools and programs.
#--------------------------------------------------------------------------------------
# This script is intended for use with Fedora 37 and above.
# It has been tested through Fedora 40.
#
# This program installs the RPMFusion free and non-free repositories for Fedora if
# they are not already. It also installs all current updates.
#
# Syntax: ./postinstall.sh -[h]|[V][acCDdfGgKLlmrVvxX]|[A]
#######################################################################################
# Options:
# A     All: Install Applications, LibreOffice, Multimedia, and fonts.
#            Does not install Development packages or servers.
#--------------------------------------------------------------------------------------
# a     Install various GUI desktop applications including graphics.
# c     Install various CLI fun apps such as boxes, banner, steam loco, asciiquarium,
#           and much more.
# d     Install development packages such as the kernel devlopment.
#         -- This will be needed if you are going to install VirtualBox.
# f     Install more desktop fonts from repository.
# l     Install LibreOffice.
# m     Install various multimedia applications for DVD playback and streaming video.
# r     Reboot after completion.
# s     Install server software packages.
# t     Test mode - Exit after setup and sanity check. Do not do anything.
# v     Verbose mode.
# V     Print the version of this software and exit.
#--------------------------------------------------------------------------------------
# ###### Options to install Desktops ######
# D     Install all desktops listed below.
# C     Install Cinnamon Desktop.
# G     Install Gnome Desktop.
# K     Install KDE Plasma desktop.
# L     Install LXDE desktop.
# M     Install MATE desktop.
# X     Install Xfce desktop.
#--------------------------------------------------------------------------------------
# ###### Miscellaneous Options  ######
#--------------------------------------------------------------------------------------
# y     Automatically answer Yes to all questions that require input of YNQ.
# h     Print this Help.
# g     Print the GPL License header.
#######################################################################################
# This BASH program is distributed under the GPL V2.
#--------------------------------------------------------------------------------------
# It is suggested you redirect all output to a log file to retain a record of
# what tasks were perfomed. Example below:
# ./postinstall.sh -[Your chosen options] >> /root/postinstall.log 2>&1
#######################################################################################
root@testvm1:~#
Figure 5: Display the Help page.
Running postinstall.sh with no options will install all currently available updates, the Fedora RPMFusion free and non-free repositories which provide access to applications and tools that aren’t available in the official Fedora repositories and much more. It does not perform an automatic reboot unless you use the -r option. Even with no options this program performs a number of important tasks. I suggest you read the code yourself to understand everything it can do and under what conditions.
The postinstall.sh program performs some sanity checks before it does anything else. It will either quit or ask for input depending upon what it found.
- Check for an invalid option.
- Determines the physical architecture of the host.
- Verifies that the Linux distribution is Fedora.
- Determines the release.
- Determines whether the release is equal to or greater than the minimum release defined in the variables. The minimum 35 at this writing but is defined in a variable.
- Exits if not Fedora or if the release number is too low.
- Checks whether this is a VirtualBox VM or a physical host.
- Checks the presence of the xorg-x11-server-common to determine whether this host has a GUI installed. Whether running in graphical-user or mult-user mode is irrelevant.
- Checks for installation conflicts if options to install graphical desktops are given on a host that has no graphical desktops already. This will result in a set of choices to allow the admin to either install a GUI desktop or not, and which one.
- If no other desktop is installed and the -y option was provided on the command line, the Xfce desktop is installed.
The following tasks are performed when no other options are selected. These tasks are always performed no matter which options are specified at the command line. If this is a GUI desktop system, some GUI applications are removed because I don’t like them.
- Install the Fedora Fusion repositories.
- Install wget which is needed to install some other files and tools.
- Perform all of the common tasks I want on my Fedora hosts. This is a lot of stuff so check the code.
- Install some common and useful command line tools.
- Performs some customization of the screen program and Vim.
- Disable the AVAHI and ABRT services if installed.
- Remove some KDE services that I don’t like if they’re installed. Be sure to delete or comment out these tasks if you want to keep all that.
- Adds 2 users, dboth and student. Disable or change these as appropriate.
- Sets Midnight Commander color configuration.
- Remove Evolution if installed.
- Install some command line ASCII games and fun stuff.
- Install the BOINC client and the text-mode BOINC manager, boinc-tui. This is part of a distributed supercomputer that allows your unused CPU cycles to be used for various useful and interesting projects. https://boinc.berkeley.edu/
- Update the Man database because new Man pages won’t display until the database is rebuilt.
- Install and run RKHunter to set up the initial database. Tootkit Hunter, as its name imples, searches for rootkits that might be installed on your computer.
- Reboot the computer or display a message telling you to do so.
Remember, we’re still using no options other than -r which does the reboot. If the host has a GUI desktop, some desktop applications can be installed by selecting the corresponding options.
I suggest you start your test with a small test using a VM with only the -r option to perform a reboot after the default tasks are performed. That will give you a better idea of some tasks performed by this tool.
From desirable to necessity
Everything was going along nicely for years after creating my postinstall.sh program. Although I could have done all of that work manually, it has been much easier to use my automation. When Fedora 21 appeared on the scene a decade ago, and the automation I had created over the years had become a necessity.
For those of you who are not familiar with Fedora 21 — and all Fedora releases since — the installations changed dramatically with that release. Prior to Fedora 21, the ISO images provided more than just a basic installation. Those installation ISOs also provided the ability to select other software to be installed such as LibreOffice and other office software, more administrative tools, Games, and much more. The drawbacks to this were the requirement to use a large USB drive or DVD instead of a CD to store everything, and the additional time and bandwidth required to download the image.
Beginning with Fedora 21, there were then separate installation ISO images: Desktop, Server, and Cloud. The new installations, even the desktop spins were terribly limiting for the vast majority of Fedora users. By 2024, there are 5 Editions, 4 Atomic Desktops, 10 Spins, and 8 Labs from which to choose. None of those provide install-time capability to choose additional tools or applications such as LibreOffice, although the various images do install the tools and applications required for their specialty.
There are no options for installing any packages during the installation except those that are in the live image ISO. None. If I wanted to install the KDE–or any other–desktop instead of GNOME (which I did), I would have had to download the KDE spin or install it after the initial installation. I couldn’t do it from the primary installation medium, the Live image. That’s still true today even though my new favorite desktop spin is Xfce.
I still need to install many other things after the initial installation regardless of which Fedora image I choose. In my opinion this is a huge stumbling block to many would-be Linux users, especially newcomers, but as mentioned before, it was time-consuming and you needed to know more than just a little about what you’re doing to get it all right.
Fortunately, my post-installation script allow me to do just that with very little fuss. And yes, I have had to make a few adjustments to my script–as I have with every new release–to accommodate some of the changes between releases.
My penchant for following the Linux philosophy has paid off exceedingly well for me. Because I take the time to automate everything, I have personally experienced little disruption due to a major change in the way Fedora Linux handles installations.
So here is what I gained by automating my installations with a script:
- I save time on every installation.
- Installations are consistent.
- There is zero to minimal disruption when major changes to distribution installation are introduced.
Of course, there are other ways to do the automation of a Linux installation and configuration, and many tools that can be applied to that task, such as Ansible, Kickstart, Puppet, Satellite Server, and others. I have used Kickstart extensively, but my script just worked very well for me in the environment I had then and met my needs—and that is the name of the game in Linux.
Cleanup
After the postinstall.sh program has done its job, you may want to disable the SSH server to regain that additional level of security. You may also want to remove the remote root login capability as an additional security measure in case the SSH server is enabled at a later time.
But wait–there’s more!
As my needs changed, I found that, although this script and the RPM that I created to install it and other programs and scripts worked well, Ansible offered some interesting capabilities. In future articles, we’ll explore creating an RPM to perform post-install tasks, using Ansible for post-installation tasks, and use of Kickstart to perform the installation in addition to the post-install tasks.
Warning: The Bash program described in this article is always a work in progress and may contain errors. Some of the changes this script will make to your system, such as disabling SELinux may leave your system more vulnerable to intrusion. It may not work as intended or described and you should use it only as a learning tool in the context of these articles and not in a production environment until you have modified it as necessary for your own needs and environment, and thoroughly tested it.
- This link is to the Fedora 36 Anaconda installation documentation. At the top of the page, it says that there is a newer version of the documentation. Please don’t click on that link because the Fedora 36 version is the most recent for which this documentation is available — at least that I could find. Be sure to scroll down to the graphical installation to see the Anaconda menus. ↩︎
More Stories
Five reasons for Windows users to move to Linux
Take back your power As the October deadline for dumping Windows 10 is fast approaching, many users are considering their...
Linux News
There are two items of interesting Linux news today. Fedora 42 The first is that Fedora 42 will be officially...
Breaking News – M$ Allows older computers to install Windows 11
Microsoft has finally bowed to the inevitable and changed their draconian stance on older computers. They'll now allow older computers...
Why does M$ require so much personal information?
Microsoft is really getting insistent about requiring an account before you can install new versions of Windows. They're even blocking...
Using Linux on Apple Silicon
I bought an M3 MacBook Air last fall to experiment with AI tools and LLMs that were available for use on Apple Silicon.
A Fresh Start with Linux Mint
A few weeks ago, someone at the faith community I attend asked for my help logging into their computer. I...