Use rclone to put your files in the cloud
In our shop, we use Google Drive™ to store, share and backup our work product, which is largely in the form of documents, spreadsheets and presentations. As the token Linux user in the organization, I have been waiting… and waiting… and (still) waiting… for Google to provide a version of Google Drive for desktop that would allow me to synchronize our shared space on Google Drive with what’s on my Ubuntu desktop machine, my Ubuntu laptop, and maybe the small collection of Debian and Ubuntu servers we operate on behalf of various clients.
The other day, I finally decided to stop waiting and start doing. My first round of investigation showed me that there were lots of third party applications out there that purport to solve my sharing-with-the-cloud problem. In digging into this list, the one that kept floating to the top is rclone – an open source command-line program that can be used to copy files between computer file systems and the cloud, providing backup, restore, duplication, one-way and bi-directional synchronization and even “file streaming” – making a folder appear virtually in your physical filesystem. And not just with Google Drive, but with all sorts of cloud providers, both proprietary and open source.
As I compared what rclone can do with other solutions, I was at first put off by rclone’s complexity – it can be used to do so many different things in so many different configurations that I was concerned I would never arrive at a stable, performant configuration that I understood and that met my needs. However, as I thought further about it, and read the excellent, thorough documentation, I eventually came to the conclusion that I could master it sufficiently to satisfy my requirements.
Having my desktop now using rclone to synchronize files with Google Drive, I will walk through and document the process in this article.
First, decide what problem you want to solve
rclone offers four basic modes of operation that interest me:
- Copying to / from computer from / to the cloud;
- Synchronizing what’s in the cloud with what’s on the computer, or what’s on the computer with what’s in the cloud;
- Bi-directional synchronization, which is what I was after in the first place;
- “File streaming”, that is, making files in the cloud appear as though they are on the desktop by “mounting” the cloud folder on a mount point on the computer.
In my case, after thinking through these possibilities, I decided that I want to use the bi-directional synchronization – I want the contents of my /home/me/rclone on both my desktop and laptop computers to be synchronized with my RClone folder in my Google Drive. Note that in my case, I have Google Workspace for Business, which gives me a somewhat different use-case than someone using the free Google Drive.
The rclone usage guide offers detailed instructions for configuring connections to a wide range of cloud storage services. For my purposes, I followed the Google Drive link shown there to the guide to using rclone with Google Drive.
Before configuring rclone itself on your computer, you will need some information from the Google side of the conversation; so let’s configure it first.
Configuring the Google Drive side
This section of the guide to configuring rclone for use with Google Drive summarizes the Google configuration steps.
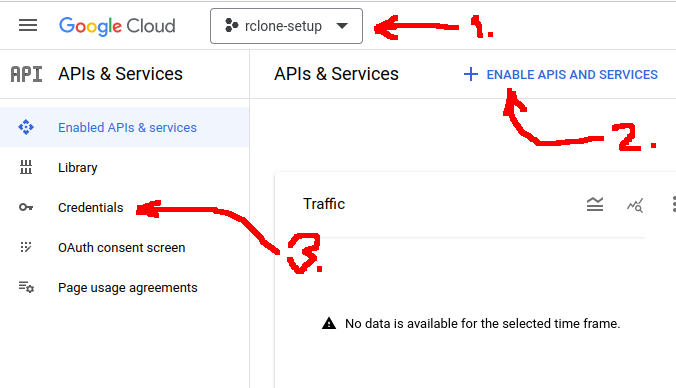
Basically, the Google side of the configuration involves creating a client_id. The rclone configuration instructions suggest that “it doesn’t matter what Google account you use”. Nevertheless, in my case, I want to use my own Google Workspace for Business account. Let’s work through the suggested configuration steps from this point of view as seen in Figure 1.

- Log into the Google APIs & Services console, using the Google Workspace for Business admin account.
- Create a new project, in my case called “rclone-setup”, by clicking on the projects dropdown at the top of the page.
- Enable the Google Drive API by clicking the link + ENABLE APIS AND SERVICES near the top of the page. On the page that opens, find the Google Drive API panel and click it. From this panel, enable the the Google Drive API. Return to the APIs & Services page.
- Click on the Credentials link on the left hand side of the page.
- Follow the suggestions on the “Making your own client_id” section on the rclone Google Drive configuration in points 5 through 9, except instead:
- selecting internal rather than external on the consent configuration screen
- using the my Google Workspace for Business email address for all email fields
- saving the offered JSON file to have text copy of the client_id and client_secret values.
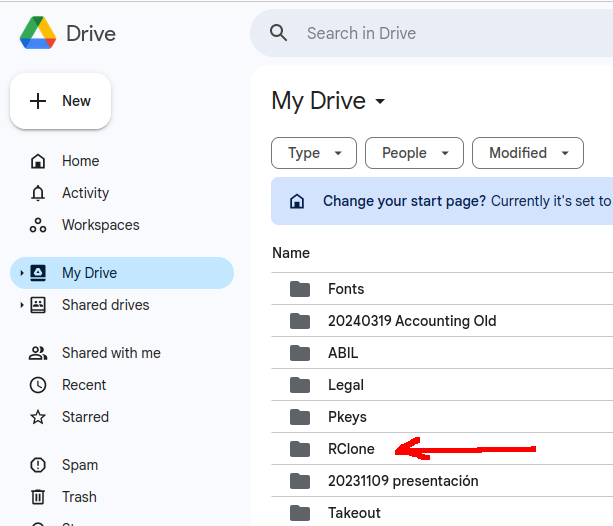
Having my client_id and related credentials established, from the Google Drive interface, I used the navigation panel on the left hand side of the interface to navigate to My Drive. In that view, I created a folder called RClone.
Figure 2 illustrates this result.

Once I have rclone configured, I will synchronize my desktop RClone directory with this one.
One last step: navigate to the RClone directory on Google Drive, and in the navigation bar at the top of the screen, you will see an address something like:
https://drive.google.com/drive/u/1/folders/1Z**********MNLH**********PYcYfvW
Make a copy of the text from the rightmost slash / to the end of the line; in the case above, this is 1Z**********MNLH**********PYcYfvW. This is needed to identify the drive in the rclone configuration steps that follow.
Configuring rclone
Now that we have enabled the “conversation” from the Google Drive side, we need to configure the rclone side. Once again, refer to the rclone documentation for configuration with Google Drive. In my specific case, in the terminal, I create my local synchronized folder and run the configuration step:
mkdir RClone
rclone config
My interactive session follows (leaving out the prompts where I just accept the default and highlighting my input like this):
rclone config
2024/04/04 12:49:50 NOTICE: Config file "/home/me/.config/rclone/rclone.conf" not found - using defaults
No remotes found, make a new one?
n) New remote
s) Set configuration password
q) Quit config
Choose ‘n’ here to indicate a new remote and give it the name of the Google Drive sub-folder created in the Google configuration step (in my case, this is RClone):
n/s/q> n

Enter name for new remote.
name> RClone

Option Storage.
Type of storage to configure.
Choose a number from below, or type in your own value.
(an enormous number of options appear; we want the one that says “Google Drive”):
17 / Google Drive
   \ (drive)

Storage> 17

Option client_id.
Google Application Client Id
Setting your own is recommended.
See https://rclone.org/drive/#making-your-own-client-id for how to create your own.
If you leave this blank, it will use an internal key which is low performance.
Enter a value. Press Enter to leave empty.
Here we want to enter the value assigned to ‘client_id’ in the JSON file provided by the Google authentication step (I’ve obfuscated mine below):
client_id> 3***742***23-uj**********ldd*************3cd5.apps.googleusercontent.com

Option client_secret.
OAuth Client Secret.
Leave blank normally.
Enter a value. Press Enter to leave empty.
Similarly, here we want to enter the value assigned to ‘client_secret’ in the Google JSON file (obfuscated, again):
client_secret> GO****-D7**********2Ia**********mUr

Option scope.
Comma separated list of scopes that rclone should use when requesting access from drive.
Choose a number from below, or type in your own value.
Press Enter to leave empty.
 1 / Full access all files, excluding Application Data Folder.
   \ (drive)
 2 / Read-only access to file metadata and file contents.
   \ (drive.readonly)
   / Access to files created by rclone only.
 3 | These are visible in the drive website.
   | File authorization is revoked when the user deauthorizes the app.
   \ (drive.file)
   / Allows read and write access to the Application Data folder.
 4 | This is not visible in the drive website.
   \ (drive.appfolder)
   / Allows read-only access to file metadata but
 5 | does not allow any access to read or download file content.
   \ (drive.metadata.readonly)
In my case, I want full access, so I choose option 1:
scope> 1
In my case, I can accept all default values until offered the opportunity to edit advanced configuration parameters. Respond ‘y’ to this option in order to specify the “mount point” on the Google Drive side:
Edit advanced config?
y) Yes
n) No (default)
y/n> y
I can take the defaults from this point on until reaching the prompt for root_folder_id, which corresponds to the value saved above from the view of the Google Drive RClone folder.
Option root_folder_id.
ID of the root folder.
Leave blank normally.
Fill in to access "Computers" folders (see docs), or for rclone to use
a non root folder as its starting point.
Enter a value. Press Enter to leave empty.
root_folder_id> 1Z**********MNLH**********PYcYfvW
Take the defaults for the rest of the advanced options until you arrive at the following prompt, then respond ‘n’:
Edit advanced config?
y) Yes
n) No (default)
y/n> n
Now it’s time to let rclone authenticate with Google. Respond ‘y’ to the following prompt. Your browser should open a window to Google asking for authorization; approve it.
Use web browser to automatically authenticate rclone with remote?
 * Say Y if the machine running rclone has a web browser you can use
 * Say N if running rclone on a (remote) machine without web browser access
If not sure try Y. If Y failed, try N.

y) Yes (default)
n) No
y/n> y

2024/04/04 12:58:55 NOTICE: Make sure your Redirect URL is set to "http://127.0.0.1:53682/" in your custom config.
2024/04/04 12:58:55 NOTICE: If your browser doesn't open automatically go to the following link: http://127.0.0.1:53682/auth?state=_8c***************RtbA
2024/04/04 12:58:55 NOTICE: Log in and authorize rclone for access
2024/04/04 12:58:55 NOTICE: Waiting for code...
2024/04/04 12:59:08 NOTICE: Got code
I don’t want my subfolder to be a shared drive, so I reply ‘n’ to the next prompt:
Configure this as a Shared Drive (Team Drive)?

y) Yes
n) No (default)
y/n> n
At this point, rclone responds:
Configuration complete.
And shows a list of the configuration options provided; finally asking if the remote should be kept, and offering to configure more or exit if the response is ‘y’:
Options:
<SNIP>
Keep this "BisyncFolder" remote?
y) Yes this is OK (default)
e) Edit this remote
d) Delete this remote
y/e/d> y

Current remotes:

Name                 Type
====                 ====
RClone               drive
https://gist.github.com/kabili207/2cd2d637e5c7617411a666d8d7e97101
e) Edit existing remote
n) New remote
d) Delete remote
r) Rename remote
c) Copy remote
s) Set configuration password
q) Quit config
e/n/d/r/c/s/q> q
That’s it – at least in my case. Now we’re ready to bi-synchronize.
Running rclone
The rclone bisync page offers warnings (as of this writing, bisync is still considered beta software and use in production is discouraged) and lots of advice on configuration and operation. In my case, I’m willing to take the beta risks after reading the manual and limitations provided. I followed the suggestions and first ran:
rclone bisync RClone: /home/clh/RClone --create-empty-src-dirs --compare size,modtime,checksum --slow-hash-sync-only --resilient -MvP --drive-skip-gdocs --fix-case --resync --dry-runThis seemed to work ok, so time to try without the dry run…
rclone bisync RClone: /home/clh/RClone --create-empty-src-dirs --compare size,modtime,checksum --slow-hash-sync-only --resilient -MvP --drive-skip-gdocs --fix-case --resyncThis also ran OK. I did a spot check on a random-ish sample of files and everything looked good.
The rclone installation guide recommends auto-starting rclone using systemd or cron. I haven’t yet crossed that bridge because a) I’m not sure how often I want to synchronize, b) I probably want to use systemd rather than cron, but I know cron better and c) I like to watch the output of the command as it runs to see if there are any hiccups.
For those wanting to explore this automated synchronization further, this Github GIST offers an interesting conversation. As well, this rclone forum post presents some useful ideas.