
Draw in color using Portable Pix Maps
The Portable aNy Map (PNM) is an older image file format “family” that dates back to the 1980s. Originally designed to transmit images over email as plain text, these images became popular at the time because the relatively simple file format made it easy to create all kinds of images.
Portable aNy Map files come in several types:
- Portable Bit Map (PBM) for black and white images
- Portable Gray Map (PGM) for grayscale images
- Portable Pix Map (PPM) for color images
See my other articles about creating black and white images in PBM and grayscale images in PGM. Let’s explore how to create colorful images using PPM:
Plain text PPM
Like other images in the PNM “family,” Portable Pix Map images have a header section that defines the image dimensions, and a data section with the image values. The PPM header starts with P3 as the “magic number” that identifies the file as a PPM image, then the width and height of the image in pixels, followed by the maximum color value in the image. All of these values are plain text, separated by whitespace like a tab, space, or newline.
For example, to create a 9×10 image, with a maximum color value of 2, use this header:
P3
9 10 2
The maximum color value is the highest decimal value that can be used in a red/green/blue color, or RGB. In this case, 2 means any red, green, or blue color can be in the range of 0, 1, or 2—that’s 3 possible gradations for each RGB value, for a color palette of 3x3x3 = 27 different combinations of red, green, and blue. If the maximum color value is 0 to 255, colors are assumed to be 1-byte values; for color values 256 to 65,535, colors use 2-byte values.
The data section is a series of RGB values, each given in that order: red, green, then blue. Separate each value by whitespace, such as spaces or tabs or newlines. Continuing with the above example, we can write this sample PPM image that contains a series of vertical stripes:
P3
9 10 2
0 0 0 0 0 1 0 0 2 0 0 0 0 1 0 0 2 0 0 0 0 1 0 0 2 0 0
0 0 0 0 0 1 0 0 2 0 0 0 0 1 0 0 2 0 0 0 0 1 0 0 2 0 0
0 0 0 0 0 1 0 0 2 0 0 0 0 1 0 0 2 0 0 0 0 1 0 0 2 0 0
0 0 0 0 0 1 0 0 2 0 0 0 0 1 0 0 2 0 0 0 0 1 0 0 2 0 0
0 0 0 0 0 1 0 0 2 0 0 0 0 1 0 0 2 0 0 0 0 1 0 0 2 0 0
0 0 0 0 0 1 0 0 2 0 0 0 0 1 0 0 2 0 0 0 0 1 0 0 2 0 0
0 0 0 0 0 1 0 0 2 0 0 0 0 1 0 0 2 0 0 0 0 1 0 0 2 0 0
0 0 0 0 0 1 0 0 2 0 0 0 0 1 0 0 2 0 0 0 0 1 0 0 2 0 0
0 0 0 0 0 1 0 0 2 0 0 0 0 1 0 0 2 0 0 0 0 1 0 0 2 0 0
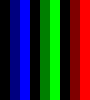
0 0 0 0 0 1 0 0 2 0 0 0 0 1 0 0 2 0 0 0 0 1 0 0 2 0 0A 9×10 image is too small to display effectively on a website, so here’s the same image after it’s been expanded to 90×100 size. You can see the image has stripes of colors, divided into three bands of red, green, and blue, going from dark (black) to bright:
Binary PPM
Programs can write image files more efficiently if they write in binary mode, and that’s why PPM also supports a raw binary version. The file is basically the same, except that the header uses P6 for the “magic number,” and the RGB data is written as binary triplet values, such as could be written using the "%c%c%c" format in a C program.
When writing color PPM files, consider the palette you need to use. You aren’t restricted to using a pre-defined palette like RGB values from 0,0,0 (black) to 0xff,0xff,0xff (white in the standard 256-color screen palette). Instead, you can choose your own palette. That means for a maximum color value of n, black will always be 0,0,0 and white will always be n,n,n and other colors for intermediate RGB values. The colors will be translated to screen values when the image is displayed.
Here’s an example program that generates the web-safe colors. Normally, you would use the standard web colors from R,G,B=0,0,0 to R,G,B=0xff,0xff,0xff but using “steps” from 00 to 33, 66, 99, cc, and ff. You can write a sample HTML file with a Bash script, like this:
#!/bin/bash

cat<<EOF
<!DOCTYPE html>
<html lang="en">
<head><title>Web safe colors</title>
<meta name="viewport" content="width=device-width, initial-scale=1">
<style>
body{display:grid; grid-template-columns:repeat(6,1fr);}
div{padding:1em;}
</style>
</head>
<body>
EOF

webcolors='00 33 66 99 cc ff'

for r in $webcolors; do
  for g in $webcolors; do
    for b in $webcolors; do
      color="$r$g$b"
      echo "<div style='background-color:#$color'>$color</div>"
    done
  done
done

cat<<EOF
</body>
</html>
EOF
There’s a lot in that script, because it also writes the supporting HTML elements and styles that make it look nice on a screen. The most important part is the three “nested” for loops, each moving from 00 to ff with each “step” at 33. If you run the script and save the output to a file, you can view the HTML file in a browser to see the web-safe colors:
$ bash websafe.bash > websafe.html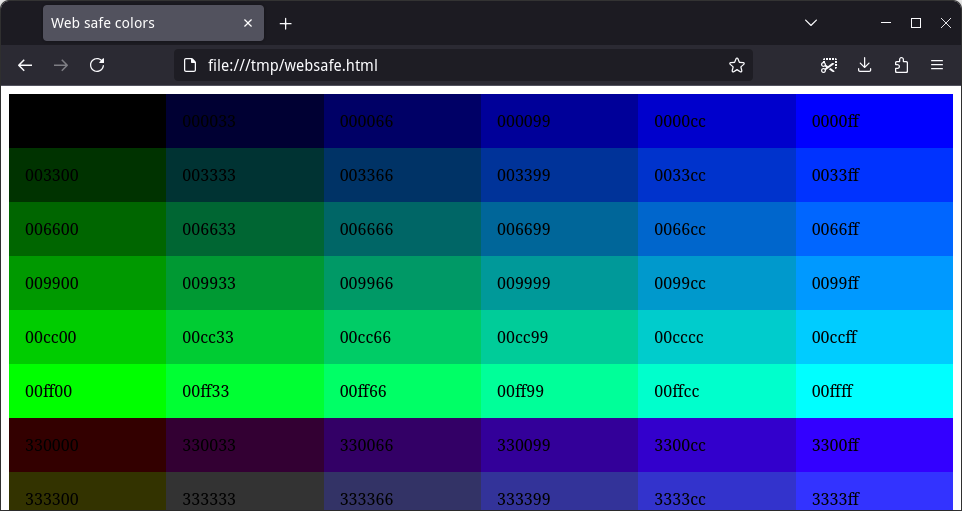
Writing a PPM file to show these same web-safe colors requires iterating over six possible values for each red, green, and blue value. That means a color range from 0 to 5, which gives six values. An RGB triplet of 0,0,0 is black, and a triplet of 5,5,5 is bright white.
#include <stdio.h>

int main()
{
    puts("P6 6 36 5");

    for (int r = 0; r <= 5; r++) {
        for (int g = 0; g <= 5; g++) {
            for (int b = 0; b <= 5; b++) {
                printf("%c%c%c", r, g, b);
            }
        }
    }

    return 0;
}
Compile this program and run it to generate the web-safe palette as a PPM file. The program writes to standard output, so you also need to redirect the output to a file that you can view later.
$ gcc -Wall -o webcolors webcolors.c
$ ./webcolors > webcolors.ppm
This generates a small file that’s just 6 pixels wide and 36 pixels tall. Here’s the same image after I’ve “zoomed in” so you can see each of the pixel values:

More information
Creating color images is easy using the Portable Pix Map (PPM) file format. Write a header that defines the dimensions and maximum color value, then write the header in either plain text or binary. Use the “magic number” to define the kind of file you want to create: P3 for a plain text PPM image, or P6 for a binary PPM image. The Netpbm project at Sourceforge has the full details about PPM files and other file formats in the Portable aNy Map (PNM) “family” of images. See the ppm manual page for more information about creating PPM images.
More Stories
Thinking about Algol 68
I took my first computer science course in my second year at the University of British Columbia in Vancouver, Canada. The course was a full year, starting in September 1974, and we programmed in Waterloo FORTRAN IV, which if memory serves was called Watfor or maybe Watfiv at the time. We also had a brief session with IBM 360 / 370 Assembler language. Both languages were available to us in the form of batch timeshare services where we wrote our programs on IBM 029 key punches and submitted the card decks to be run, generating printouts which were almost entirely compilation or execution failures interspersed with the occasional output of a program that generated the hoped-for results.
Code like it’s the 1980s
Our computers are so powerful today that it’s hard for younger developers to understand what early desktop computing was like....
Grayscale images with Portable Gray Maps
Learn to write grayscale images using the Portable Gray Map format.
Write tiny images using PBM
The Portable Bit Map (“PBM”) image file format was invented in the 1980s as a way to transmit small black...
Reading a whole file at once
Two methods to load a data file into memory. Use mmap on Linux sysetms.