
Secure electronic document disposal with Linux
We can’t be too careful about ensuring that our personal data is safe, both paper documents and electronic ones. I’m sure I don’t need to go into all the reasons why proper disposal of our data is important
Paper document disposal
Many of my paper documents contain personal or financial data. I have a decent shredder in my home and use it frequently to shred a few documents at a time.
However, twice in the last few years we’ve cleaned out a couple decades worth of old financial and personal documents, far more than could easily be processed by my shredder. Both times I filled multiple 12 gallon containers with documents that needed to be shredded. When filled with old documents, those containers are quite heavy.
My credit union sponsors shred days at our local branches, so I loaded up my car and got in a long line of more than fifty cars in front of me. While waiting for the shredding to start, another hundred of so lined up behind me. There were three shredding trucks performing the actual deed so things went slowly but smoothly until my turn. As I left, I could see that the line was longer than ever. It’s good to see that so many people are aware of the fact that old documents need to be disposed of in a manner that prevents bad actors from stealing our data.
But what about the personal data we keep on our computers?
Preparation
To provide a file I can use to test with, I entered the command in Figure 1 in my ~/Test directory, to create a file of about 160MB. The dd command takes random data from the urandom device and pipes it through the od command to convert the random data into octal.
$ dd if=/dev/urandom bs=2024 count=20000 | od > testfile.txtFigure 1: This command creates a file we can use to test the shred command.
Electronic document disposal
The simple act of deleting a file from our storage device1 doesn’t actually delete the data. It just removes the link to it from the directory in which it’s stored. The data is still there and will be unless we take extra measures to shred the file ensuring that the data is unrecoverable.
That’s right, we shred the data using the — wait for it — shred command. This command overwrites all of the data of the specified file multiple times to ensure the data is unrecoverable. It uses various combinations of random data and specific patterns such as all bits on/off, alternating bits on, and so on. The default number of iterations is three times but you can use the -n option to specify a different number of iterations. The -u2 option can be used to deallocate the space and delete the file, and the -z option can be used to hide the fact that the file has been shredded. I sometimes like to use the -v option so I can view the progress; otherwise the command emits no output thus conforming to the Linux Philosophy for SysAdmins tenet, “Silence is Golden.”
Let’s look at an example.
The command in Figure 2 shreds the file by overwriting it the default of 3 times and displays the progress in Bytes and percent for each pass. It then deletes the file. This only took a little over 8 seconds in real time.
$ time shred -vu testfile.txt
shred: testfile.txt: pass 1/3 (random)...
shred: testfile.txt: pass 2/3 (random)...
shred: testfile.txt: pass 3/3 (random)...
shred: testfile.txt: removing
shred: testfile.txt: renamed to 000000000000
shred: 000000000000: renamed to 00000000000
shred: 00000000000: renamed to 0000000000
shred: 0000000000: renamed to 000000000
shred: 000000000: renamed to 00000000
shred: 00000000: renamed to 0000000
shred: 0000000: renamed to 000000
shred: 000000: renamed to 00000
shred: 00000: renamed to 0000
shred: 0000: renamed to 000
shred: 000: renamed to 00
shred: 00: renamed to 0
shred: testfile.txt: removed

real    0m8.225s
user    0m0.101s
sys     0m0.548s
$
Figure 2: Shredding the file.
This is a great way to shred a file that contains information you don’t want anyone else to see. You can also use file globbing to select multiple files in a directory.
Other uses for the shred command
Suppose you have a whole hard drive, or a partition that contains sensitive data. The shred command can help there, too.
I am sometimes “gifted” with old computers that a friend no longer wants. I can use these computers in various ways, but I always tell them I will destroy all of their data before doing anything else with the systems. I use the shred command to shred the entire hard drive.
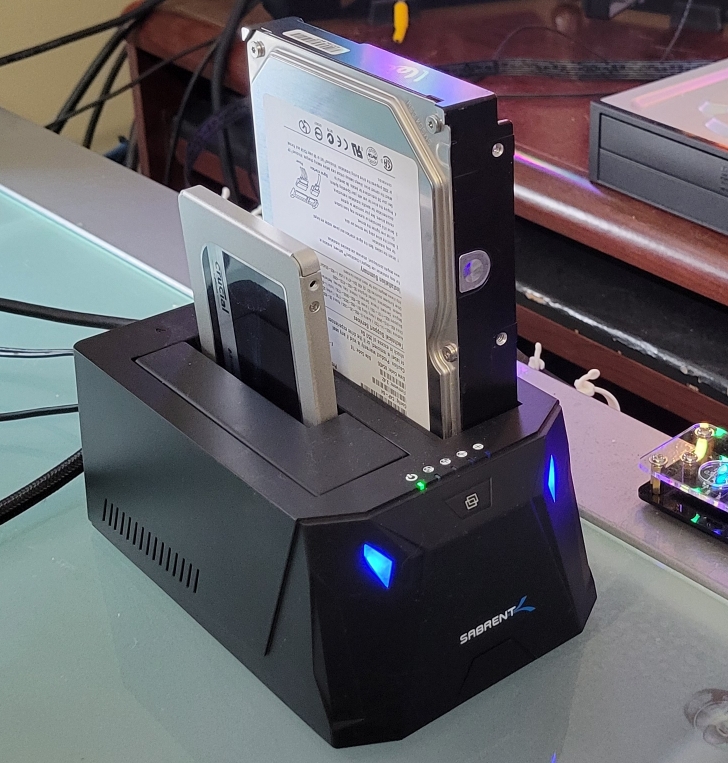
I have a two slot hard drive docking station that I use for the shred. Figure 3 shows my docking station with two storage devices inserted. The device on the left is a 2.5-inch SSD SATA drive and the device on the right is a 3.5-inch SATA HDD. When the picture was taken I was simultaneously shredding both devices.
After installing the drives in the docking station, I used the dmesg command to determine the device files associated with them. One was /dev/sdf and the other /dev/sdg. I first started shredding the sdg device with the command in Figure 4. I use -v so I can follow the progress, and the -n5 option specifies five iterations. Because this is a device and not a file, we don’t use the -u option to delete the device.
# shred -vn5 /dev/sdgFigure 4: This command shreds the entire storage device.
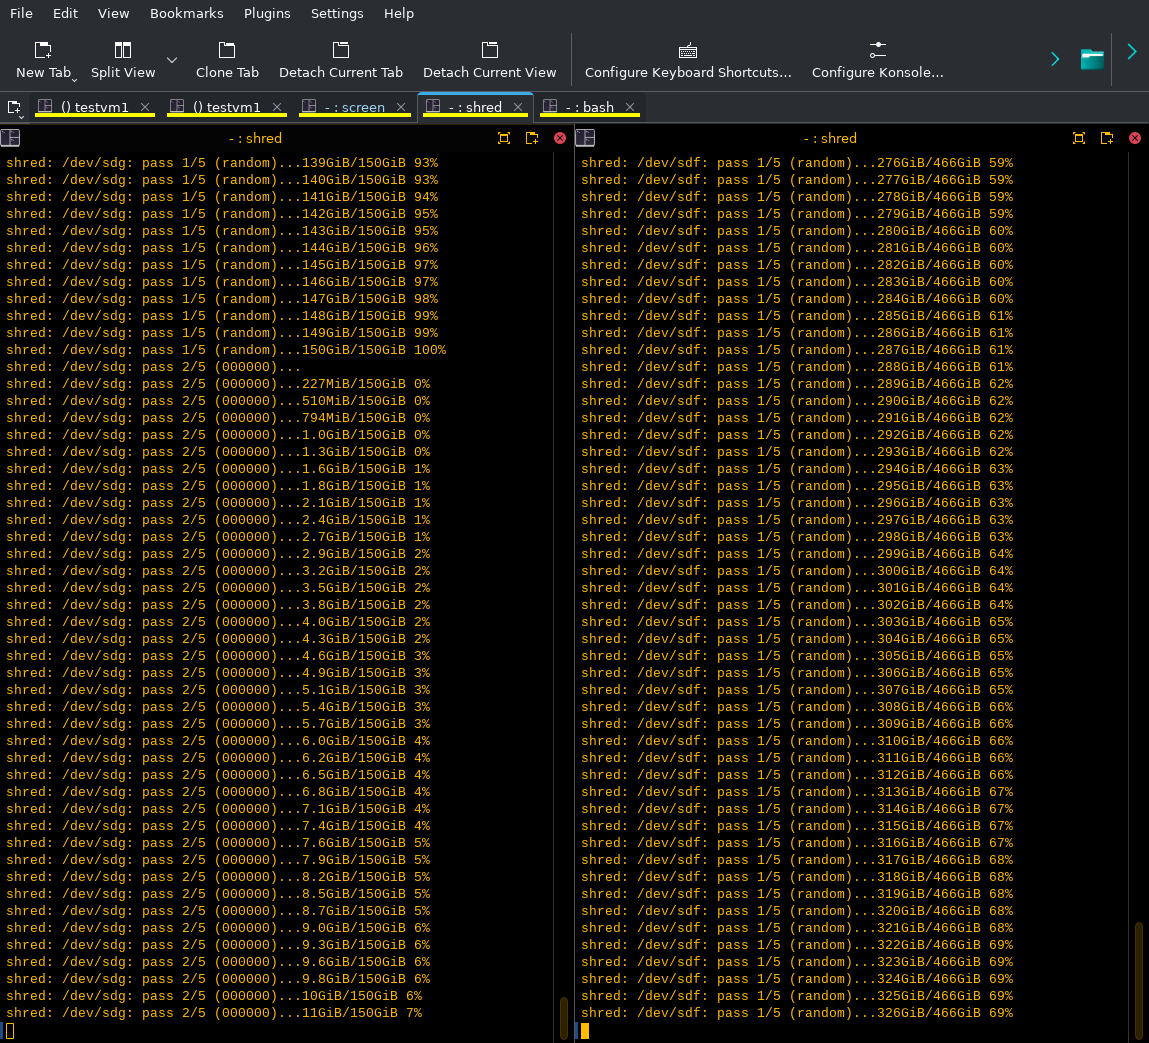
I then started shredding the second device using the same command except for the device file which is sdf. Figure 5 shows a Konsole session split into two side-by-side terminals, one for each device. You may want to click on the image to enlarge it.
The left terminal is shredding the sdg device. You can see that the first iteration of random data has finished and the second iteration of all zeros has begun. The sdf device is being shredded in the right terminal and is still in the first iteration using random data.
The shred command can also shred individual partitions or logical volumes and I’ve done that frequently. You can use the device file for the specific partition or LV. So long as they are unmounted and not in use, you can shred partitions, LVs, and entire devices that are installed in the system, whether externally via docking station or USB connections, or internal devices on a SATA or PCIe bus.
Caveats
This is the fine print. There are always conditions, aren’t there?
In this case, certain filesystems may not be completely wiped, such as mirrored RAID systems in which the data is redundant. Journaled filesystems such as EXT3 and EXT4, maintain all or part of the data for individual files in the journal, a separate location on the storage device, and that may not be wiped. That data is stored temporarily and may eventually be overwritten by other data but not multiple times. Check the shred man page for details.
However, that is not an issue when shredding entire partitions or storage devices.
Closing thoughts
The shred command is a versatile tool that I use frequently to ensure that electronic data is completely eradicated from files and devices. I’ve used it to ensure that no data remains on storage devices that are to be reused. I also use it to ensure that data is also cleared from defective drives prior to taking them to our local e-waste recycling center.
The end result is good enough to ensure that recovery efforts by even the sophisticated techniques available to most crackers will be unsuccessful.
- I use the term “storage device” to mean both hard disk drives (HDD) and solid state devices (SSD). They are both used for data storage. ↩︎
- The -u option relates to the Linux unlink function which deletes the specified file. My article, A user’s guide to links in the Linux filesystem, discusses hard and soft links and the concept of unlinking. ↩︎
More Stories
VirtualBox Problem Solved
I recently wrote about booting to a previous kernel when the updated kernel caused problems with VirtualBox. This did allow...
Announcing the 3rd Edition of “Using and Administering Linux”
I've just signed the contracts for the 3rd Edition of my "Using and Administering Linux" series of books, that together...
Fresh KDE Innovation Meets Ubuntu Stability
Recently, I came across a blog post about the latest release of Plasma KDE Neon, and it piqued my curiosity. I...
Getting Help for Linux
If you're a newcomer to Linux, or you are considering making the move to Linux, one question you'll most certainly...
Nine traits of the veteran Unix admin
Follow this field guide if you want to understand the rare and elusive hard-core Unix geek