
Learning with the turtle
Image by: Patti Black on Unsplash
Mathematics was anathema to me in my early years. As a visual learner, abstract concepts were challenging for me. However, in graduate school, I had to teach a fifth-grade student geometry using a unique curriculum involving Apple Logo and Turtle graphics. This experience changed my perspective on math.
My transformative journey with Turtle graphics began about nine years ago when I serendipitously discovered the ‘Turtle’ module for Python at a workshop. Python is readily available on most Linux distributions, so I eagerly embraced the Turtle. Learning to use the ‘turtle’ module introduced me to Python and opened up a world of creativity and learning. I’ve been fortunate to share this journey with others, especially young people eager to create turtle graphics and explore the fascinating intersection of programming and mathematics.
My first experiences with Python began in the terminal and the REPL (read eval print-loop).

I have used several development environments in my Python journey, including IDLE, VS-Codium, and VS Code. In this article, I am using VSCodium on Linux.
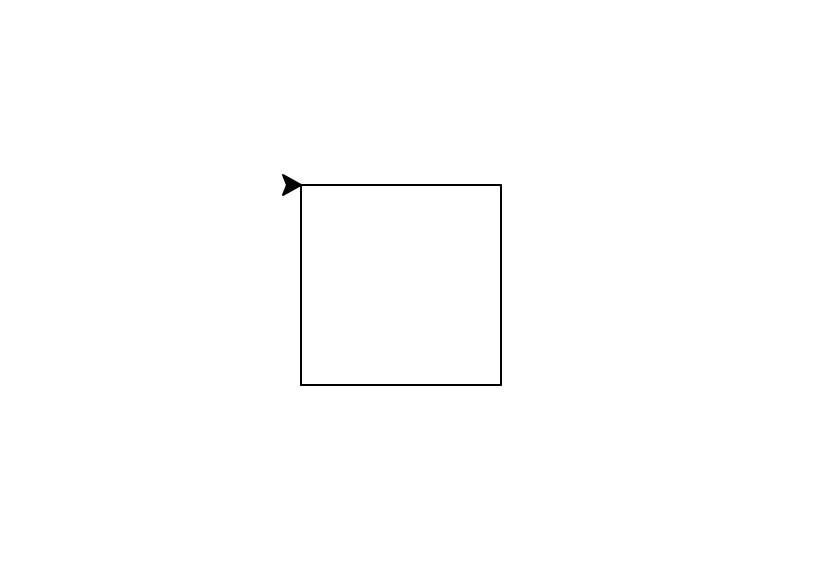
Keeping things simple, I begin with a simple program to draw a square. I need to add a couple of lines of code to keep the window open so I can show the students the code and they can see the graphical representation. I teach the students the importance of adding comments to their code, which helps them remember what each code block is for and explain what is happening to others they might be sharing their code with. Comments are denoted with the hash ‘#’
That code is:
# This is the code to add the turtle library
import turtle

# This is the code to add the drawing window

window = turtle.Screen()

# This is the code to close the drawing window

window.exitonclick()
Next, I showed them how to draw a simple square using a turtle.
# This is the code to import the turtle function

import turtle

# This is the code to open the drawing window

window = turtle.Screen()

# This is the code to draw the square

turtle.forward(100)
turtle.right(90)
turtle.forward(100)
turtle.right(90)
turtle.forward(100)
turtle.right(90)
turtle.forward(100)
turtle.right(90)

# This is the code to close the window

window.exitonclick()
I show them how to simplify and iterate their code using a ‘for’ loop. The ‘for’ loop produces the same square as illustrated above but with far less code.
# import the turtle function
import turtle

# This is the code to open the drawing window
window = turtle.Screen()

# The range function to create the square

for x in range(4):
   turtle.forward(100)
   turtle.right(90)

# This is the code to close the window

window.exitonclick()
I show them how to give the ‘turtle’ different names and create more than one turtle. I introduce the students to objects and show them how to create a unique ‘turtle’ object using a name. In this case I will use the name ‘jeff.’ . All of these iterations produce the same figure illustrated above but are building blocks for later use.
# import the turtle function

import turtle

# Create a separate turtle named jeff

jeff = turtle.Turtle()

# This is the code to open the drawing window

window = turtle.Screen()

for x in range(4):
   jeff.forward(100)
   jeff.right(90)

# Code to close the drawing window

window.exitonclick()
I demonstrate that we can create a simple square spiral by changing our code slightly.
# import the turtle function

import turtle

# Code to open the drawing window

window = turtle.Screen()

# code to create a turtle with a name

jeff = turtle.Turtle()


for x in range(50):
   jeff.forward(200)
   jeff.right(92)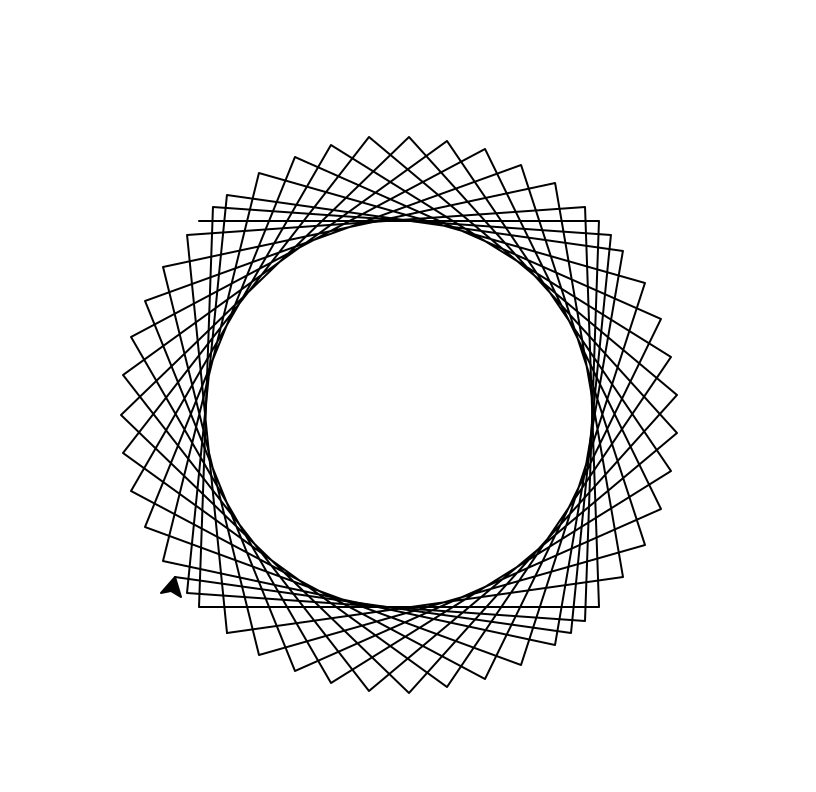
I gradually introduced more complexity in each of the programming examples and then let the students’ imaginations and nascent programming run wild. In the code below, I have added ‘color’, ‘pensize’, and ‘speed’ iterations to the code, along with changing the range and the distance the ‘turtle’ moves forward. The ‘speed’ is set to zero, the fastest drawing speed available.
# import the turtle function
import turtle

# code to create drawing window

window = turtle.Screen()

# Create a separate turtle object with colors and details

jeff = turtle.Turtle()
jeff.color("blue")
jeff.pensize(3)
jeff.speed(0)


for x in range(50):
   jeff.forward(200)
   jeff.right(92)


window.exitonclick()
Many options within the ‘turtle’ library provide many opportunities to work with beginning programmers. There are endless possibilities when you use Python and other open-source tools combined with your imagination and those of your students. Here’s one final code snippet that demonstrates more complex Python programming.
# Draw a circle spiral with four colors

# import the turtle function

import turtle

# create the drawing window

window = turtle.Screen()

# set the drawing speed to zero which is the fastest

turtle.speed(0)

# list the colors in the circle spiral

colors = ["red", "brown", "blue", "green"]


for x in range(100):
    turtle.pencolor(colors[x%4])
    turtle.circle(x)
    turtle.left(91)

# close the drawing window

window.exitonclick()
Turtle graphics is not just a tool for executing commands but a gateway to encourage students to think procedurally and reflect on their thought processes. It provides instant visual feedback on code, allowing students to explore mathematical concepts and unleash creativity. You can easily see that Python Turtle graphics are a great example of open source’s power to provide an extremely affordable, world-class programming environment.
More Stories
Intro to the Linux chgrp and newgrp commands
In a recent article, I introduced the chown command, which is used for modifying ownership of files on systems. Recall...
Intro to the Linux chown command
Image by: Opensource.com CC-by-SA 4.0 Every file and directory on a Linux system is owned by someone, and the owner...
Intro to the Linux chmod command
Every object on your Linux system has a permission mode that describes what actions a user can perform on it....
How my easy, home-made backup program saves time, space on the storage medium, and network bandwidth
Nothing can ever go wrong with my computer and I will never lose my data. Riiiiight.
This article discusses the backup program I created to prevent catastrophic data loss and facilitate easy recovery. I also show how you can install and use it yourself.
Intro to the Linux useradd command
Adding a user is one of the most fundamental exercises on any computer system; this article focuses on how to do it on a Linux system.
5 common C programming bugs (and how to avoid them)
Add a little extra code to your next program to avoid these common C programming mistakes.